
How to Print Food Orders from your Mobile App
Provide a better alternative to GrubHub, UberEats, and other aggregators
Benefits of adding the MigaPrint feature to Food Ordering Apps:
- Fully integrated with MCommerce, XDelivery & Commerce Pro *
- Manage business hours for order acceptance (MCommerce)
- Customers can place orders with a preferred delivery time
- Business can accept orders outside business hours
- Businesses can easily manage orders including Accept/Reject from admin’s phone
- Automatically send push notifications of order status (Accepted/Rejected)
- Native Push Notifications & SMS support to get order receipt to customer’s phone
- WiFi Printer Support!!!
Printer Support
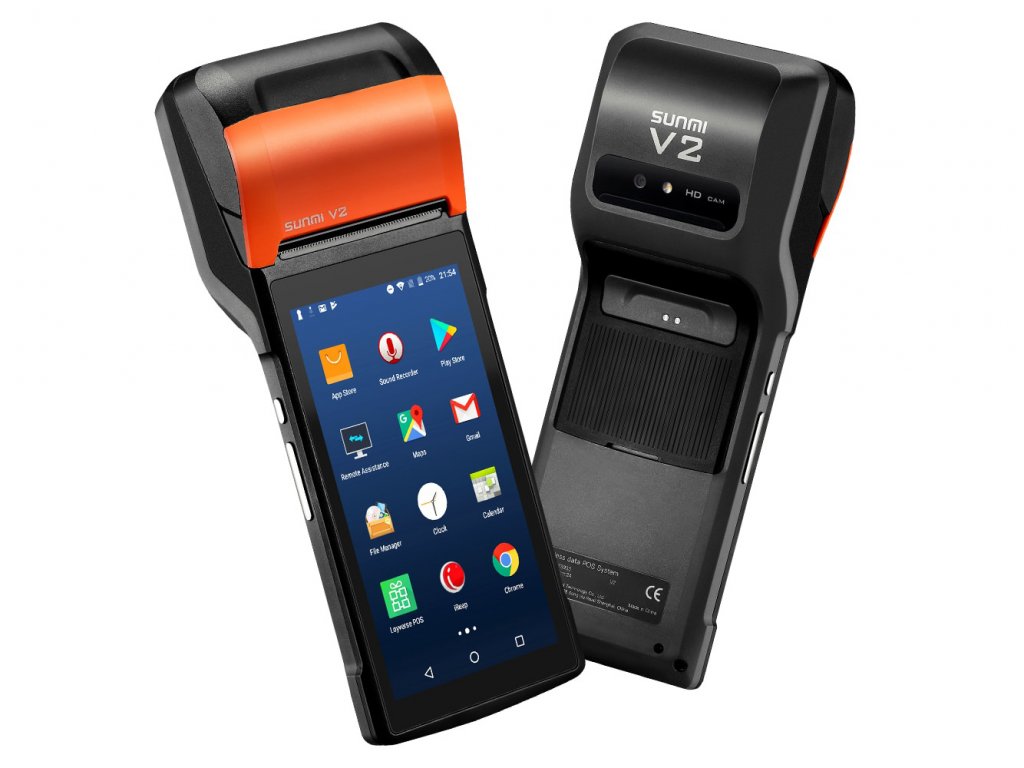
MigaPrint is designed to integrate specifically with the following printers:
- Sunmi V2 POS Android w/Integrated Printer (check with us for best price and model)
- GoodCom Printer (check with us for best price and model)
- Printer Emulation (without a physical printer) to view receipts directly on the Mobile App for MigaPrint ADMIN users.
The Business or Mobile App owner/admin can manage orders from a TABLET or PHONE directly from the Mobile App without using a Printer.
PRINTER Configuration must be completed on the settings page for the MigaPrint feature to work properly, even if no physical printer will be installed.
Please carefully review all documentation to properly configure the printer on the settings page.
MIGAPRINT supports XDelivery and Commerce Pro* Food Ordering in addition to MCommerce.
Note: feature specific configuration steps & options must be followed for the specific ordering feature enabled in the mobile app. Differences will be specified in the docs.
Add MigaPrint and only one Ordering feature to the app
First, add the MigaPrint feature and the intended commerce feature into the App from the App Editor. Use Choose only one Ordering feature per app.(either MCommerce, XDelivery, or Commerce Pro)
MigaPrint currently supports the MCommerce, XDelivery, and Commerce Pro features.
If you use MigaPrint with MCommerce, the Home Page of your shop will become completely redesigned by MigaPrint to enable new functionality. On this New Home Page, users will be able to clearly see the main information and perform actions needed to manage orders: “Open” or “Closed” status of the shop, default waiting time for order fulfillment, button to log in without leaving the page and choosing preferred time for delivery by the customer.
To do this, the following steps must be performed in the following order:
- Add Mobile Commerce feature in your app but leave this page in DEACTIVATED status.
- NOTE: this step is mandatory for MigaPrint configuration with the MCommerce feature.
- Configure MCommerce feature as required for the app, reference the MCommerce feature manual for details. All settings will be configured while the page status is DEACTIVATED.
- Add MigaPrint feature into the app and configure as directed below:
If using Migaprint with XDelivery or Commercepro, users order directly from XDelivery/Commerce Pro and those features must be visible.
MigaPrint feature can be made visible or hidden and locked with Padlock feature, to allow Admins to manage orders from app and restrict others. MigaPrint feature will be hidden from the App menu for XDelivery & Commerce Pro configurations and visible for MCommerce configurations.
Settings
From the App Editor, click on the MigaPrint feature in “My Pages” section.
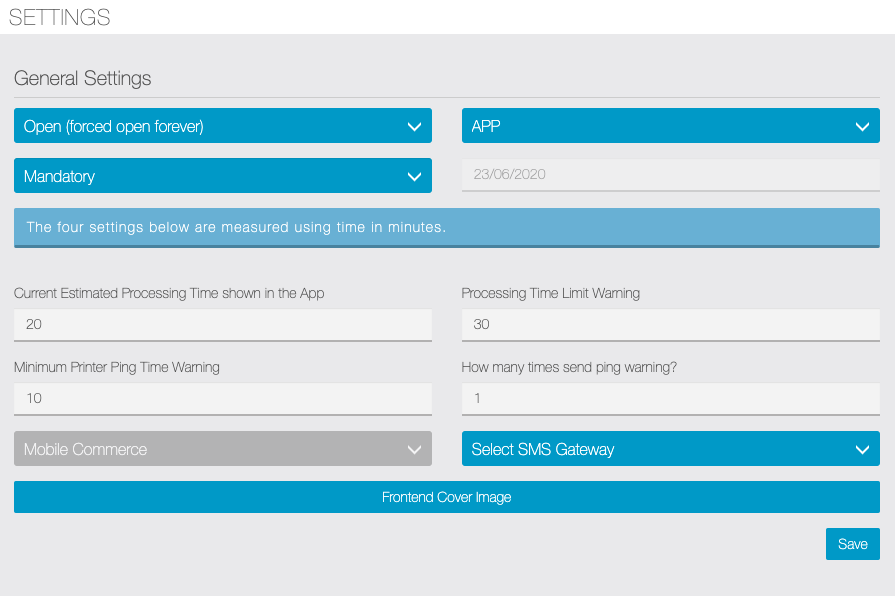
Then select the “Settings” tab to proceed with Migaprint configuration, this screen will appear:
NOTE: MigaPrint feature will not be visible until initial settings are configured.
Store Opening and Closing time
The first setting we find on this page is the selection of the store opening or closing status.
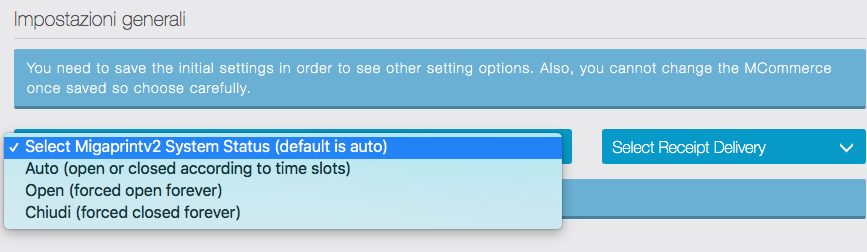
Choose from three options:
- Auto – Open or closed according to time slots, as we’ll explain in following steps.
- Open – Forced open indefinitely.
- Closed – Forced closed indefinitely.
These options can be changed later, as needed.
Receipt Delivery selection
You can choose to send orders to the MigaPrint printer or alternatively receive them and manage IN APP. Select the preferred mode from drop-down menu:
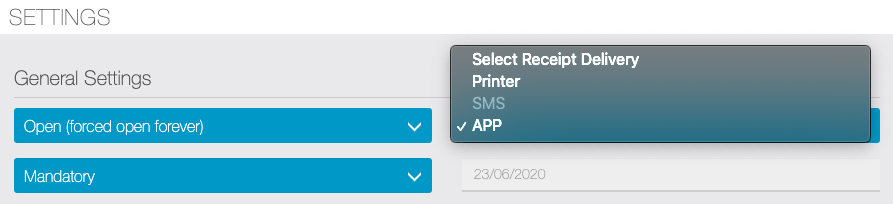
These settings can be modified later: for example, in the event of a temporary printer outage, you can choose to manage orders IN APP.
At the end of this guide we’ll demonstrate how to manage orders directly from the APP.
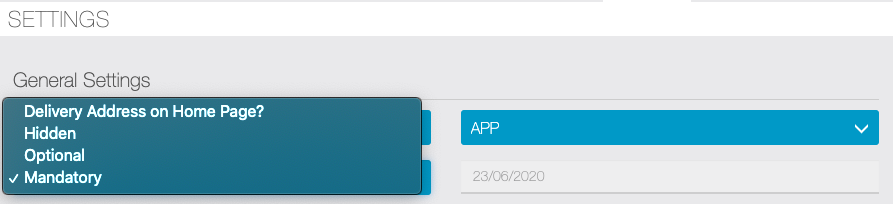
Shipping address on Home Page
MCommerce Users Only: It is possible to ask user to choose the shipping address directly on the Home Page, before proceeding with the order. This setting can be hidden (the user will choose the shipping address when checking out), optional (useful for those who also take away) and mandatory.
Order Fetch date
It is necessary to set a start date. From that date the orders will be processed by the MigaPrint module.
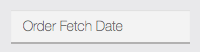
Note: This setting makes it possible to add the MigaPrint feature into existing apps where an Ecommerce feature is already in use: MigaPrint will only process orders received from the set date.
WARNING: The Date CANNOT be Changed.
Delivery times and system notifications

Settings – MigaPrint with MCommerce Only:
- Current estimated processing time showing in the app – Will be displayed on the Shop Home page.
- Processing time limit warning – If an operator does not manage the received order within the specified time, an email will be sent to the manager.
- Minimum printer ping time warning – the printer performs periodic checks to verify the connection with the system. If no reply is received in the specified time, an email will be sent to the manager.
- How many times to send ping warning? – How many times do you want to send the warning that the printer is disconnected from the system?
Select the appropriate ECommerce feature
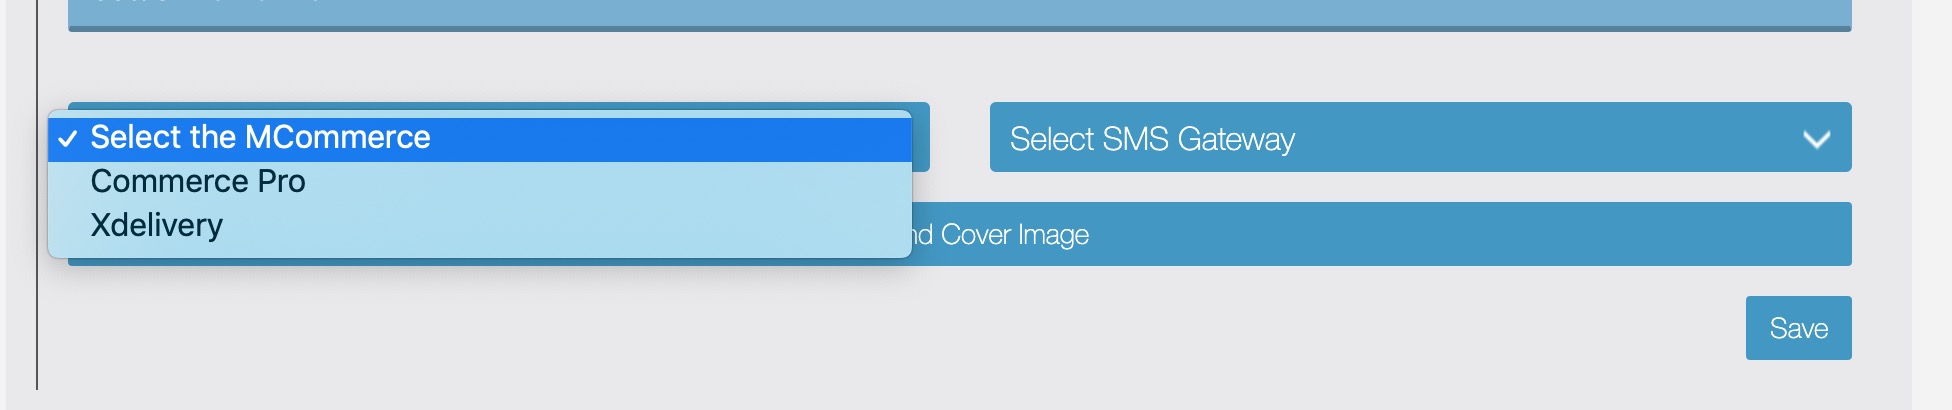
This setting is needed to connect the Ecommerce feature with the MigaPrint feature. NOTE: once selection is been made, it can’t be changed. You must add and configure the supported ecommerce feature to be used in the app (before this step) or it won’t be available in the drop down menu.
Currently, we support MCommerce, XDelivery, and Commerce Pro*.
To see the options in the list a supported feature must be added to the App, Configured and Enabled.
WARNING: This selection CANNOT be changed.
SMS Gateway selection
Optional: choose the system with which SMS sending will be managed: MIgastone or Twilio.
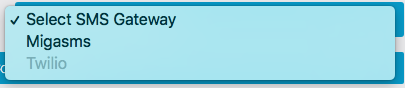
If you use our SMS service use the data provided by our Customer Service.
Cover Image

Only if you use MigaPrint with MCommerce: with this setting, you can optionally upload an image that will appear on the home page of your store.
Click on the Save button to save the settings previously entered up to this point.
NOTE: the setting sections explained below (printers and time slots) will not be visible until after saving the settings described above.
Printers Management
This section will be visible only after saving the settings described in the previous instructions.
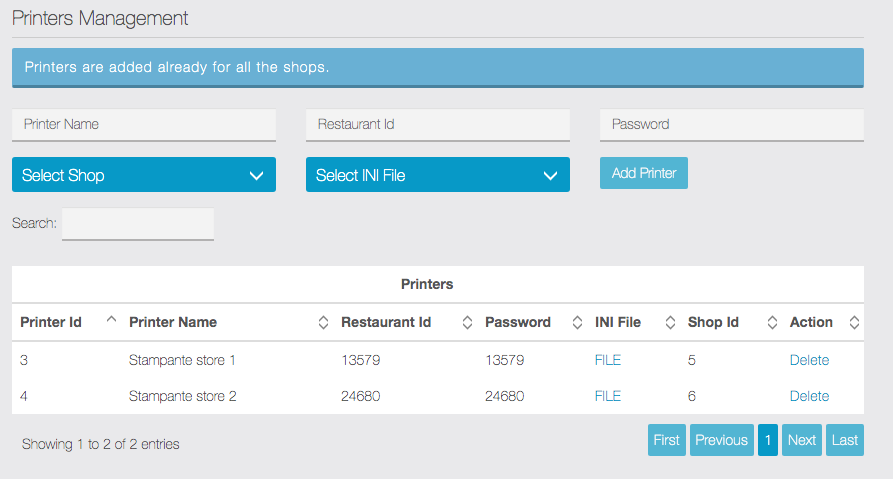
Set up a MigaPrint printer for each shop added in the ecommerce feature. These shops will be in the “select shop” drop-down menu.
WARNING: in order to manage orders of a shop with MigaPrint you must set a printer in this section, even if you choose to manage only IN APP, even if you don’t use printers.
It is possible to assign any name to the printer, while “Restaurant ID” and “Password” must be codes consisting of 8 characters, numeric only. Use codes of your choice, they are only necessary for the printer configuration.
From the “Select INI File” drop-down menu choose version 2.0 or 3.0 depending of your MigaPrint printer series.(Check Goodcom Printer Documentation for version info)
Then click on “Add Printer” button: the added printer will be visible in the “Printers” list below.
Proceed to connect printers for all your shops.
In the printers list there are two active links:
- Delete – to delete the added MigaPrint printer if necessary
- FILE – to export the INI file needed to printed configuration (If downloaded ini file is blank, check that all steps were followed as documented or open a support ticket for assistance)
Time slots setting (skip this section if not using the MCommerce feature)

Enter the opening time slots, for all days of week in which the store will be open. You can have more than one time slot for each day.
These timeslots are used only if you have chosen MCommerce. Commerce Pro and XDelivery have their own timeslots settings that are configured from within those features rather than MigaPrint.
Notifications
From this section it is necessary to set in which way the order will be notified to the customer and the Opening / Closing labels that the customer will see in the shop home page.
WARNING: you have to proceed with these steps only in the order shown below.
Shop Notifications (processing time text)
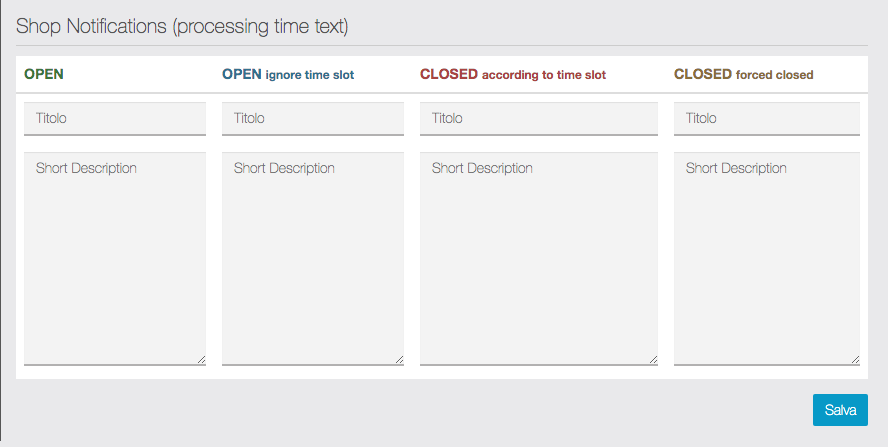
This section is located at the bottom of the “Notifications” tab screen. Add text here that users will see on the Store’s home page. Add the appropriate text in all four fields (mandatory) which will be displayed as notifications:
- When the store is open according to time slots
- When the store is open by manual setting (See “Settings” chapter of this guide)
- When the store is closed according to time slots
- When the store is closed by manual setting (See “Settings” chapter of this guide)
Notification Templates
This section completes the settings of “Notifications” tab. You have to choose for each type of notification (identified by an item in the drop-down menu) to whom to send the message and you can customize the text of those messages.
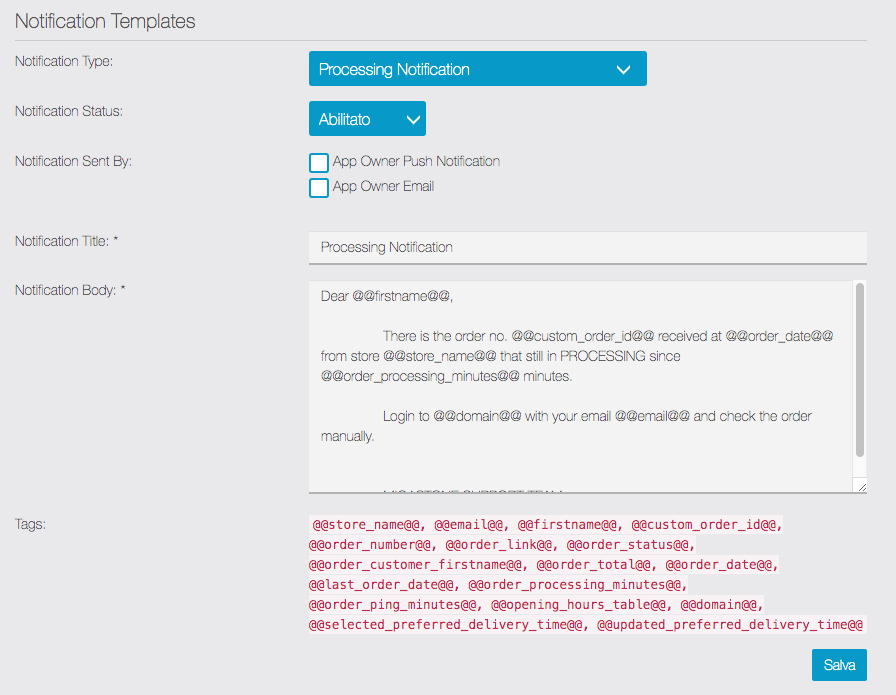
The message types in the drop-down menu are:
- Processing Notification: the message sent when the manager accepts the order
- Ping Notification: message sent (to manager only) when there is a connection issue with the MigaPrint printer
- Suspended Notification: message sent (to manager only) if the order is suspended for any progressive misalignment
- Refund Notification: message sent to notify that the order was rejected as payment was not accepted (for PayPal payment)
- Order Status Notification: message sent to notify the new order status
- Preferred Delivery Time Notification: message sent if the manager decide to change the delivery time chosen by the customer
- SMS: active only if you have chosen SMS as the order receipt mode (see previous paragraphs)
Then select the sending options for each message (at least one option must be selected for each type of message) and customize the text if necessary. The tags displayed can also be used.
WARNING: it is necessary to make the desired settings for all message types, selecting them from the drop-down menu. Press the SAVE button only after completing all message settings.
App Owners / Admins
This tab shows the list of registered app users
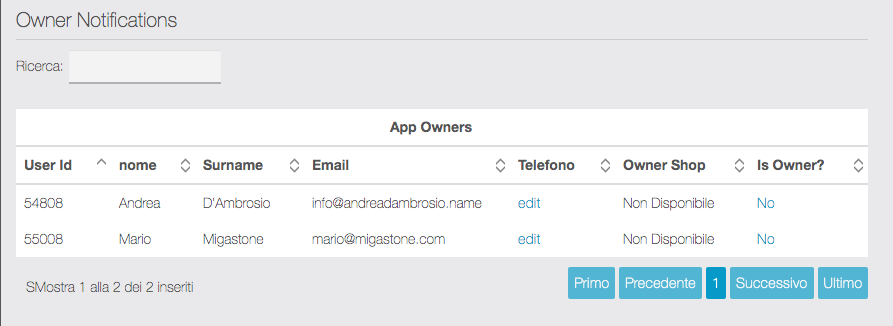
NOTE: the list will be empty until app users have registered in the app. The business owner (Admin user that will receive the orders) must be registered in the app before being able to proceed.
MIGAPRINT requires at least one ADMIN. If no Admin user is registered, the system will be paused and a red warning will be visible on the screen.
Then identify the Owner in the list and click on the “NO” link on the “Is Owner?” column on the corresponding row. By doing this the screen will be reloaded to apply the change, so click again on the “Notifications” tab to return to this page. Now the Owner user will be highlighted in the list like this:

The step is mandatory if you have chosen to receive orders via SMS. Enter the mobile phone number of the Owner/Admin. We recommend entering the number to be able to manage orders without a printer.
To enter the owner’s mobile phone number, proceed as follows:
- Locate the Owner in the list (the one already identified as “Owner” with the step just described.
- In the “Phone” column click on “Edit” and enter the mobile phone number including the international prefix.
- To save the setting click on “Enter” button on the keyboard. By doing this the screen will be reloaded to apply the change, so click again on the “Notifications” tab to return to this page.
Orders Status
This screen will display the orders placed by customers and you can manage their progress status.
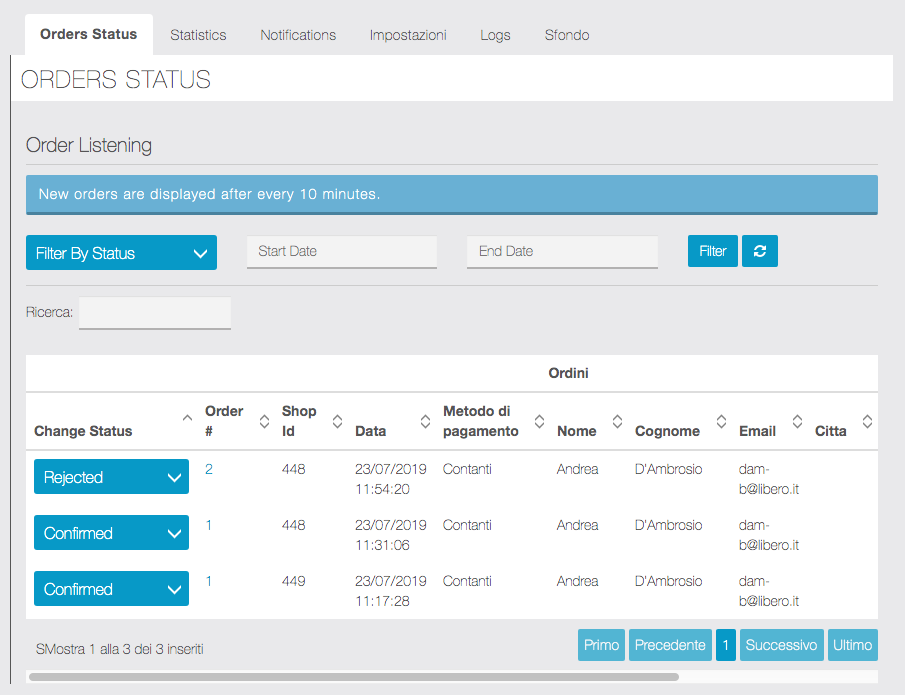
The main order statuses will be managed automatically during the progress, based on the actions of the operator to the printer, and according to the type of payment chosen by the customer (for online payments). The manager can manually change the status of an order as necessary, selecting it from the drop-down menu.
WARNING: orders are processed by the servers every 10 minutes and will therefore be displayed in the list on this screen only after processing.
You can search for orders using filters and use the button![]() to refresh.
to refresh.
Statistics
This screen will display analytical data useful for store management.
Logs
This screen, for technical / diagnostic use, will show the log of operations managed by the system and the orders managed by the MigaPrint printers.
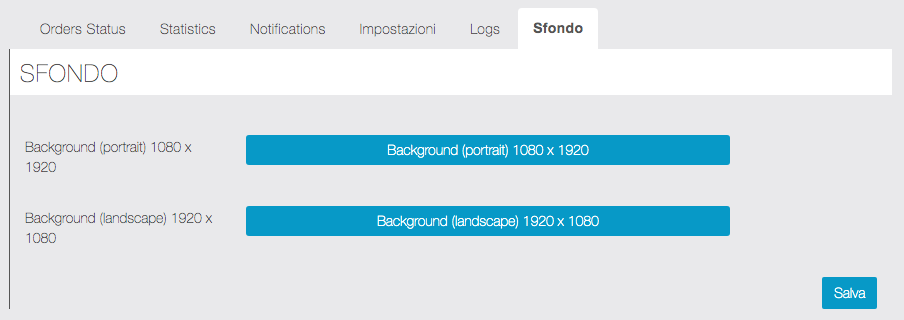
Background
Finally, as with other app features, you can upload a custom background image.
Platform Settings
The platform checks for new orders to process once every minute
Display and Manage Orders from the App
To view and manage the status of orders directly from the APP, the owner / manager must register in the app and be enabled as App Owner / Admin (see in the previous sections of this guide).
WARNING: if you have already logged in and later you set your user account as Owner / Admin of the app, remember to log out and then login again for the first time. Otherwise you will not see the administration options explained below.
By accessing the home page of the MigaPrint feature from the APP, the owner / operator will see a screen similar to the following:
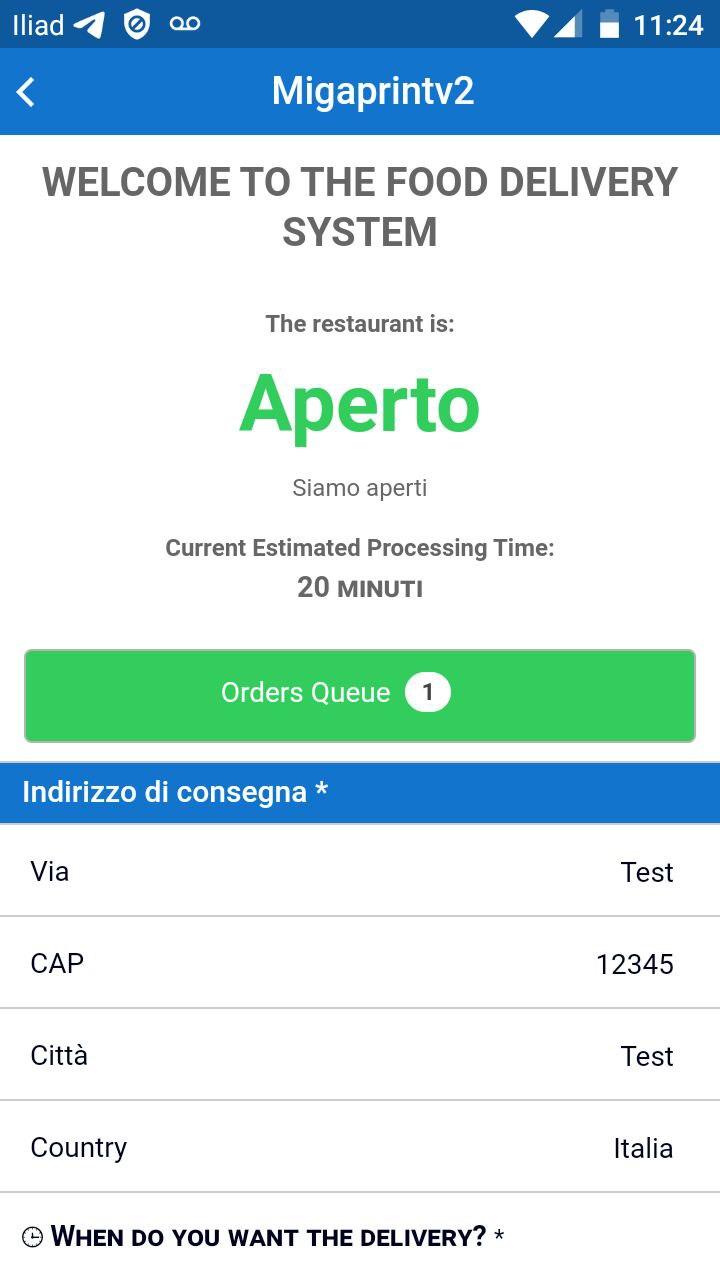
Click on the “Order Code” button to access the list of the orders received:
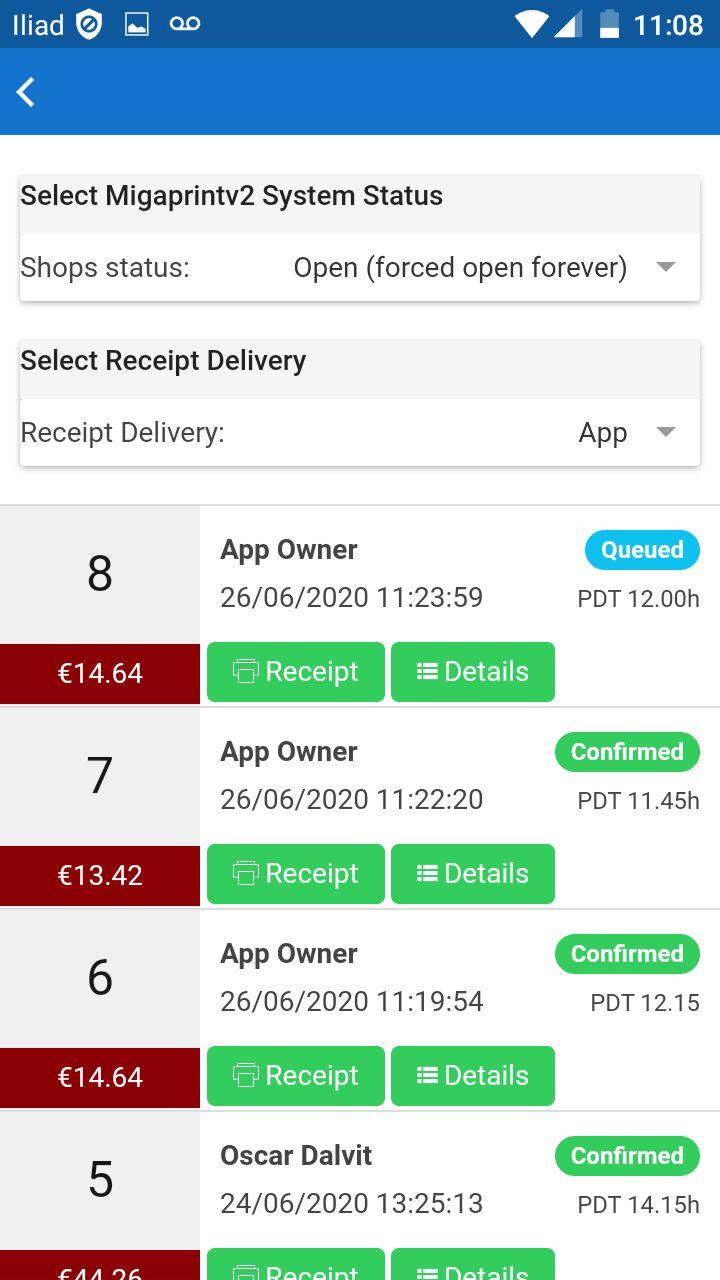
From this page, configure the Open/Close status of the shop and select the Receipt Delivery, Printer or App, as needed.
Main Order information is displayed in the list:
- Order Number and Total
- Client’s name
- Order Date and Time
- Order status
- Preferred delivery time (PDT)
The details of the single order can be viewed by clicking on the “Details” button.
Then, by clicking on the “Receipt” button in correspondence with the order to be managed, you can view the order and accept / modify the delivery time / reject the order:
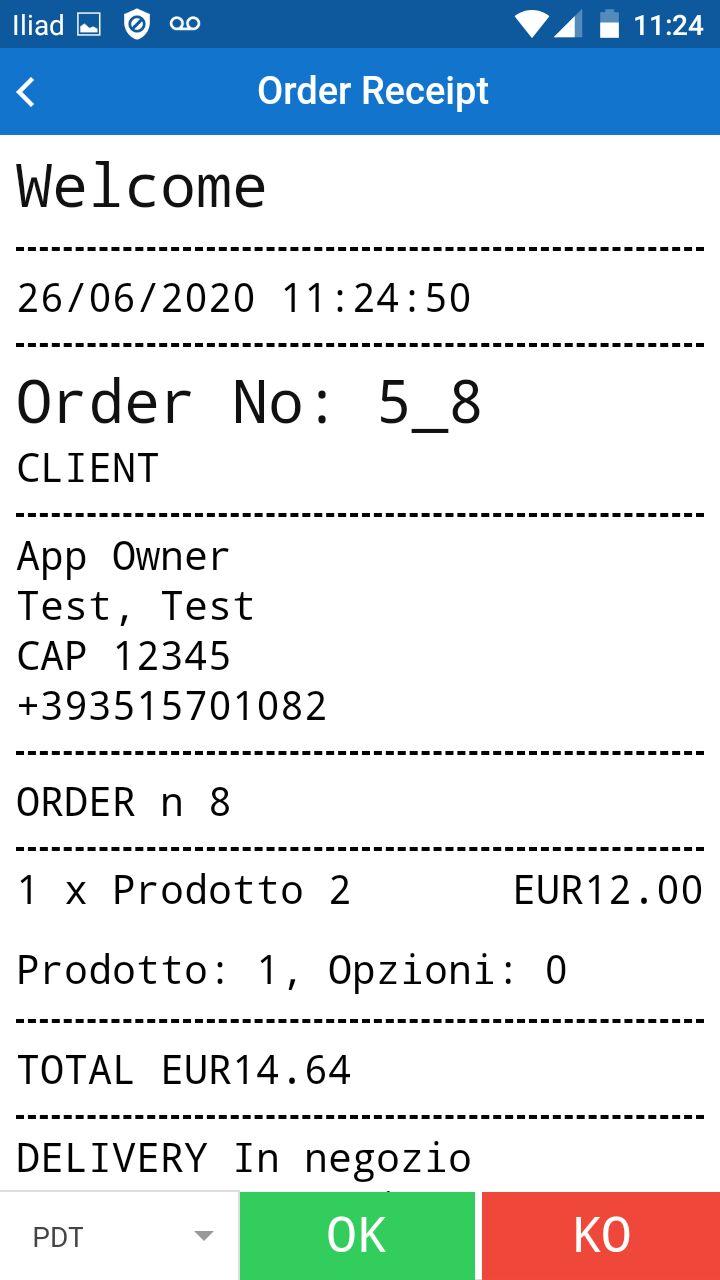
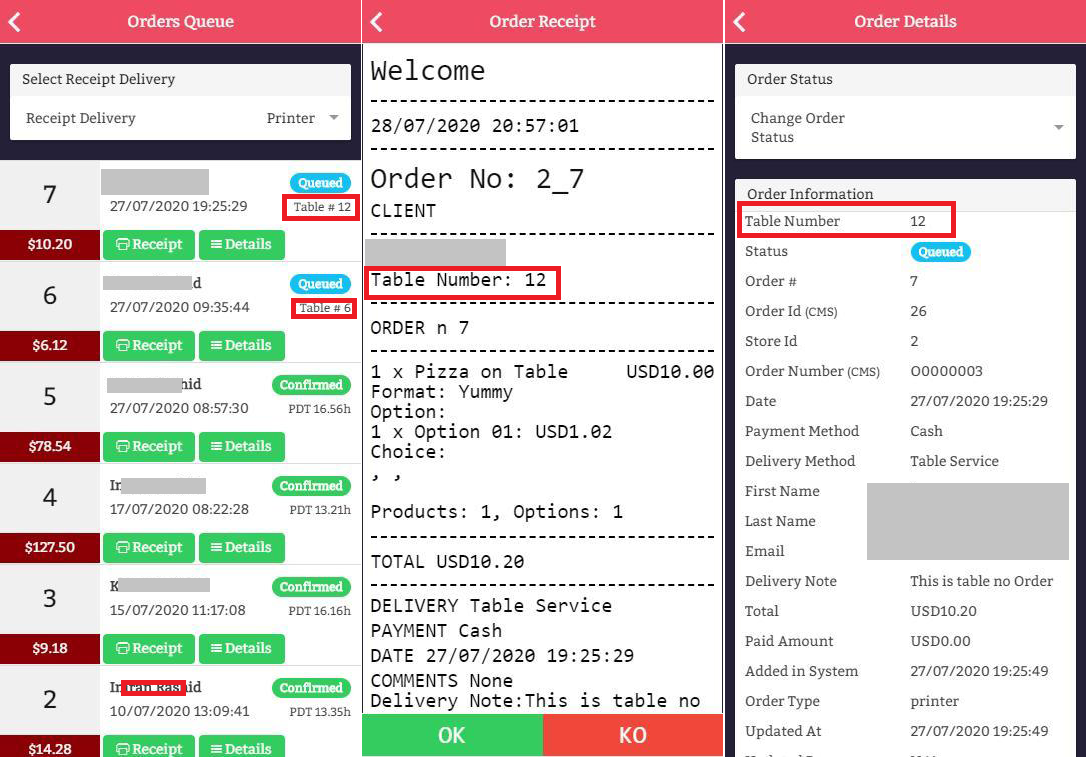
Table Ordering (Commerce Pro)
If you use the Commerce Pro feature, stores can be configured to take orders from customers already seated in the dining room or waiting inside the restaurant. The process is similar but instead of a selection of the preferred delivery time and related info, the customer will enter the table number where they are located.
On the receipt, order details, and on all other reporting, owners will be able to see the table number instead of preferred delivery time and address.
SETUP MIGAPRINT FEATURE USER INTERFACE TO REPLACE MCOMMERCE FOR THE APP USER
Since the MCommerce feature doesn’t have the ability to manage DELIVERY TIME, this data must be collected before starting the ordering process. In this case, MIGAPRINT is the starting point for the order process rather than the MCommerce feature and the MigaPrint feature provides the user interface for in-app ordering when the MCommerce feature is used.
Set MigaPrint as VISIBLE on the system, change the name to SHOP or as you want, and hide the MCommerce feature from the menu inside the mobile app.
The user will begin their order in the MIGAPRINT feature, see the cover, select the Preferred Delivery Time and finally MigaPrint forward it to Shop feature to complete the order.
App Design Note – XDelivery / Commerce Pro Only:
For XDelivery and Commerce Pro, the order process is managed by the XDelivery or Commerce Pro Ordering feature rather than MigaPrint as these features are more robust and able to collect all delivery data and time information outside the MigaPrint feature. In this integration, the Ordering Feature (XDelivery or Commerce Pro) will be visible and the starting point for orders. MigaPrint will be hidden from customers within the app.
Managing Orders through the Mobile App & Restricting Access to Authorized Admins
** MigaPrint visibility will only be available to App Owner/Admin users with XDelivery or Commerce Pro. It’s still responsible for managing orders but is invisible to the app users. **
When configuring the MigaPrint feature with Commerce Pro or XDelivery, the MigaPrint feature should only be made accessible to the ADMIN user(s) or Business Owner from the Mobile App.
To prevent unwanted access to MCommerce or MigaPrint (depending on chosen feature implementation), here’s the best way to hide Food Printer Management features:
From the Mobile App Editor, go to Features in the Left Pane:
- Add the Folder v2 feature into your app and position it where you would like it to appear in the menu (only admin will see it)
- Add the MigaPrint feature to the Folder and rename the Folder to “Settings” , “Admin”, or something similar.
- Add the Padlock feature and configure it to hide MigaPrint and only allow designated App Admins to have access to the MigaPrint feature. (This feature can be dragged to last position of features in the app)
- Hide the Padlock feature from the MENU but make sure it’s enabled.
- Create accounts if needed or enable existing App accounts to be designated as Food Ordering Admin(s) to access features hidden by the Padlock Feature. (This is required to enable in-app management)
This method provides a simple way to hide admin features from end users of the Mobile App while making it easy for the App Admin to manage the ordering system or any authorized admin functions from their own mobile device or tablet. The feature is easily accessed by Admin users but others won’t know the feature is there unless granted access by the App Admin.
** Be sure to enable the App Admin(s) to access features hidden by the Padlock. **
The images below show the 2 screens required for using the Padlock to hide features. Add the features you wish to hide behind the lock for Admin users, then create the Admin access for hidden features to a new or existing App user account.


Need to Configure XDelivery?
To configure Food Ordering with the XDelivery feature, follow this article. https://apptekz.com/how-to-implement-mobile-food-ordering/
Interested in using Food Order Printing with other Features?
*Commerce Pro is on our road map to be released in the near future. When available, it will be fully integrated into the MigaPrint feature as described and a separate document and video will be available.