
How to Configure the Event Pro Feature
Event Pro is a Complete Mobile App based Event Management Solution, providing businesses, event planners and managers, the ability to create and publish virtual and physical events, facilitate bookings, sell tickets, and promote local events, including the ability to manage and track ticket sales with real time reporting and analytics.
In this technical article, we’ll demonstrate How to Configure the Event Pro Feature in the Apptekz Mobile App Builder.
- Open the Apptekz Mobile App Builder and create a new mobile app or open an existing app to configure the Event Pro feature.
- From the Feature Tab of the Mobile App Editor, add the Event Pro feature to the app if it’s not already added.
- From the Event Pro feature, Begin in Page Settings > Settings Tab.
- Now we’re ready to begin the setup and configuration of Event Pro.
- Keep in mind that not all options shown will be configured in every app using this feature.
- Before you begin, consider the specific requirements for the Event Pro based app that will be created.
Setup
Starting from Page Settings > Settings Tab, in ‘Admin Email’ – enter the email address of the App Owner/Administrator that should receive app notifications related to event activities. As we go through the rest of the Settings Tab, options can be enabled or disabled to control the appearance of the app.
Page Settings Tab
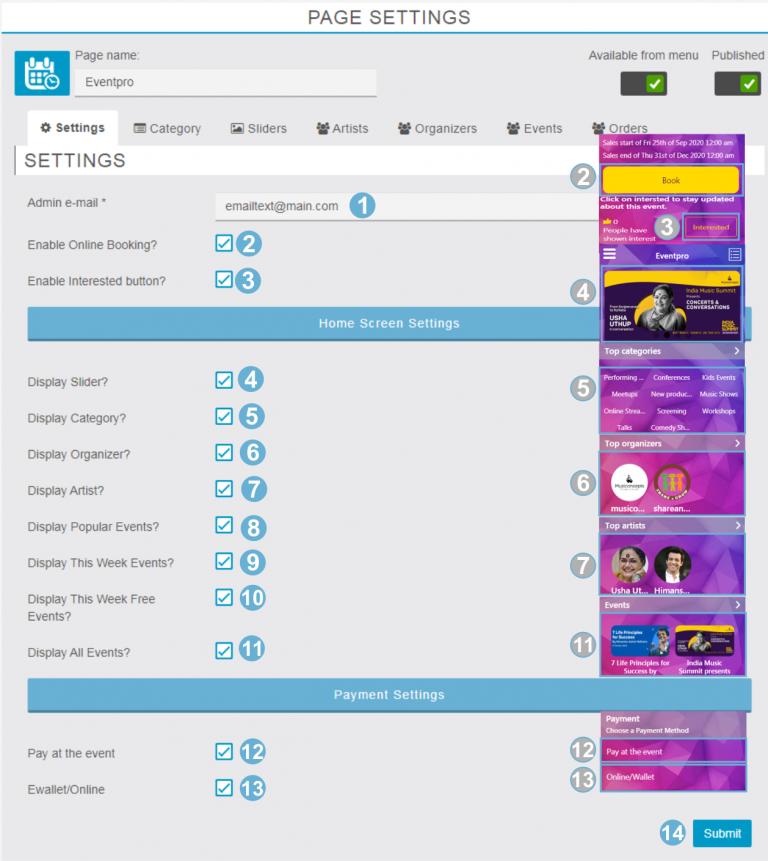
1) Enter the email to receive updates related to event activities.
2) Enable or Disable Online booking from the app.
3) Show or Hide Interested Button on Event Details page.
Home Screen Settings section under Settings Tab
4) Show or Hide Sliders from the home page.
5) Show or Hide Categories from the home page.
6) Show or Hide Organizers from the home page.
7) Show or Hide Artists from the home page.
8) Show or Hide Popular Events from the home page.
9) Show or Hide Events happening in current week from the home page.
10) Show or Hide Free Events happening in current week from the home page.
11) Show or Hide Events from the home page in
Payment Settings section under Settings Tab
12) Enable or Disable the ‘Pay at the event’ payment option as used in Ecommerce for COD Cash on Delivery.
13) Enable or Disable the Online Payment or Payment through E-Wallet, (E-Wallet must be configured in app to activate this option)
14) Click on Submit button to save all changes.
Category Tab
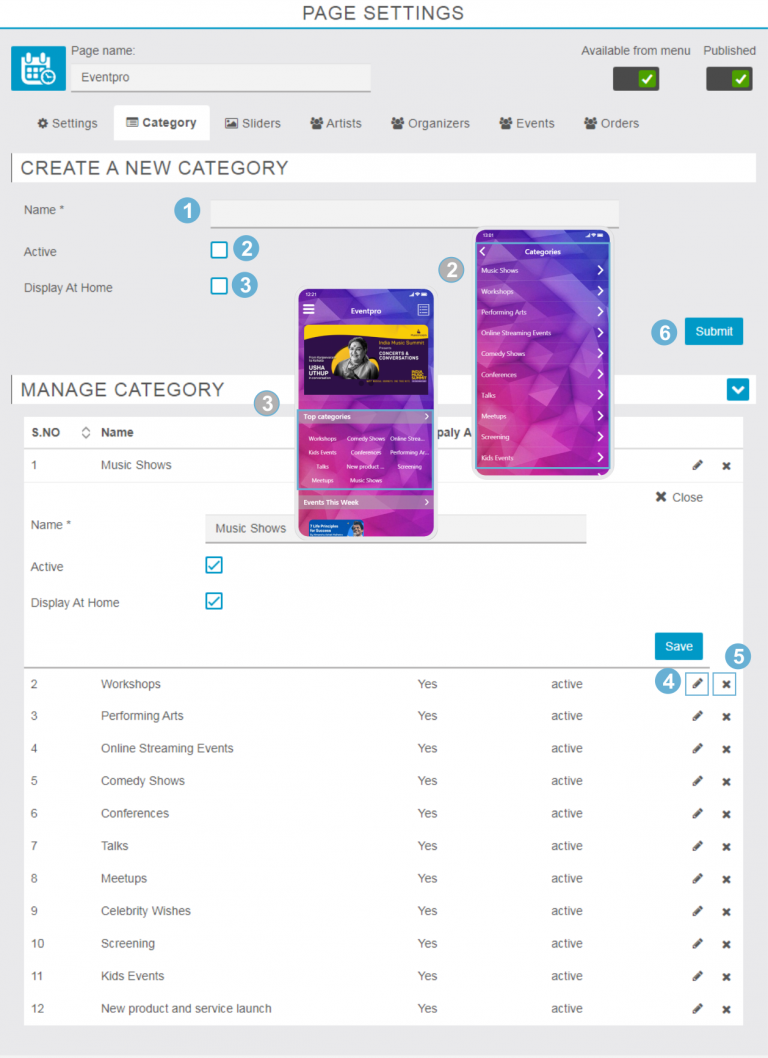
1) Enter Category name.
2) Activate or Deactivate the Category.
3) Show or Hide Category from the Home Page.
4) Change existing Categories.
5) ‘X’ icon will delete an existing Category.
6) Click the Submit button to create the Category.
Sliders Tab
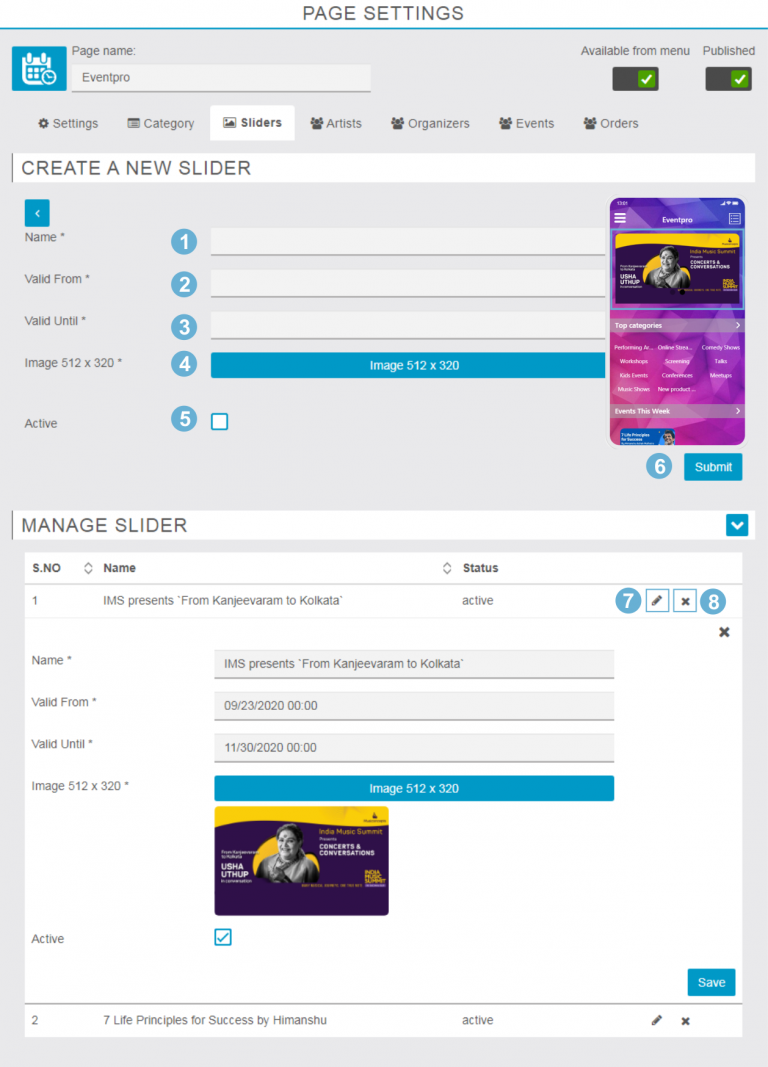
1) Enter the name of the slider or campaign.
2) Starting date of the slider to be published.
3) Ending date of published Slider.
4) Upload horizontal or landscape banner images (512 X 320 px)
5) Activate or Deactivate the Slider.
6) Submit button will publish Slider on the home screen.
7) Edit icon to modify the existing Sliders.
8) ‘X’ icon will delete the existing Sliders.
Artists Tab
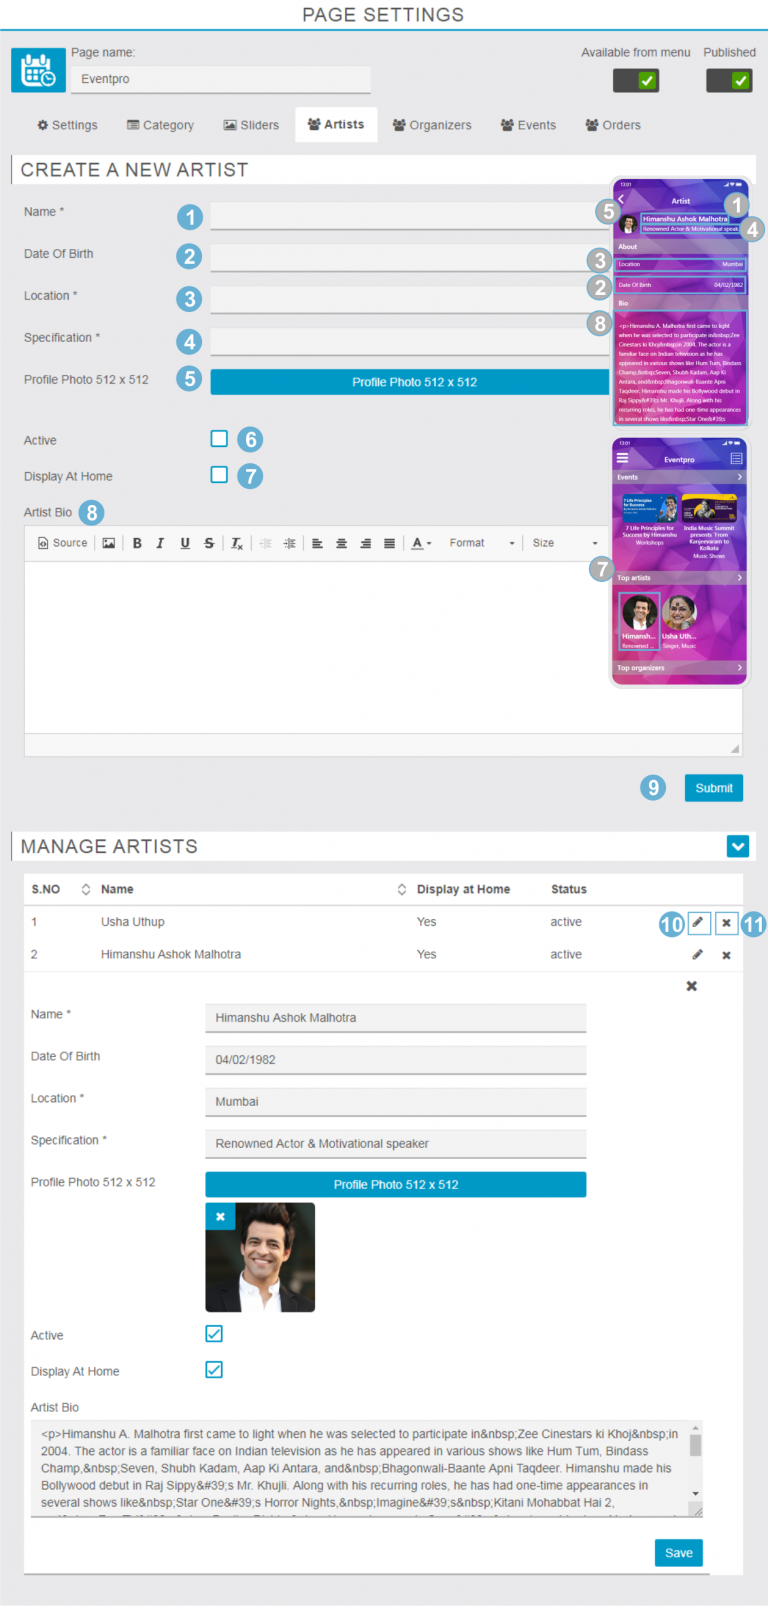
1) Enter the name of the Artist or Headliner.
2) Enter the Date of Birth of the Artist.
3) Enter the Event’s location for physical events, otherwise for online events,enter the URL.
4) Enter ‘Specification’ (Title/Accomplishment Details) about the Artist or Headliner.
5) Profile Photo button uploads the Profile image of the Artist or Headliner. (Recommended image size is 512 X 512 px)
6) Activate or Deactivate the Artist or Headliner.
7) Show or Hide Artist or Headliner from appearing on home page.
8) Enter biography details about the Artist or Headliner.
9) Submit button adds the Artist or Headliner into the app.
10) Edit the Artist or Headliner’s information.
11) ‘X’ icon will delete an existing Artist or Headliner.
Organizers Tab
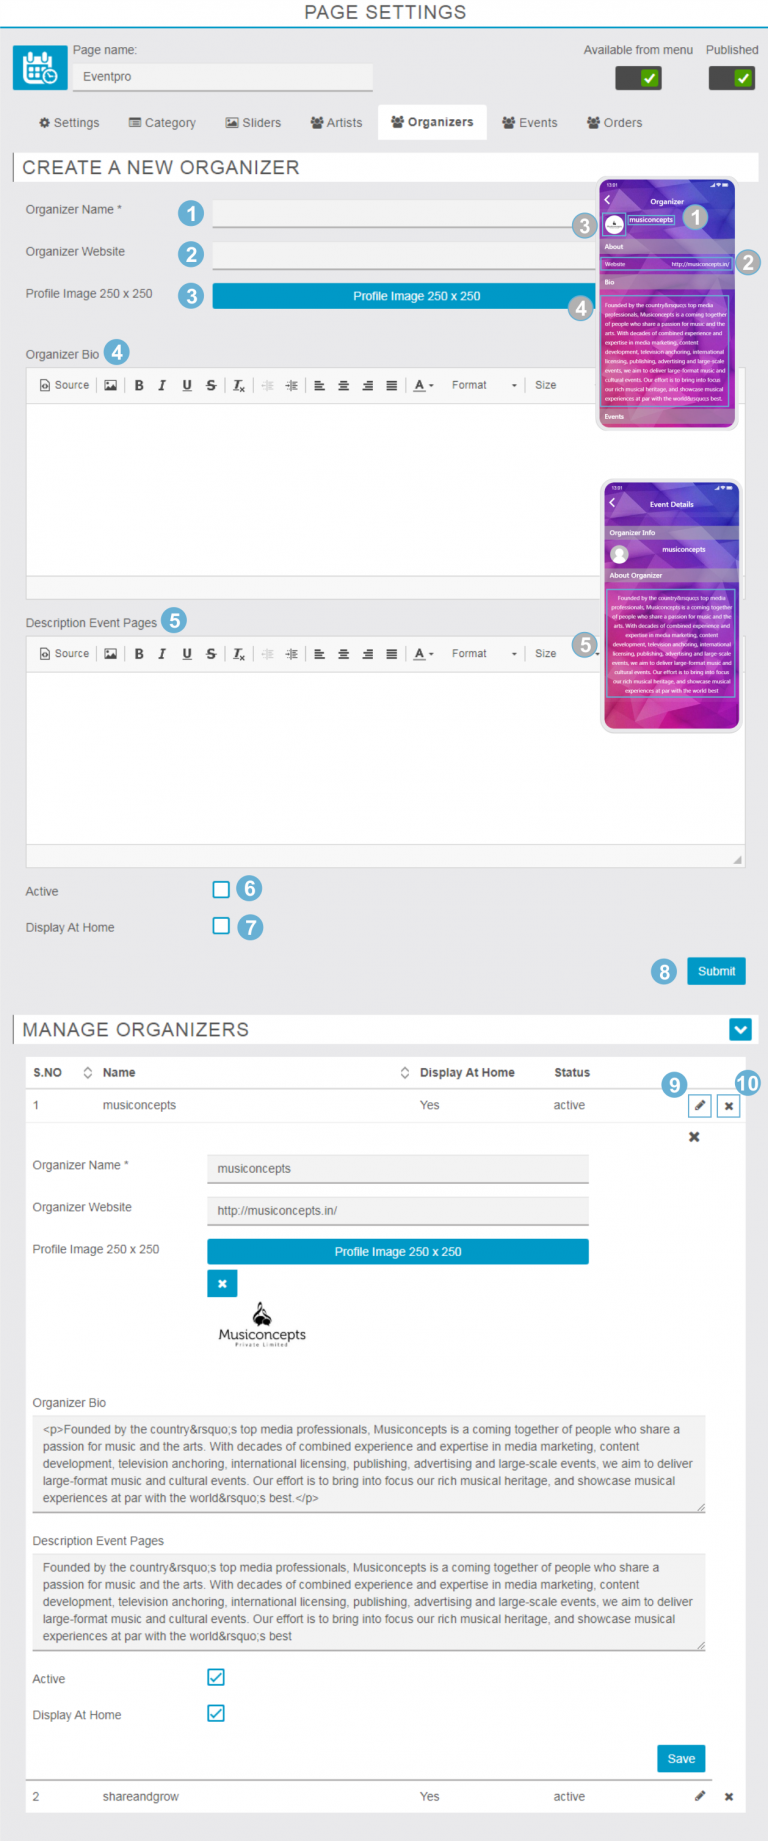
1) Enter Organizer’s name.
2) Enter the Organizer’s website, if desired.
3) Profile Image button uploads the profile image of the Organizer.
4) Enter Biography details for the Organizer.
5) Enter ‘About Description’ for the Organizer to display on Event page.
6) Activate or Deactivate the Organizer.
7) Show or Hide Organizer from appearing on home page.
8) Submit button adds the Organizer into the app.
9) Edit the Organizer’s information.
10) ‘X’ icon deletes existing Organizers.
Event section
Clicking on the Event tab opens a new browser window and the “Create a New Event” section.

1) Enter the Event Title.
2) Select the Organizer from drop down menu.
3) Select the Event Category from the drop down menu.
4) Enter the event location by selecting Venue or Online. Then enter the location in the address field for either the Venue or a URL for Online Events.
5) Select whether the event is a single event if it is held once, or a recurring event if it will be held in multiple times. Enter the event Start Date and Start time & End Date and End Time of the event.
6) Click ‘Save’ Button to save info entered in this section and move on next section.
Details Tab under Event section
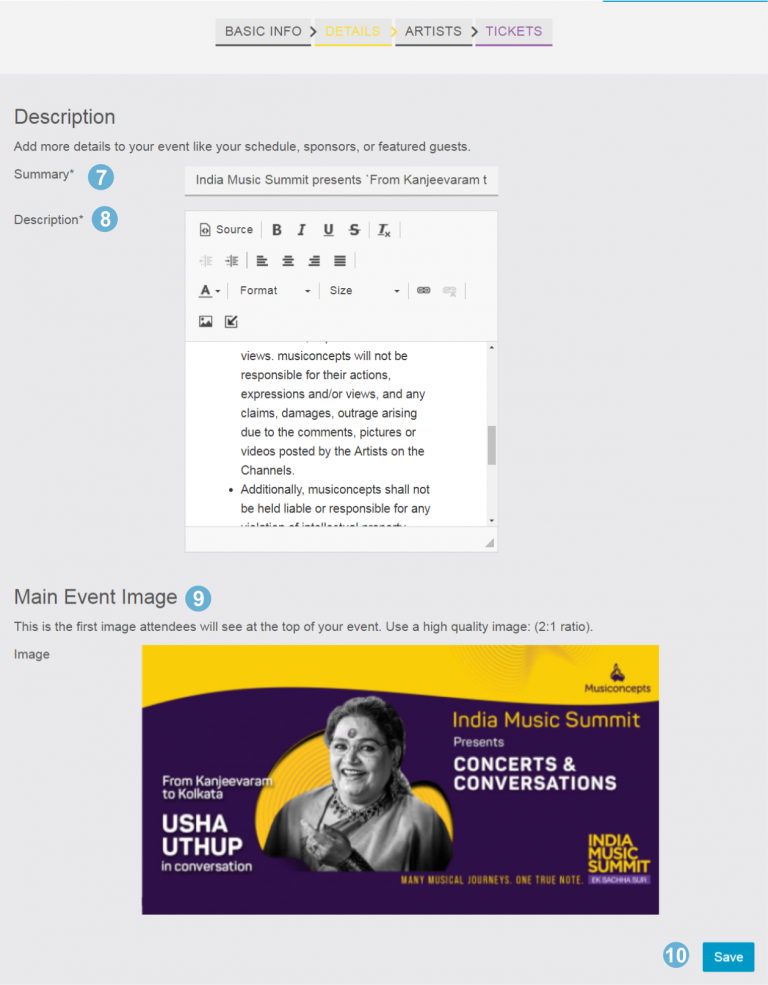
7) Enter Event Summary to describe the event.
8) Enter description about your event like your event Schedule, Sponsors, Guests, Activities, etc.
9) Upload Main Event image such as a banner, poster, ad contents, etc. (use a high quality image with 2 :1 ratio)
10) “Save” the changes.
Artists tab under Event section
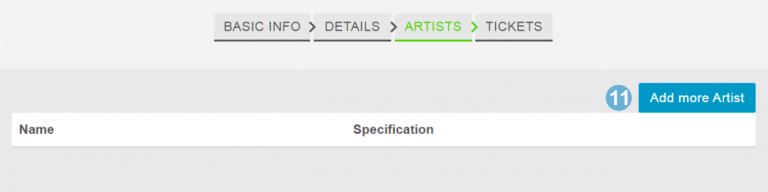
11) By Clicking the “Add more Artist” button, all active artists in the app will be listed.
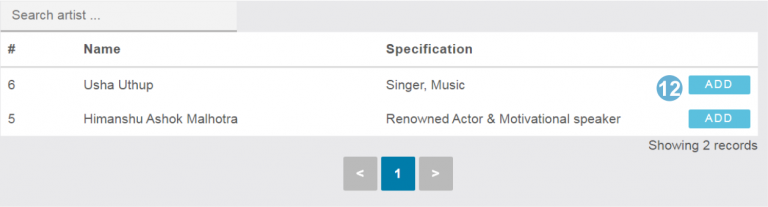
12) By Clicking on the “Add” Button the Artist will be add to the event.
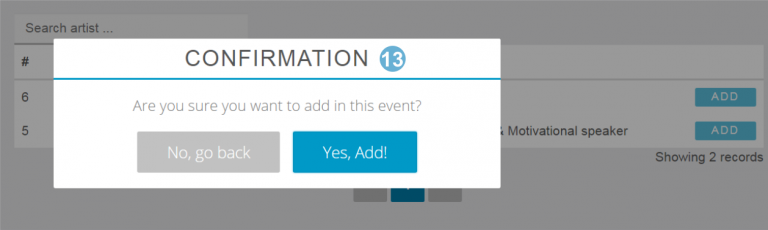
13) Chose ‘Yes, Add!’ to confirm that you want to add the Artist to the event.
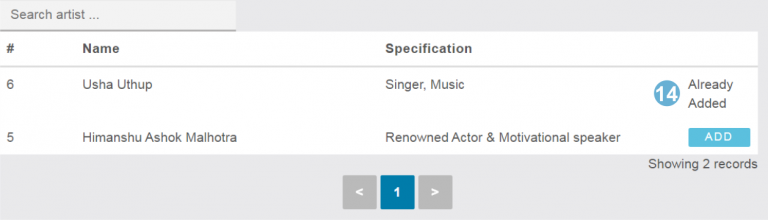
14) Displays status of added Artists in the event.
Tickets tab under Event section
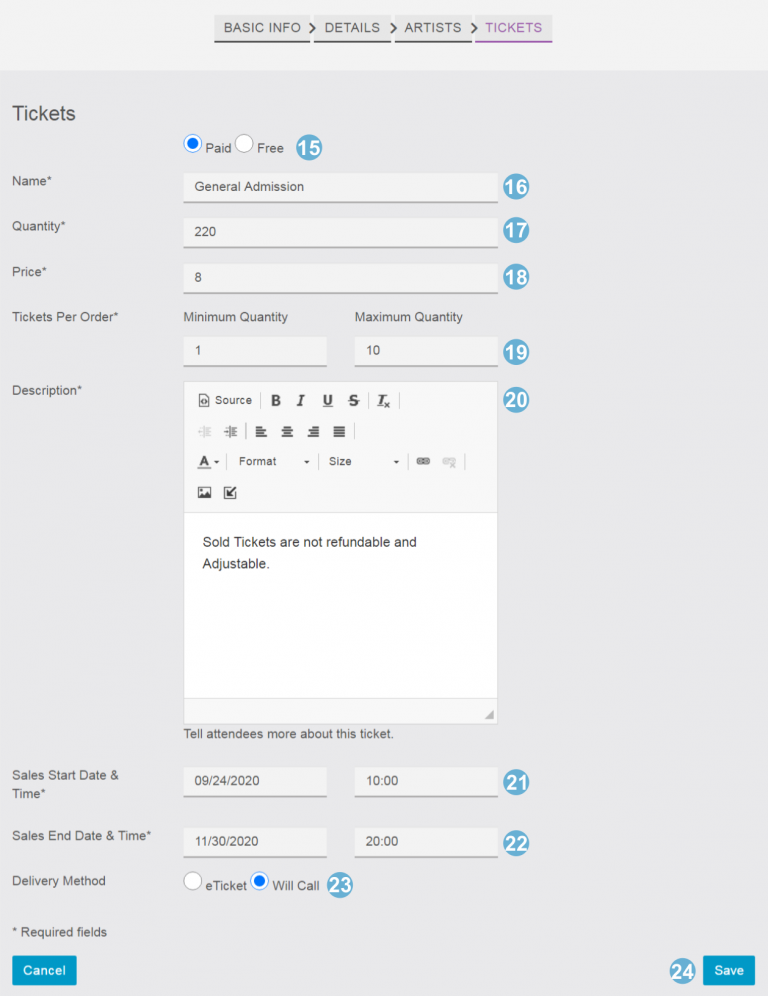
15) Select tickets type of ‘Free’ or ‘Paid’.
16) Enter the Ticket name: like General Admission, Balcony, VIP, Front Row, etc.
17) Enter the number of seats available in quantity (of tickets).
18) Enter Ticket Price for that ticket type.
19) Set tickets order quantity as minimum and maximum for single order.
20) Enter General Ticket Description and terms and conditions related to tickets sales.
21) Enter Sales Start Date and Time to START selling tickets for the event.
22) Enter Sales End Date and time to STOP selling tickets for the event.
23) Select Delivery Method “E-ticket” or “Will Call”.
24) Save the changes.
After creating an Event it must be ‘Published’ to display inside the app.
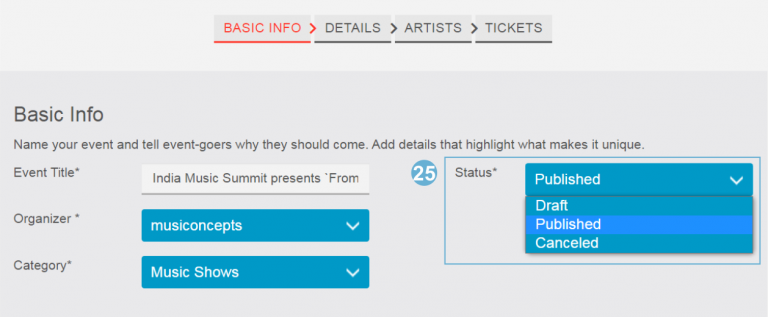
25) After Creating and saving an Event, select the desired Status of either ‘Draft’, ‘Published’ or ‘Canceled’.
Event analysis and management
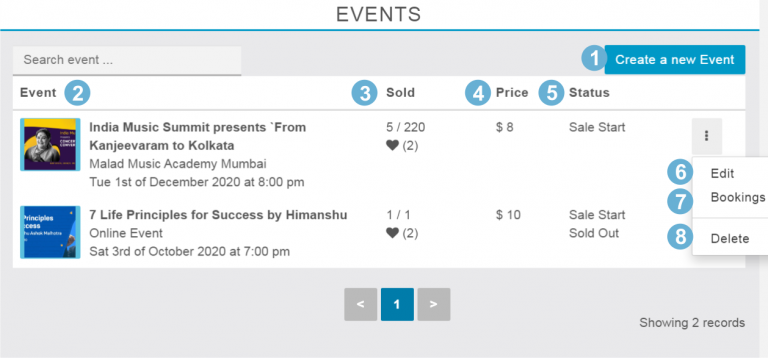
1) Click on ‘Create a new Event’ to create additional or new events.
2) All Events will be displayed in the list.
3) Sold Column shows Tickets Sold, out of total ticket quantity available as well as the number of people interested.
4) Price Column shows Tickets Price for each type of ticket created for each event.
5) Status Column shows Sales Start, Sold Out status, etc.
6) From the 3 dots, Edit existing Events.
7) View Event Bookings for the selected Event.
8) Clicking on “Delete” will remove unwanted events.
Orders tab
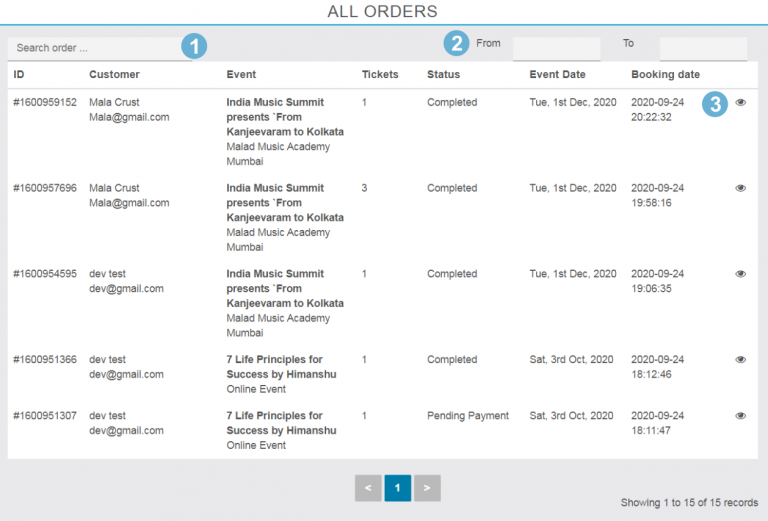
1) Search Ticket Order details
2) Search Ticket Orders by date range.
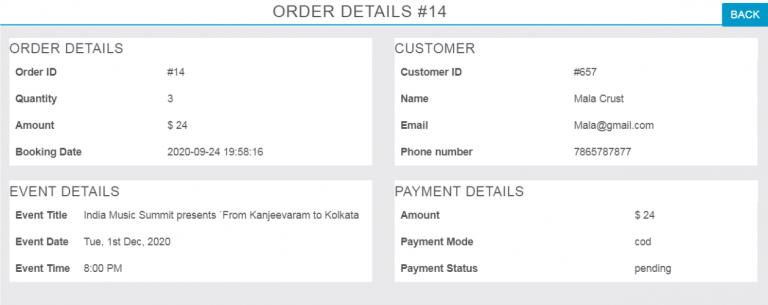
3) Click Eye icon to view details about that specific order
Are you ready to build an affordable custom mobile app for your next event? Reach out and let us help make it a success. https://apptekz.com/support