How to Setup your White Label Mobile App Reseller Platform
Step 1: Create a White Label Reseller account
Create an account, accept the terms and conditions, then login to the Apptekz Mobile App Platform. Once in your White Label Mobile App Builder, you’ll be able to start building your first app. However, you’ll want to customize the platform to use your own branded domain name and add your logo to provide a consistent user experience to your customers that will need access to customer managed components of their app.
Note: Be sure to make any changes to your White Label and your Base Package Name and Bundle ID’s before publishing apps under your White Label. Once published, apps cannot have these elements changed without publishing a new app.
Step 2: Configure your subdomain to access your Mobile App Builder
Once your reseller account is created, you will need a domain name or subdomain to configure for use with your white label platform. This can be a subdomain from your primary business or a brand new domain name to use for your clients to access the platform. This cam be done at any hosting provider you choose. If you already have a domain, you’ll just need to create a subdomain that will point at your white label reseller platform and configure a CNAME record that maps to our Content Management Systems (CMS). Your CNAME record will be pointed to our main platform url at cms.apptekz.com.
Note: When purchasing a new domain, it is not required to purchase hosting service with the new domain name, you only need the domain or subdomain since we’ll be hosting the platform for you.
Now that you’ve decided on which domain name or subdomain to use, you’ll need to access the DNS zones from the domain name management interface where your DNS is managed. DNS means Domain Name Service. Even if you’ve never done this, it’s very straight forward if you follow the instructions for creating or modifying DNS records. In most cases, you’ll find the DNS zones in the Domain section of your domain administration panel at your hosting company.
Note: Most hosting companies have supporting documentation for making DNS changes on their website or help available through their customer support channels.
Step 3: Create a CNAME record to map your subdomain to the Mobile App Builder
Once in your DNS management tools, you’ll just need to create a type CNAME or CNAME record for your subdomain. In this record you will need to enter the following info:
Domain name: Your subdomain such as “apps” for apps.yourdomain.com or your root domain if that’s what you are using such as yourdomain.com. (Don’t use the same root domain that’s already used for another purpose like your website)
Address: The address of your while label mobile app builder (for example, cms.apptekz.com, if your platform is installed on a subdomain, or yourdomain.com it will be pointed at the white label platform.
For example: apps.yourdomain.com will point to cms.apptekz.com
The example below is an illustration of how it might look on the domain admin panel where your DNS management is hosted:

Your can either choose to use a new or existing domain name exclusively to access your White Label interface, or choose a subdomain (this is an example of the format: subdomain.yourdomain.com). You must enter the subdomain or domain name in the configuration. If you have the option, set the TTL to the minimum value available. This helps to reduce the time it takes for the update to take effect.
Note: It can take up to 24 hours for DNS records to complete the propagation process. During this time you may not be able to connect to the address consistently from devices that use different network providers such as your computer and mobile phone.
Step 4: Configure your White Label Mobile App Builder to use your subdomain
( If you need assistance with this process, please open a support ticket at https://apptekz.com/support )
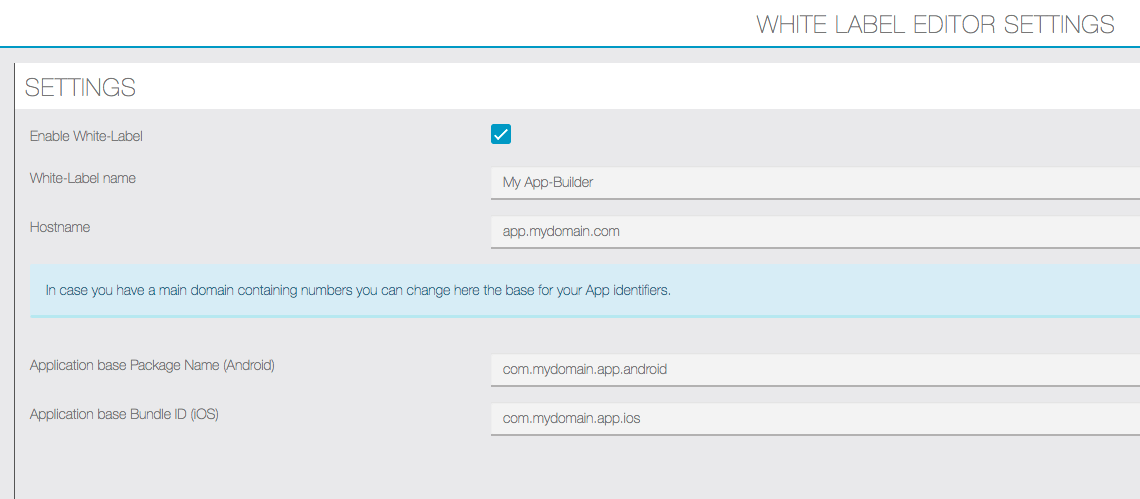
Login to your White Label builder at the main address for the customizations that we’ll be doing. So for this step you’ll login at cms.apptekz.com. Then, in White Label > Settings, enter the subdomain name or root domain that you configured with CNAME in the “Hostname” field. If you are using the root domain for the White Label admin panel, you must enter that as the domain name; if you are using a subdomain, you must enter the full subdomain url such as apps.yourdomain.com.
If the CNAME has not been configured correctly or has not yet finished propagating, you will receive an error message. If you do get an error, please recheck the CNAME configuration and wait for the DNS propagation to finish. Sometimes it is necessary to clear the local DNS cache on your computer before you can access the White Label on the newly configured subdomain, even if the DNS information has propagated. If you aren’t sure how to manually flush your DNS cache, you can simply restart your computer to automatically flush the local DNS cache for you.
Step 5: Setup your App Builder to Publish Apps to the App Stores
In order to publish apps to the app stores in your White Label account, you must enter a name for the White Label and the Application Base Package Name (Android) and Application Base Bundle ID (iOS) as shown in the example above.
Note: The Application Base Package Name and Bundle ID should not be changed after you make these one-time changes or previously published apps may become unavailable to access or update on the app stores.
Step 6: Configure your Company Branding
Now that you have finished the technical configuration, the next thing you’ll want to do is customize your White Label Mobile App Builder to use your branding and logo.
Customize the admin panel by clicking on this icon on the right of the general menu at the top:

Please note that customizations made with this process will appear to everyone using your white label platform. (Steps 1-6 are a one-time configuration)
Step 7: Login to your White Label Editor with using your subdomain
Once your DNS changes have updated (which could take up to 24 hours) you’ll be able to connect to the subdomain you configured in the previous steps. If you were able to set the TTL to the minimum value and you’ve flushed the local DNS cache on your local computer, you may be able to access the white label interface immediately by typing the name of the domain or subdomain into your web browser. If not, you should be able to access it within 24 hours.
Note: Your branded subdomain can now be used by you and your team as well as any customers that need to manage their apps. App customers should always login to your branded White Label URL.
Please let us know when you have completed this process if you have not already opened a ticket so that we can configure the SSL certificate for your platform to avoid getting any customer facing error messages related to browser security.
Step 8: Configure your custom SMTP server for sending alerts using White Label domain
Why resellers and app owners should configure a custom SMTP server for email
Most resellers and certainly mobile app customers, want to use their own branding on emails that go out to their customers. The only way this can be accomplished is by using a custom SMTP server configuration. It’s not possible for the platform to send out email on behalf of others without a verified SMTP configuration that explicitly allows the platform to send mail on behalf of another email domain. Another thing to note is that a Bulk Email service provider is the only supported method for doing this as regular email providers may flag bulk mail as SPAM and may suspend your email privileges for sending email suspected of being SPAM.
Here’s how to configure your White Label SMTP server configuration
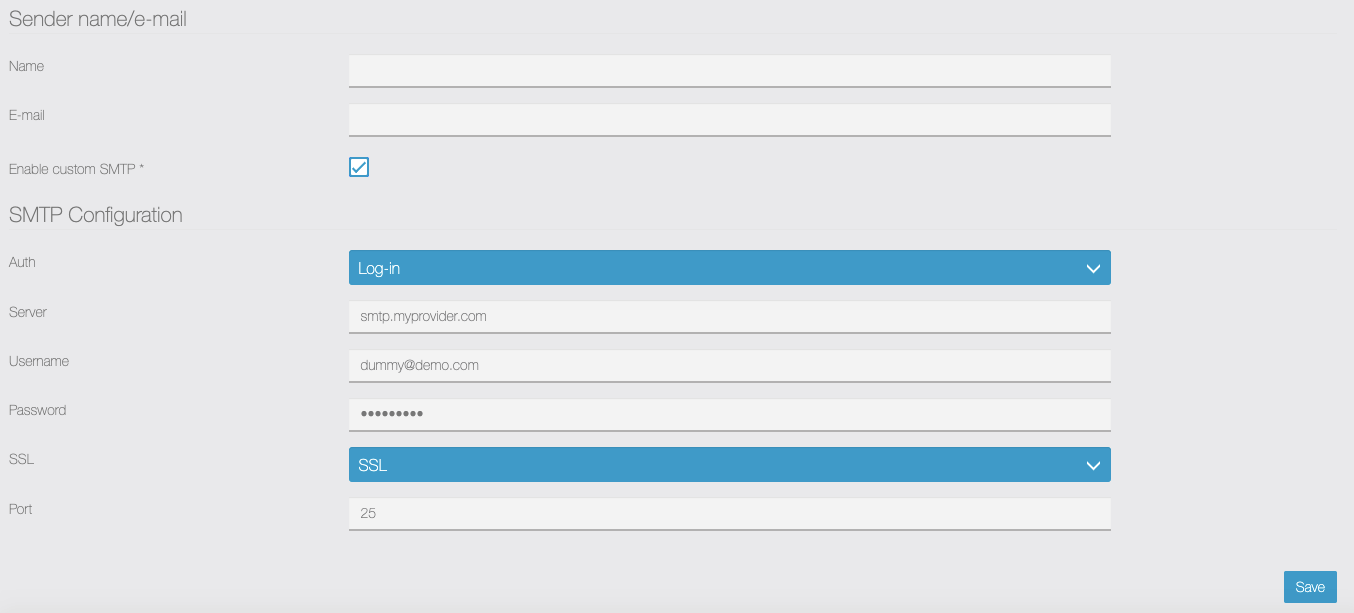
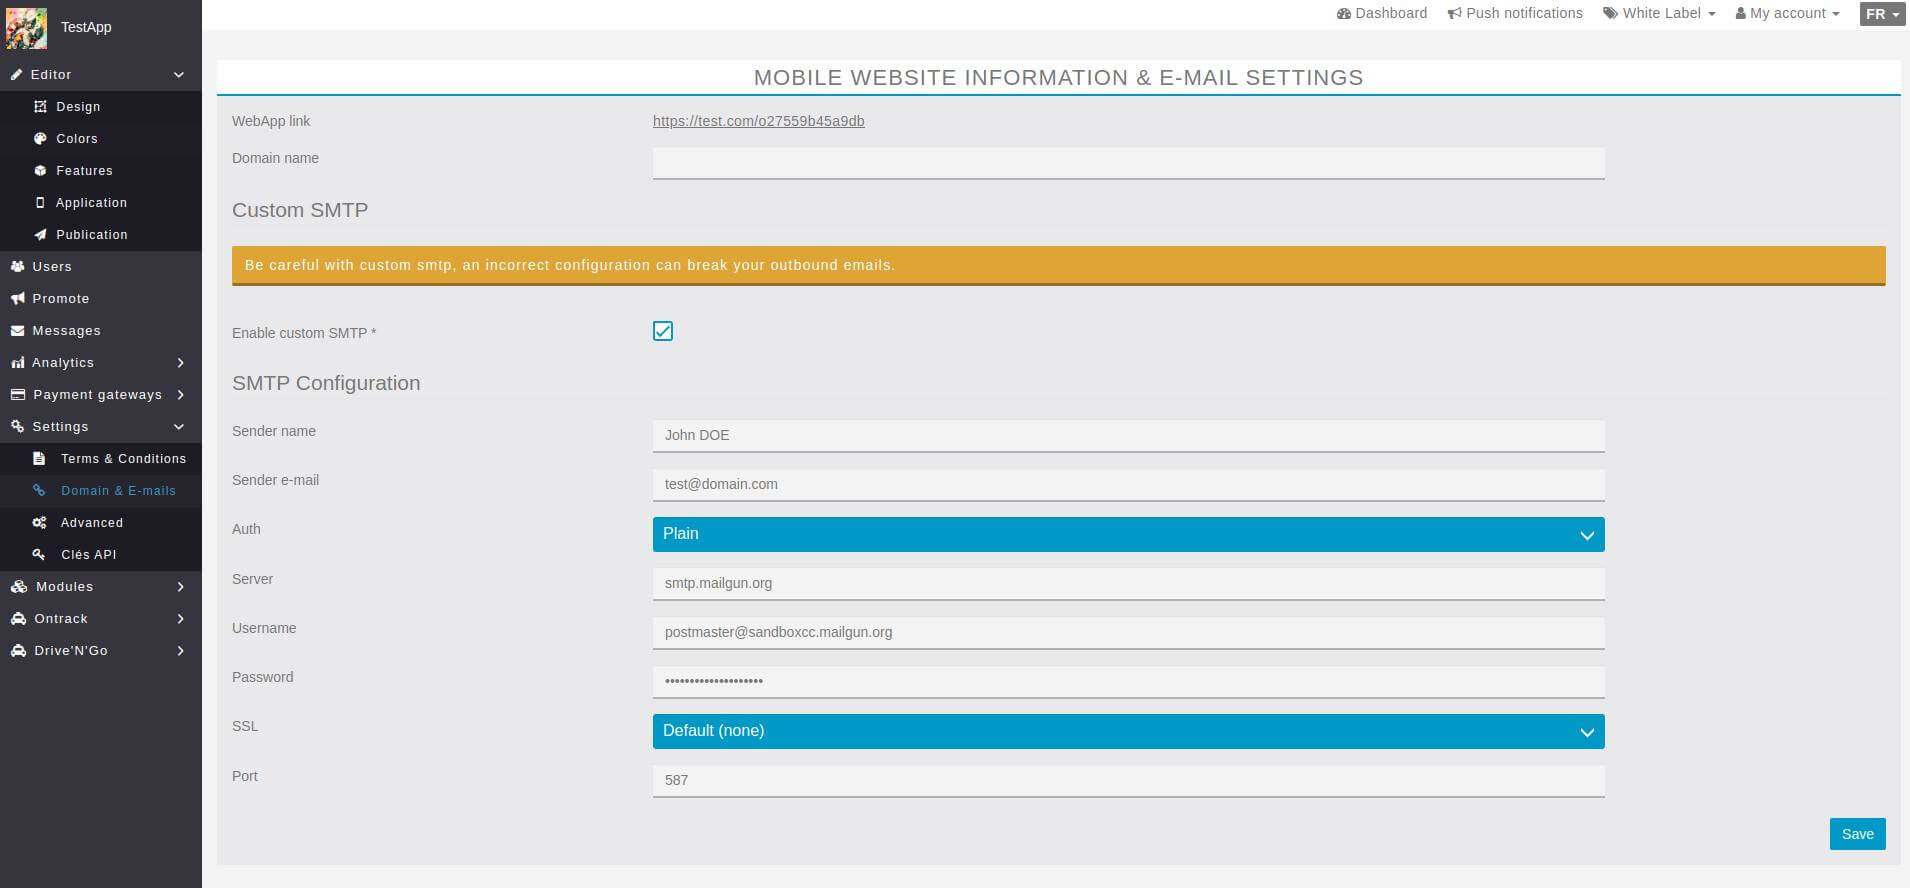
At the bottom of the White Label configuration page, you’ll see the section below. Add the name that will appear as the sender and email address that you would like to use for notifications sent from the platform. Then add the SMTP information provided by your vendor (Auth, Server, Username, Password, SSL option, Port).
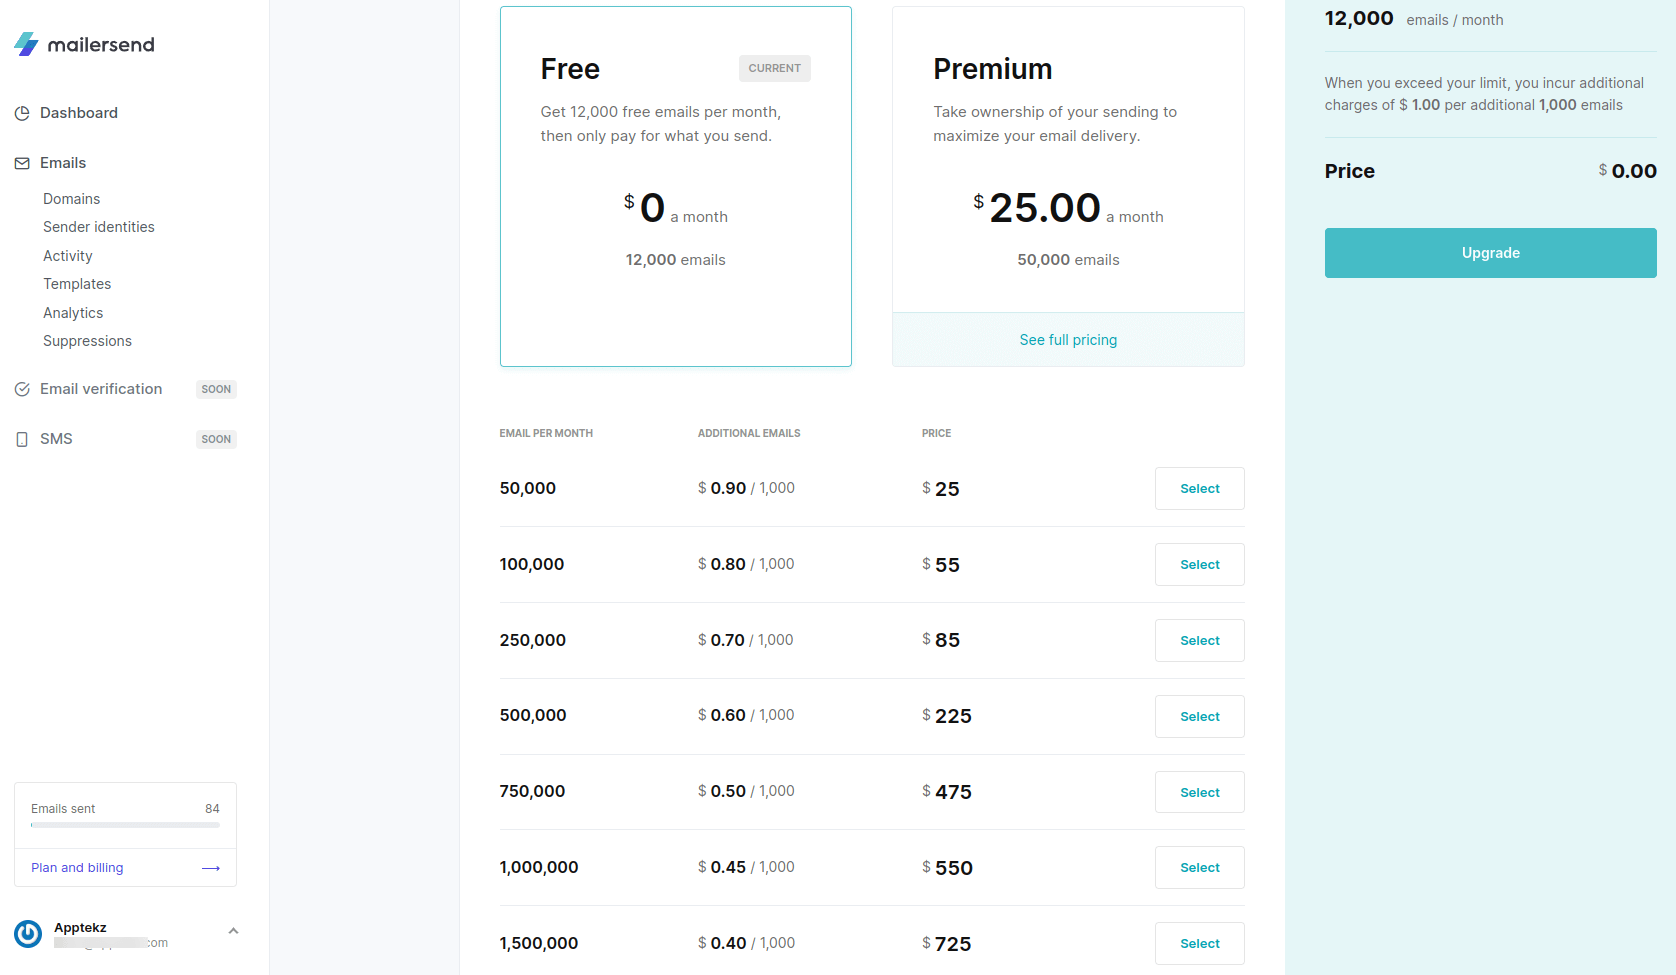
We recommend using MailerSend which provides 12k emails per month on their Free Plan and they have one of the best pricing structures should you need to send more than 12k. It’s important to watch your email usage so you know when to scale up to a larger plan.
How to setup your MailerSend account
First, follow this link https://refer.mailersend.com/apptekz to get a new account if you haven’t already done so.
Start with a free trial plan and send up to 12k emails per month after your account is approved.
Be sure to select SMTP to send email and MailerSend will create the information you’ll need to copy into your White Label SMTP configuration page.
For details on how to enable SMTP on MailerSend, read this knowledge base article for SMTP Relay.
If your email domain is used for other email, you’ll probably need to combine your SPF records. Only one SPF record per zone is permitted. Here’s an article to help you merge SPF records. https://www.mailersend.com/help/how-to-merge-spf-records
After you configure SMTP by toggling on the option, you’ll be presented with the information you’ll need to copy and paste into the White Label SMTP section of the Apptekz Mobile App Builder.
Once you’ve setup your SMTP info in your White Label configuration, all apps owned by the White Label will use this SMTP server to send out email notifications until the apps under the white label are configured with their own separate SMTP server configuration.
** Reseller Note: your customers will be using your SMTP configuration until you setup a custom SMTP for their domain. As few as 4 busy apps could consume your 12,000 free emails per month so it’s important that each app that provides customer notifications be configured with an SMTP account that will be paid for or controlled by the app owner.
Configure each Mobile App with a Custom SMTP service. (This is critical for Mobile Apps that will send out customer emails or alerts and for apps that will use Marketing Funnels.)
While not required, this allows business owners to use their own branded email domain and would be recommended to use for active apps sending out many email notifications (We recommend configuring a custom SMTP for Apps sending >100/day). The setup will be very similar to the White Label SMTP configuration above and enables configured apps to use their own SMTP server configuration instead of the platform or white label configuration. We would recommend using MailSender for customer domains as with your White Label, but any Bulk SMTP provider could be used if they already have one and provide the configuration details. Otherwise, you can setup MailerSend and give them the login to complete the registration customer verification after it’s setup.
SMTP Configuration screen in your App Editor under Settings > Domains & Emails
Note: An SMTP mail service is recommended over using standard personal or business SMTP server settings due to analytics and monitoring of email reputation & bounce rate often impacted by app user errors. An SMTP service also improves delivery speed and accuracy of important notifications.
*** For apps that are sending >100 emails per day per app, you’ll want to complete the custom SMTP configuration for them to avoid the risk of incurring charges for exceeding the number of emails sent through your plan. Keep in mind that 100 emails/day x 30 days = 3000 emails/mo, so only 4 client apps sending at this rate will consume all of your 12,000 free emails. (Apps with booking or sales transactions can easily send more than 100 notifications per day.)
Step 9: You’re now ready to build your first Custom Branded Mobile App
When you build an app for clients, you’ll need to configure client access to the new mobile application and provide the login link to your client in your white label panel. We often refer to this as allocating the app to the client or business but we can also give access to users approved by the business to update or review components, orders, appointments, reports, etc. in the app.
While in the Editor with the app you want to allocate to the business owner, app admin, etc. Go to ‘My Account’ and Click Create New User.

Create the user account and choose the appropriate Editor ‘Role’ to assign permissions to the user, then save.

Once you save, the user will be added to the list of users for the White Label Editor. Then Select the User to Edit and provision the user to the App(s) they will manage in the Editor. Now that user is allocated, they will be able to login to the White label Editor and manage the app(s) based on the Role and settings assigned.

This process will be repeated for new clients or additional users to existing apps to enable login and to manage their app(s) on your branded White Label Mobile App platform.
You’ll repeat this process to allocate apps to business owners for each new client app within your White Label Editor.
Note: The the steps to allocate App Admin users in the Editor above are different than for App user logins within the app.
To create App users within the app itself, from the left pane, select ‘Users’ as shown in the image to the right. Then create users in the app. Users can also create their own account directly inside the app. App users accounts can be managed here to reset passwords or to enable padlock access.

For more info on how to configure and manage in-app users, this article on the Padlock feature has more details on the process.
https://apptekz.com/how-to-use-the-padlock-feature/
Congratulations! You have configured your White Label. ** Don’t forget to open a support ticket to request a free SSL certificate for your White Label platform URL. This will help to avoid any unwanted security error messages showing up on customer browsers.**
Let us know if this article was helpful. If you need additional assistance or information, please open a support case and we’ll be happy to assist you.