Funnel v2 – Automated Marketing Campaigns
Our Funnel v2 feature is one of our most powerful marketing tools. Funnel v2 enables app owners or administrators to send automated marketing messages through email or push notifications to mobile app users when a defined trigger is activated. In other words, when your customers download the app or use many of the features to engage with your business, an automated campaign can be started at the perfect time to help you connect with your customers, to build loyalty and engagement that ultimately generates more revenue for your business.
It’s really a very innovative marketing tool and perfect for direct response marketing automation. This unique feature as a stand-alone product often sells for more the price of an app but is included with all of our premium app subscriptions.
A specific campaign sequence can be triggered based on feature usage or actions taken as defined within the app.
In a typical use case, the business will deliver high value content within the App which results in app user registrations. Registered App users can then redeem a coupon or reward, make a purchase or book an appointment in the app, install the app on a new device, etc., any of these events can trigger a relevant and targeted, automatic followup campaign to the app users. The content can be delivered at pre-defined intervals by both email & push notifications without further administration or effort since it’s sent over a defined time period, whether daily, weekly, monthly or any other configured frequency or desired time interval.
In addition to Native Push Notifications, the Funnel v2 feature provides functionality to add 3rd party email funnels through our API integration with popular email marketing solutions like Mail Chimp, Sendinblue, and others.
If you don’t already have a supported email marketing platform, we’d recommend creating and integrating a free account with Sendinblue as they offer one of the most affordable email marketing solutions, along with a generous number of free emails each month to keep costs low until you have grown your customer list.
While PWAs don’t support individual push notifications, we can trigger emails to PWA users using the same configurations. To enable for PWAs, simply contact support to mark your Android App version as published to activate the Funnel automation.
Note: If the native app is already published on at least one app store, this feature will already be activated for use. In the case of PWA, we only mark the Android app as published to activate this feature.
* On the Roadmap for 2023 is SMS Marketing integration that allows using SMS as an additional automated marketing channel in automated campaigns. We’ll update with more info as we get closer to launch.
Event Triggers
An Event Trigger can be configured to fire upon the First use of a supported feature from the list below. Event Triggers are used to define a campaign based on the action taken to fire the Event Trigger.
Currently Supported Event Triggers:
- App Installed on a new device
- My Account – New App Login
- Appointment Pro – First Appointment Booked
- XDelivery – First Order Made
- Commerce Pro – First Order Made
- Commerce – First Order Made in App
- Discount Coupon – First Coupon Redeemed
- Loyalty Card – First Points Used
- Progressive Loyalty Card – First Point Used
- Progressive Loyalty Card – First Prize Redeemed
- Event Pro – Integration on Roadmap
Push Funnels (Funnel of Push Campaigns) * For Native Apps only, for PWA, skip this section
When any defined event trigger is activated it will start a FUNNEL OF PUSH, a sequence of unlimited number of pushes scheduled to be sent automatically to the user.
Every push has a delay of hours or days from the previously push selected.
Is possible to setup a welcome push immediately after the registration of a new user and schedule every 7 days an automatic push sent to the user for an entire year!!
Follow the instructions to learn how to setup the FUNNEL OF PUSHES campaign.
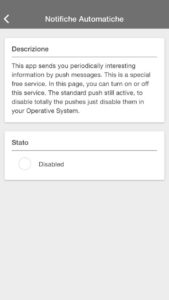
When a funnel is activated the feature will add a new page to the menu of the APP. The page has will allow the user of the APP to UNSUBSCRIBE from the automatic push service as you can see in the example below:
Click on SETTING and modify the DESCRIPTION. The description should explain the to the App user that the App they have just downloaded has an automatic push funnel, the user may disable any automatic push by clicking the option in the page. This will only disable the automatic push notifications sent through Funnel v2 but important /manual push notifications sent from App administrator or the App owner are not affected. (These settings and options only affect automated funnels)
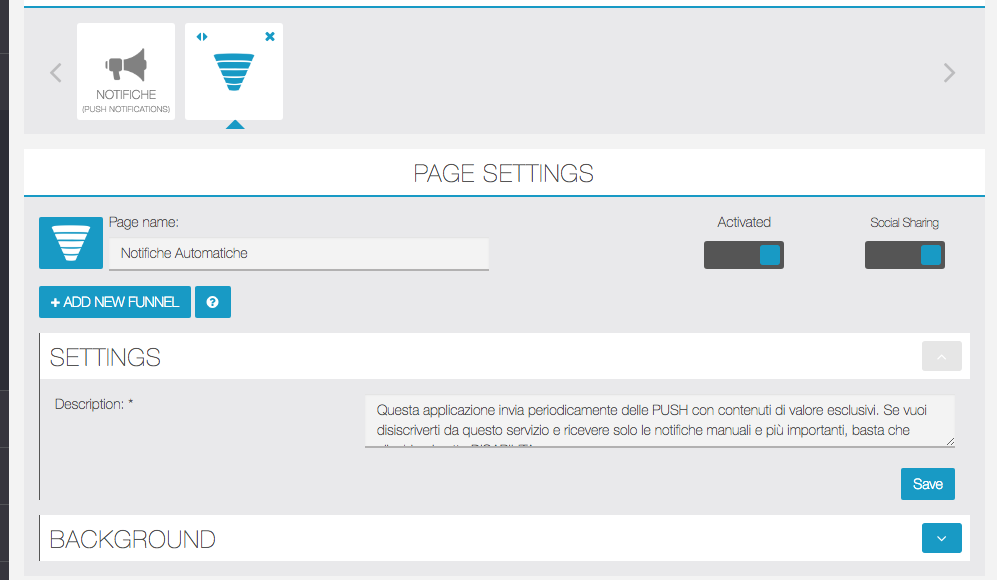
After you enter the description, select ADD NEW FUNNEL as you seen in the example above.
You will now see a new page, as seen in the screenshot below, where you can add possible to add the following details :
- TITLE, is the name of your funnel, useful to find it in the list of funnels you have (yes, you can set many push funnels)
- DESCRIPTION, is a small description that allow you to remember what is doing this funnel.
- TRIGGER, this is the event WHEN the funnel should start, select the one you need from the drop menu.
- STATUS, allow you to ACTIVATE or DISABLE the funnel. When you disable a funnel all new users will be excluded from the funnel, all old users will continue to receive the pushes scheduled. In other words, the DISABLE only affects new users
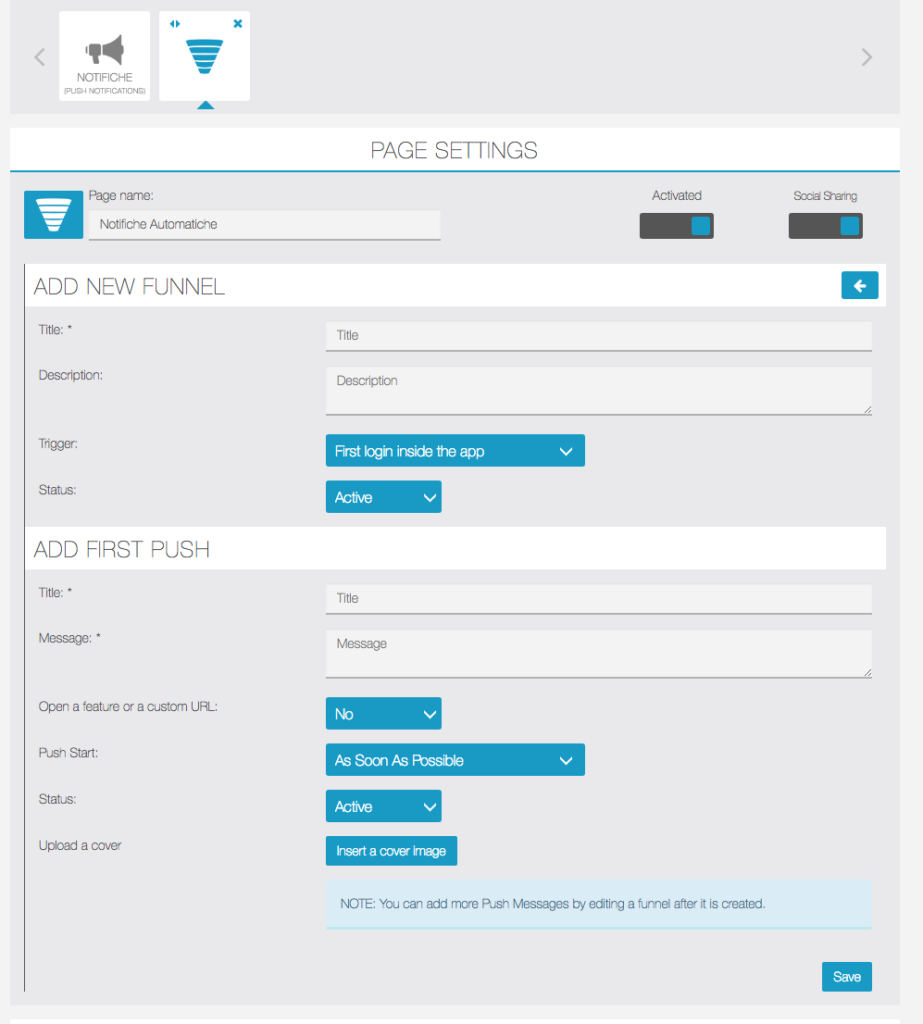
Set the first PUSH:
- TITLE, this is the title of the first push you are setting. This first push will be sent after the trigger/event occurs and according to the delay period set in the configuration (see later)
- MESSAGE, this is the text message of your push. Don’t add a long text, remember it’s a push notification not an email 🙂
- OPEN A FEATURE or A CUSTOM URL, this option allows to bring the user to an URL or a specific page of your APP by clicking the button VISIT of your PUSH notification.
- PUSH START, this is the delay that you set from the event/trigger of this funnel. You can set SOON AS POSSIBLE, HOURS DELAY or DAYS DELAY as you want. The first push will start for example 1 hour later the trigger “first registration of the user”
- IMAGE, you can upload an image that is showed with the push.
In this example, the first push is configured with all the details required:
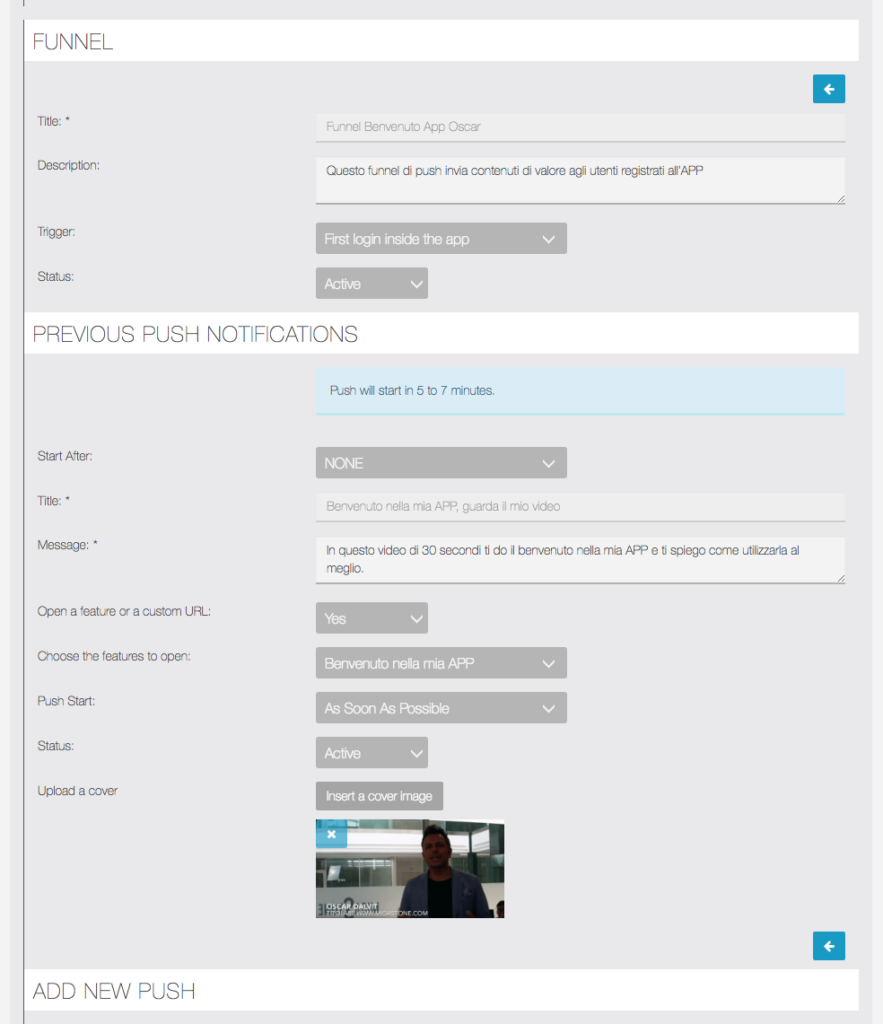
Now you can start to add more pushes, the concept is that every push is linked to a previously one with a “delay” set. You can choose any of the previously configured push notifications as a trigger. In this example you see the ADD NEW PUSH tab:
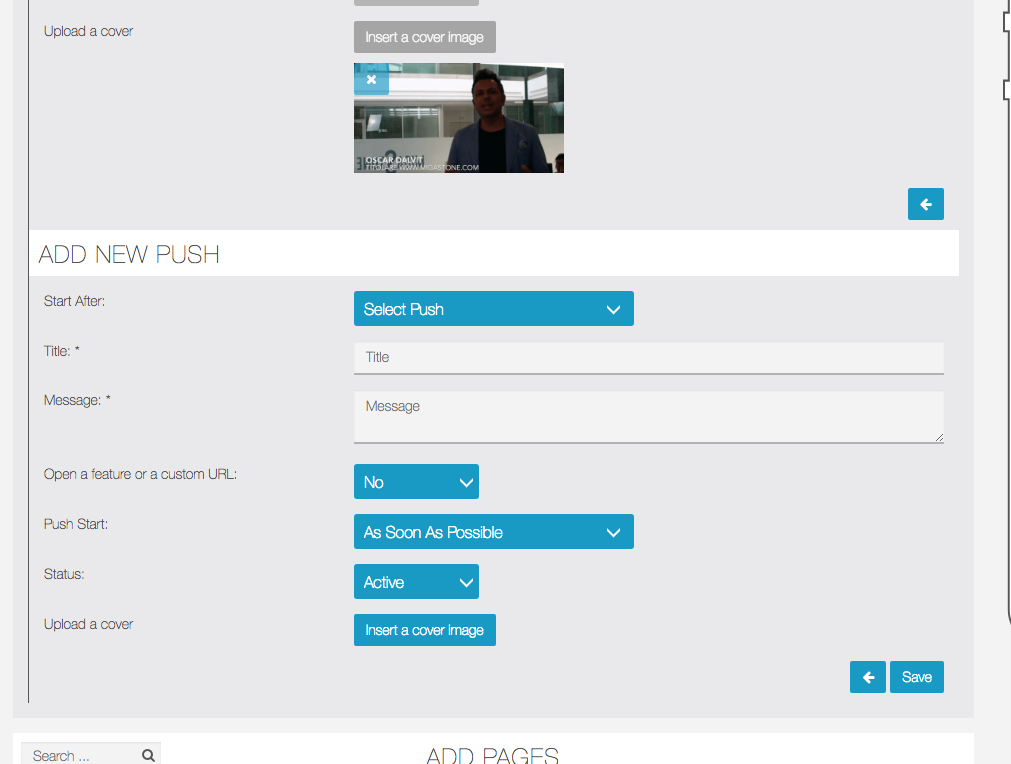
In the next example, START AFTER is a menu that allows selecting one of the previously configured push notifications. But first, in this example there is only one push available, the first one:

After selecting the START AFTER push, we set a delay of 1 day, therefore this new push will start exactly 1 day after the first push message is sent, as illustrated in the example below:
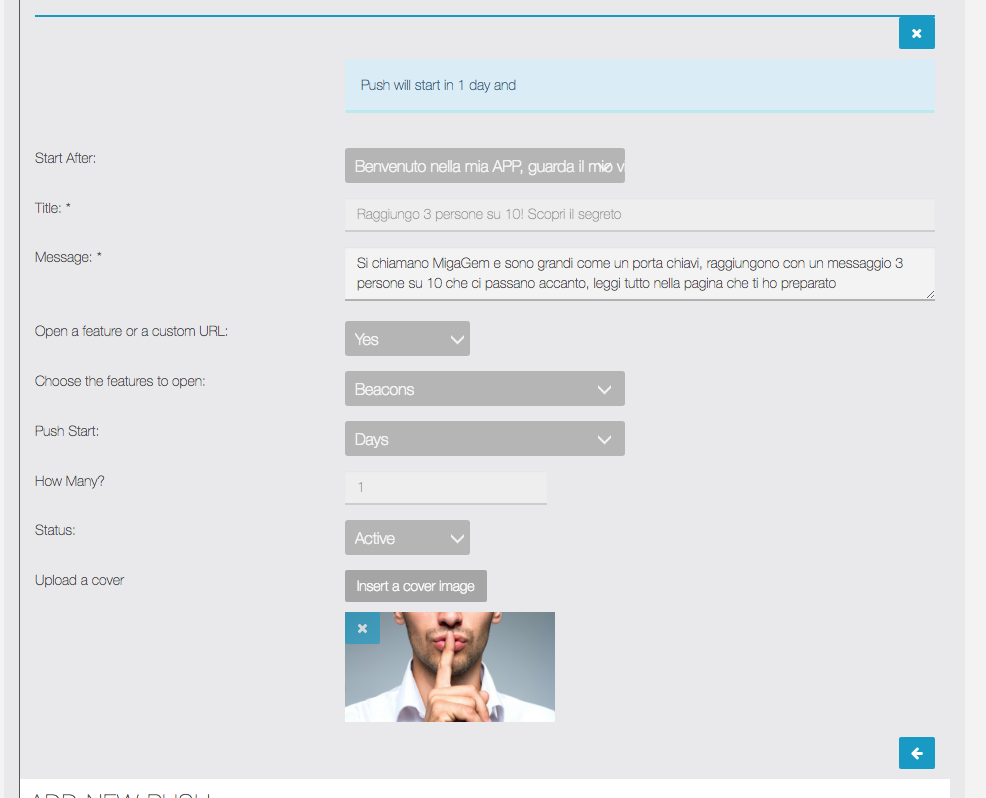
IMPORTANT NOTES:
- All the push notifications scheduled per user are saved in the principal PUSH NOTIFICATION history of push that you normally find in the PUSH NOTIFICATION feature of your APP.
- When a users UNSUBSCRIBE from the push notification service, all the pushes scheduled to reach this user are automatically deleted.
- Every time a PUSH is deleted from a funnel all the scheduled pushes related this specific push are deleted.
- You can only delete a push funnel if there is only the FIRST PUSH so if you want to delete an entire funnel including all configured push messages, first delete all the other stored messages, then you can delete the funnel when only the First Push remains.
Data Import – Saved Funnels
Our Funnelv2 module has the option to import funnel data previously created to use in another funnel or to share with other users that also have the funnel module. This is a great way to re-use campaigns across multiple apps in the same vertical. In some cases, campaigns may be similar in more than one business vertical so it’s possible to deploy this feature quickly with only minor modifications and limited effort.
Import / Export
Now you can export a funnel:

To start export click on ![]() .
.
A window will open to choose the path to download and save the file. The funnelDataExport.zip file will be created and downloaded to the specified path.
To import a funnel ![]() :
:

On “IMPORT FUNNEL” section click on “Choose file” and navigate to the path where you saved the funnelDataExport.zip file.
Email Funnel (Email Campaigns) *For Both Native & PWA
The Funnel v2 module enables the use of email funnels in addition to push notifications. Also, for PWAs, email funnels are the only way to setup automated campaigns triggered by actions in the app
By connecting to some of the more popular email marketing platforms, you can create a robust mobile marketing system within your mobile app. If you need to setup a new email marketing account, consider using a free account at SendinBlue. Have your credentials ready for one of the supported Email Marketing solutions before completing the next section.
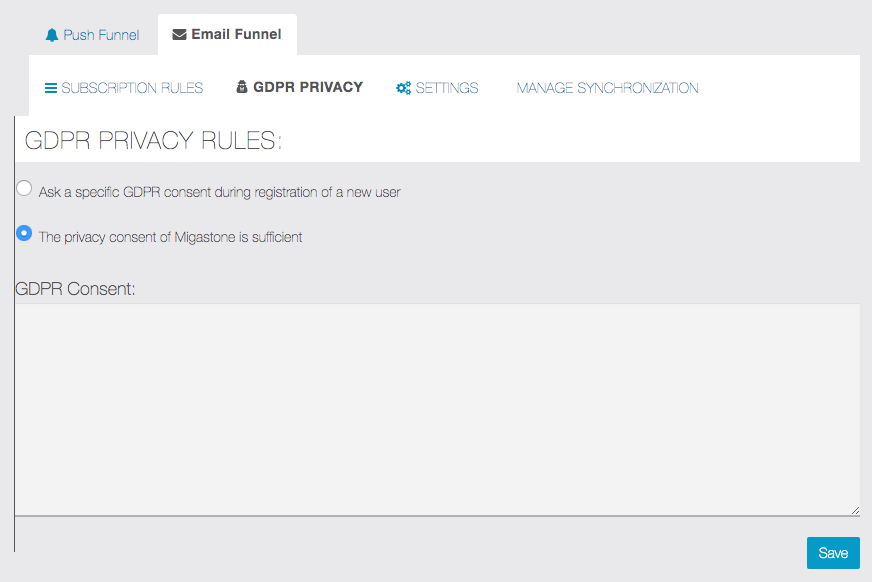
First select GDPR PRIVACY and choose whether to use the default information or customize the message by adding your own text:
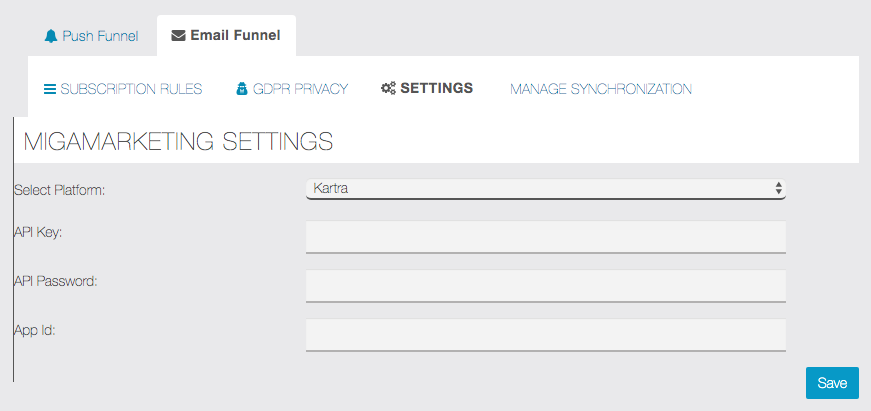
Choose the platform and related access keys, from SETTINGS.
The following platforms are currently supported:
- kartra.com
- mailchimp.com
- sendinblue.com (Our Top Recommendation and “It’s FREE”)
Finally, set the rules for registration. It is possible to select a different list and possibly a different segment for each trigger (action performed by the user in the app). It is however necessary to make the setting for all the triggers present in the list.
Each time an app user performs one of the actions, the associated email address will be imported into the corresponding list of the connected email marketing platform.
Note: List imports are performed during by the automatic synchronization process which occurs periodically throughout the day, so it’s possible that the list updates may not appear immediately on your email marketing system.
Please let us know if you have any questions about this powerful marketing feature and how it could help your business.
** For PWA, please open a ticket to have us mark your Android App as published to enable this feature.
Let Apptekz help you supercharge your mobile marketing today.
