
How to Implement the Appointment Pro Feature
Appointment Pro feature enables mobile apps to provide easy and powerful appointment booking, helping business professionals manage their schedules more efficiently and earn more revenue by keeping their calendar full. App owners can create multiple stores, categories, services, and providers, categorized by type, service or class. Simply define and manage store opening and closing times, along with updates of specific schedules of the service providers according to their availability. The Appointment Pro feature includes a robust branch wise payment system to manage payments, across multiple locations and location based list of providers within the apps, allowing clients and customers to choose the nearest provider to their current location.
Key Features
- Appointment Scheduling for Businesses & Professionals
- Class & Workshop Booking (Classes, Workshops & Events with multiple bookings per time-slot)
- Ideal for Fitness Centers, Gyms, Yoga, etc
- All-in-one Calendar
- Automatic Confirmation
- Email Reminders
- Accept Payments (Prepayment & COD)
- Apply Cancellation Fees
- Analytics & Reports
- Home Screen Customization
- Progressive Loyalty System integration
Premium Features
- Google Calendar Sync (new)
- Class & Workshop Booking
- GPS Distance Calculation to nearest booking location
- Branch-wise payments for multiple location payment management
- App Owner, Manager, or Provider can manage bookings from within the mobile app
Appointment Pro is an Automated Booking Machine
Appointment Pro can send push reminders before each scheduled appointment to reduce missed appointments. Default reminders are set for 1 hr before the appointment time but clients using the app may adjust according to their individual needs.
Appointment Pro is integrated with the Progressive Loyalty Card to create a customized loyalty rewards program that allows points to be accumulated with every booking that is made automatically, and used to encourage future business. This feature is ideal for transactional businesses that offer paid bookings. Please note that the Progressive Loyalty Card feature must be installed and properly configured before assigning loyalty points to any booked services.
Appointment Pro includes an advanced new feature that provides a branch wise payment option to manage payments across multiple locations. Payments can be managed centrally, semi-centrally, and separately (Branch wise). All controls are provided within the booking platform, reducing both complexity and expense.
Using Google Maps with Appointment Pro
Another new and innovative features we’ve added is the distance calculation feature, showing distance between business branches and the app user’s current location. Note: Verify this is working before allowing customer access to the app.
To activate the distance indication feature it is necessary to obtain and properly enter a Google Maps JavaScript API Key for each Mobile App that will be configured with the Appointment Pro feature.
- Step 1 – Obtain the Google Maps JavaScript API Key for your App
- Step 2 – Login to the Mobile App Editor
- Open the Mobile App to be configured
- From Left Menu > Settings > API Keys > Google Maps settings
- Enter the Google Maps JavaScript API Key created in Step 1
Order Cancellation and Chargeback Fees
Another new and unique feature being introduced with Appointment Pro is especially for business owners. Sometimes customers or clients pay through different payment modes that are chargeable on a transaction basis and if they later cancel the booking after payment, the business owners may incur chargeback fees. We now offer the option for the business owner to mitigate these losses with a new ‘Cancellation’ option which allows the app owner to apply cancellation charges when bookings are cancelled based on a user defined % of the amount charged. While not a mandatory option, this will be important for many businesses.
Configuring the Appointment Pro Feature
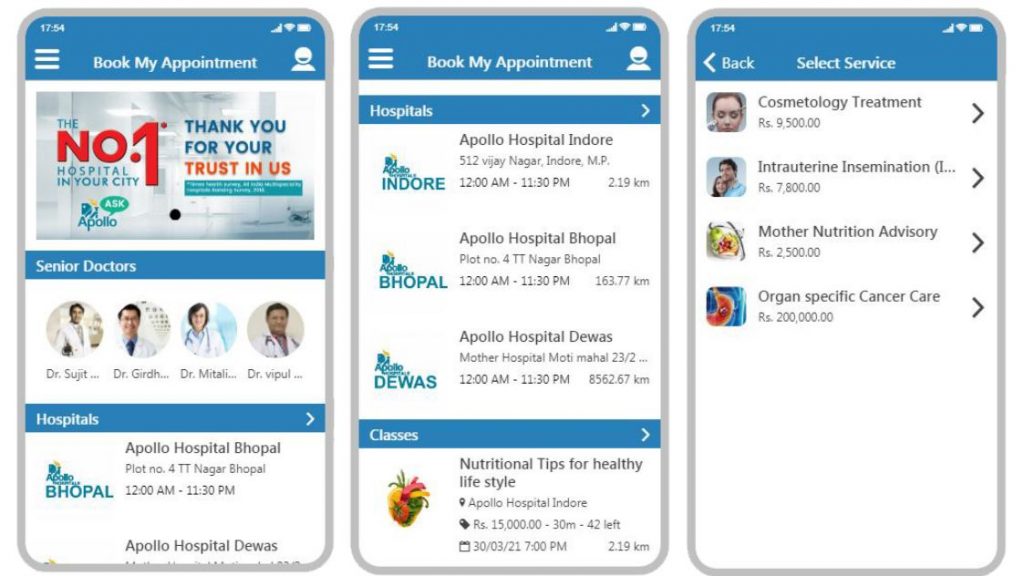
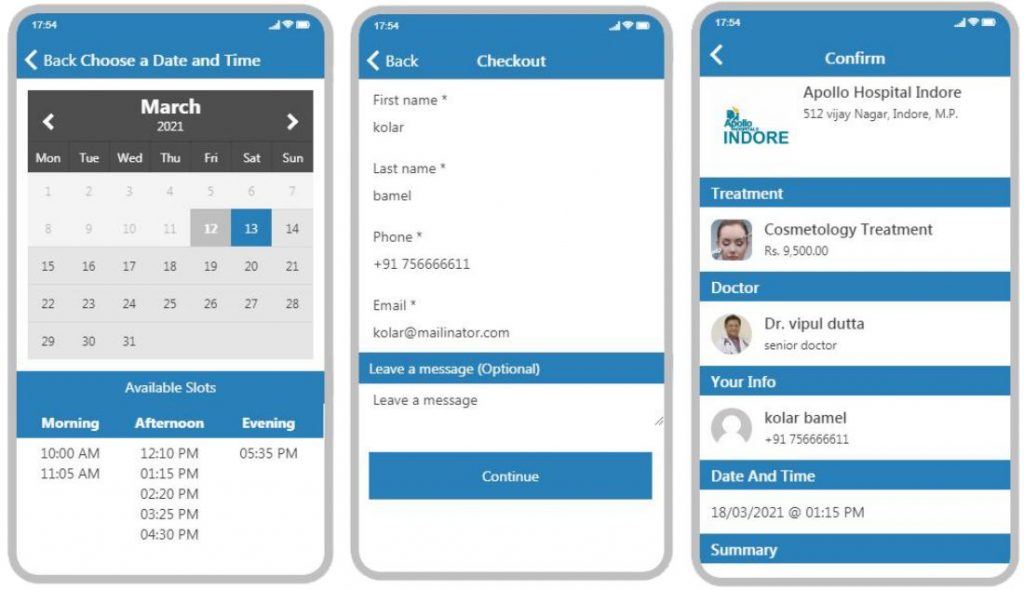
Let’s begin by looking at how an app might appear with a fully configured Appointment Pro feature enabled.
Mobile App Screenshots
Settings Tab
Easily manage all Booking, Payment, Date & Time, Cancellation, Notification, and Currency settings. This should be configured before moving to the others steps. These settings can be changed later if needed.
Home Screen (for the booking feature inside the app)
From the Home screen section, you can manage the Slider, Popular Provider, List Design, Location sorting.
1) Check/Uncheck Enable Slider to enable or disable the Slider from App’s home screen.
2) Check/Uncheck Enable Popular Provider to enable or disable display of Providers from App’s home screen.
3) Check/Uncheck Enable Top Category to enable or disable display of Categories from App’s home screen.
4) List Design changes HomeScreen view of the app to list or card style.
5) Default location sorting displays branches according to distance from end-user’s current position, Alphabetical (Alpha) other according to branch name wise and according to created date wise by selecting any of the sorting types from drop-down list.
Booking Settings
Manage Admin’s Email, Booking Type, Booking, and enable/disable Auto Accepted Bookings.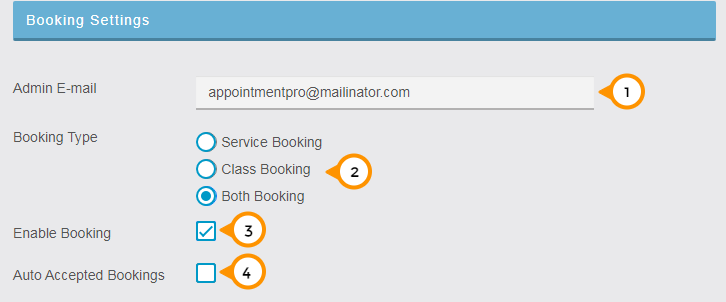
1) Add or update the admin’s email address to receive relevant updates and notifications.
2) Select booking type according to service categorization as Service booking, Class booking, or Both.
3) Check/Uncheck Enable Booking to enable or disable booking in the app.
4) Check/Uncheck Auto Accepted Bookings – If selected, individual bookings are automatically accepted.
Payment Setting
Manage all payment-related options: Price Hide, Online Payment, Offline Payment, Display Tax, Tax Percentage, PLC points.
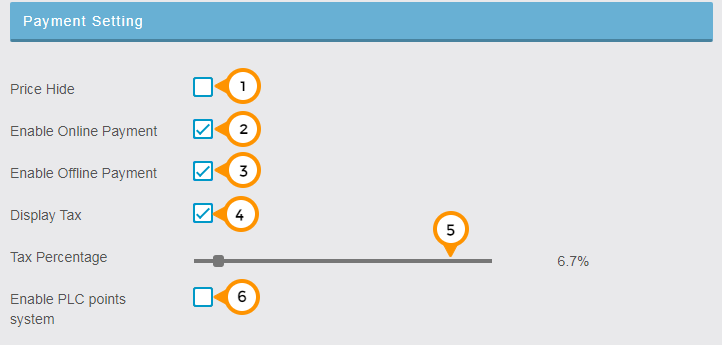
1) Check/Uncheck Price Hide check box to show or Hide the services’ price from the app.
2) Check/Uncheck Enable Online Payment check box to enable or disable online payment options from the app during service booking.
3) Check/Uncheck Enable Offline Payment check box to enable or disable offline payment options from the app during service booking.
4) Check/Uncheck Display Tax check box to show or Hide Tax charges from the app.
5) Drag the tax percentage bar to change the applicable percentage of tax of the services or set the tax percentage by using navigation keys of your keyboard by clicking on the bar point and press UP/DOWN (or) LEFT/RIGHT keys to increase/decrease percentage value.
6) Check/Uncheck Enable PLC points system to enable or disable use off features of the Progressive Loyalty Card.
Date, Time Format, and Distance Setting
Manage Time & Date Formats, and Distance Units.
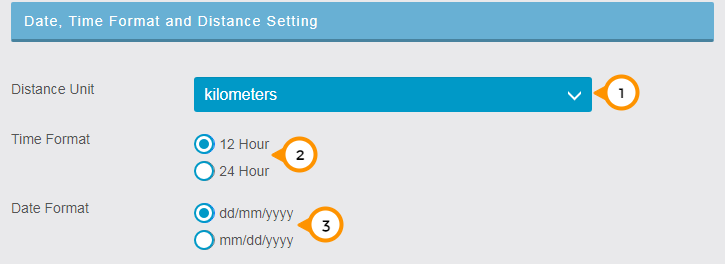
- Click on Drop and Down menu to change the distance display format in the app.
- Click on bullet buttons to change the Time display format in the app.
- Click on the bullet button to change the Date display format in the app.
Cancellation Setting
Manage the Criteria, Charges, and Cancellation Policy of Services and Classes.
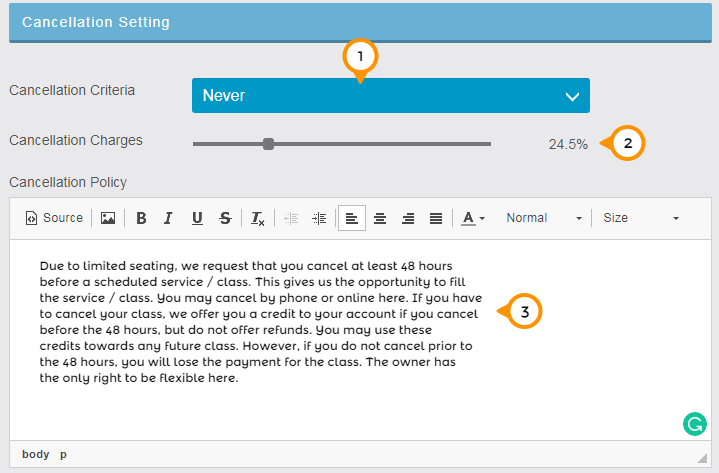
- Click the drop-down menu to select the cancellation criteria from the available options. (Never, Always, Hour/s before, the day before, and the week before).
- Drag the cancellation charges percentage bar to change the applicable percentage of cancellation charges on the services and classes or use the navigation keys of your keyboard just click on the bar point and press UP/DOWN (or) LEFT/RIGHT keys to increase/decrease the percentage value.
- Write terms and conditions regarding cancellation of booked services and classes. Customize the message by adding images, formatting text, and more with our full featured text editor.
Currency Options
Currency options provides management of the position, Decimal separator, Thousand separator, and Number of decimals to display based on location requirements for business locale.
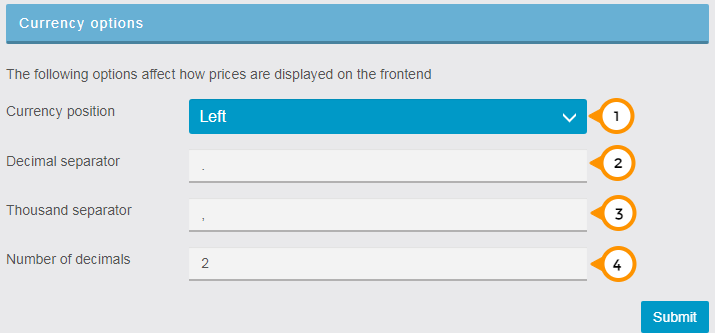
- Click the drop-down menu to select the position of the currency symbol for price display.
- Set or change the decimal separator symbol of the price display in the app.
- Set or change the thousand separator symbol of the price display in the app.
- Set or Change Decimal format of the price display in the app to show the number of digits after decimal.
Payment Method
Manage and Setup Payment Gateways.

Paypal
Manage or set up PayPal payment system.
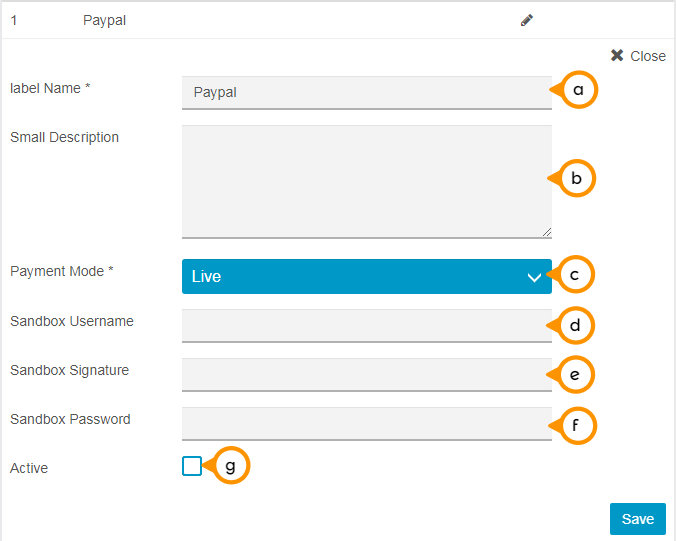
a) Add a label name of Paypal gateway.
b) Small description about transaction conditions, offers, instructions, etc.
c) Click the drop-down menu to change payment modes of the Paypal gateway
d) Enter the Username of your Paypal active account.
e) Signature values of your Paypal active account.
f) Enter the password of your account to connect to the Paypal gateway.
g) Check/Uncheck on the ‘Active’ check box you can enable or disable the Paypal gateway from the app’s payment option.
Stripe
Click the edit icon to manage or set up the Stripe payment gateway system.
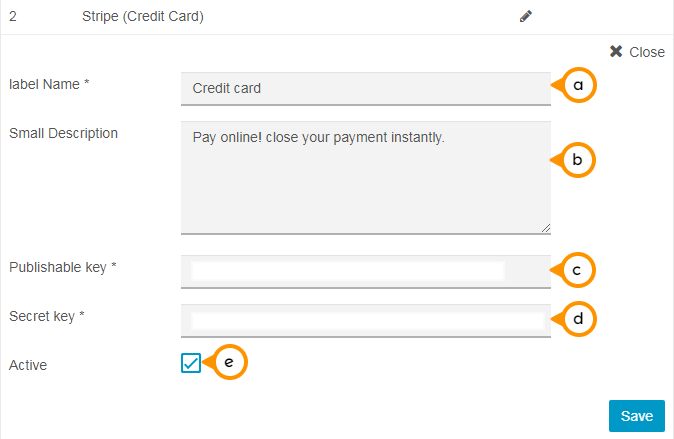
a) Change the label name of Stripe gateway according to your choice.
b) Enter Small description of transaction conditions, offers, instructions, etc. related to your payment gateway.
c) Enter the Publishable Key of your Stripe active account.
d) Enter the Secret Key of your Stripe active account.
e) Check/Uncheck ‘Active’ to enable or disable the Stripe gateway from the app’s payment options.
Cash
Click the edit icon, to manage the cash payment.
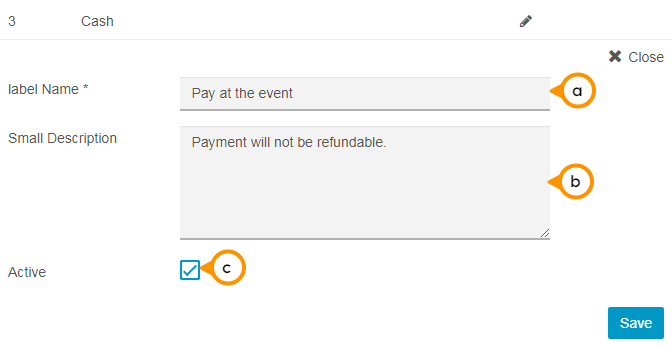
a) Change the label name of Cash Mode of payment.
b) Enter Small description about offers, instructions, etc.
c) Check/Uncheck ‘Active’ to enable or disable the cash mode of payment from the app’s payment options.
Sliders Tab
From here you can add, change, or manage sliders.
Create a New Slider
By click on a Plus icon, you will able to add a new slider to your app.
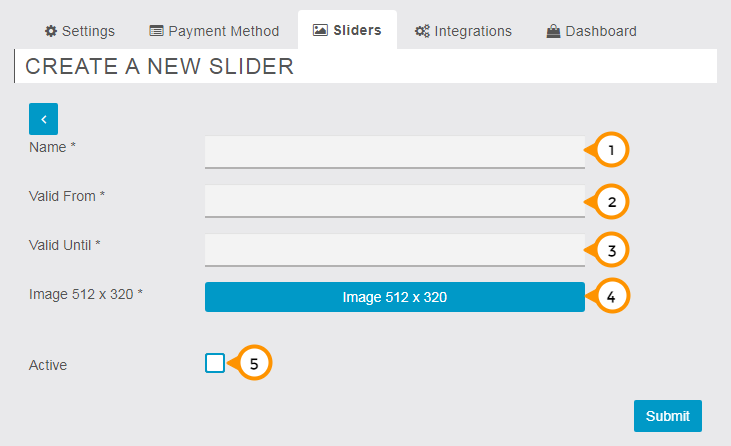
- Enter the name of the slider.
- Enter the start date of the slider to be displayed.
- Enter the Last date of the slider to stop being display.
- Click on the Image button to upload the slider image. (image size should be 512 x 320 px)
- Check/Uncheck ‘Active’ to enable or disable the slider from the app’s home page.
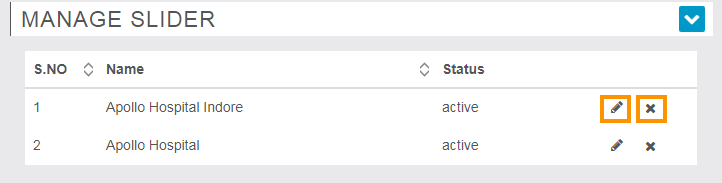
Manage Slider
Manage existing sliders in the app by clicking the edit button or by clicking on the ‘X’ button, to remove existing sliders from the app.
Integrations
The Web URL or embed code enables businesses to accept Bookings through Appointment Pro on their website or any application that can accept either the link or HTML embed code.
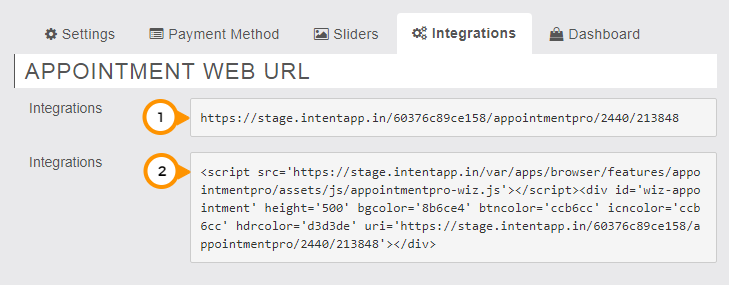
- Direct access URL of your appointment page in the mobile application.
- Embedded code to copy and paste to show the Booking Page on the business website or any place that you can insert HTML source code. (HTML pages, apps, etc.)
** For a desktop view, it may be necessary to modify the width and height parameters in the embed code.
After you see the line of code id=”wiz-appointment” height= “500′ try changing height value to 1150
Then add width=”100%” in front of the height parameter. This should improve the view on a desktop viewed website.
Now that section of code should look like this: id=”wiz-appointment” width=”100%” height=”1150″ the height can be adjusted to get the look you need but the width at 100% should be fine.
Manage Labels
From here you can change the labels name according to customer’s business or app requirements. For example, a salon business might prefer the Business Provider = Hair Stylist, Location = Parlor or Salon, Services = Products, and Category = Package, etc.
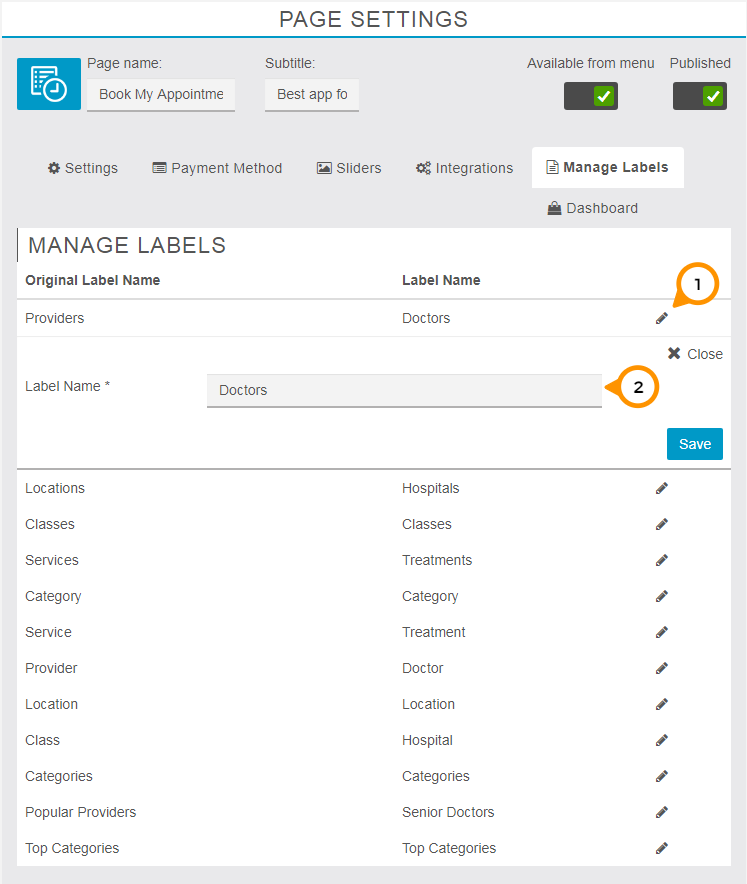
- Change the name of the default labels to customize the app labels to match your particular needs.
- Enter the new label name as needed then click the save button to apply the changes.
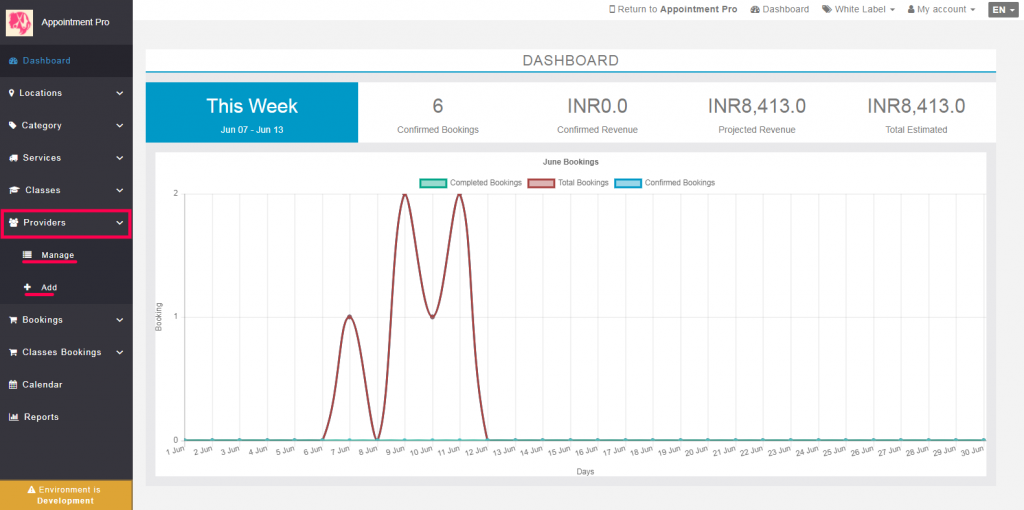
Dashboard
The Dashboard provides the ability to manage the complete business related aspects of the appointment system. Create and manage Locations, Categories, Services, add and manage classes, providers, and all types of bookings, The Dashboard also provides the Booking Calendar and notification management, as well as Business Reports to analyze booking related revenues.
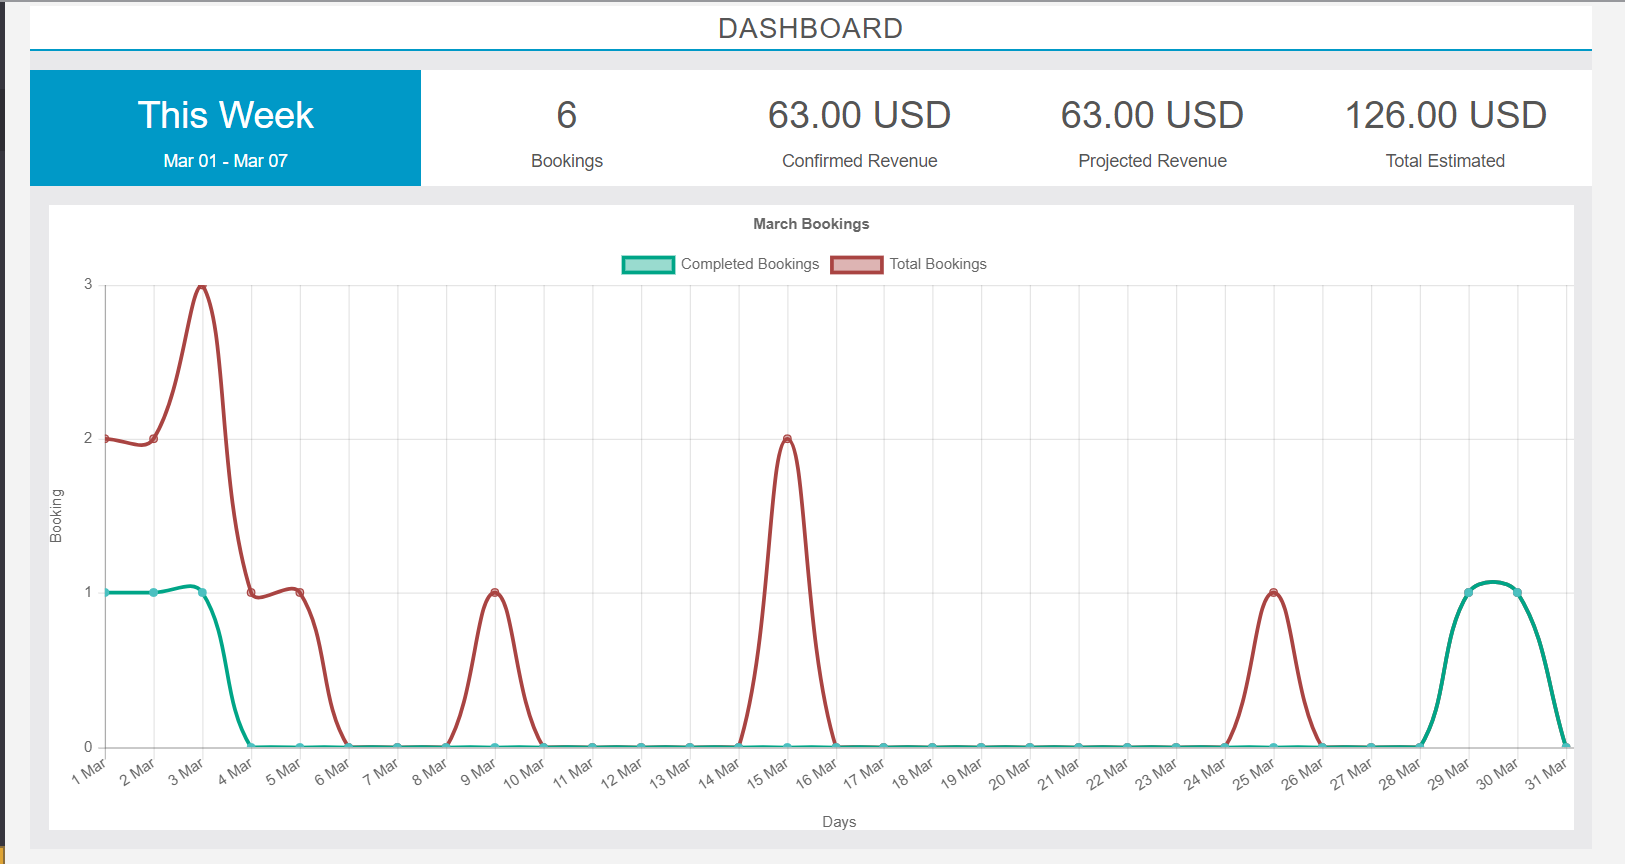
Default view shows the information of the current week revenue estimation from Monday to Sunday in increasing order as shown in the image above. The available info includes total successful bookings, confirmed revenue of the week till the date, projected revenue which means the forecasted value of revenue which may be changed according to the successful completion of booking, Total estimated revenue.
The graphical analysis display area on the dashboard shows the total bookings by a red color line and completed bookings by green color lines. The analysis chart shows data of a complete current month on the dashboard.
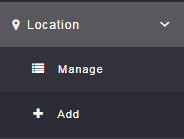
Location
By Location tab, you can Manage the existing locations or Add the new locations.
Add Location
Add new business locations for delivery of services and classes and configure payments by branch, if desired.
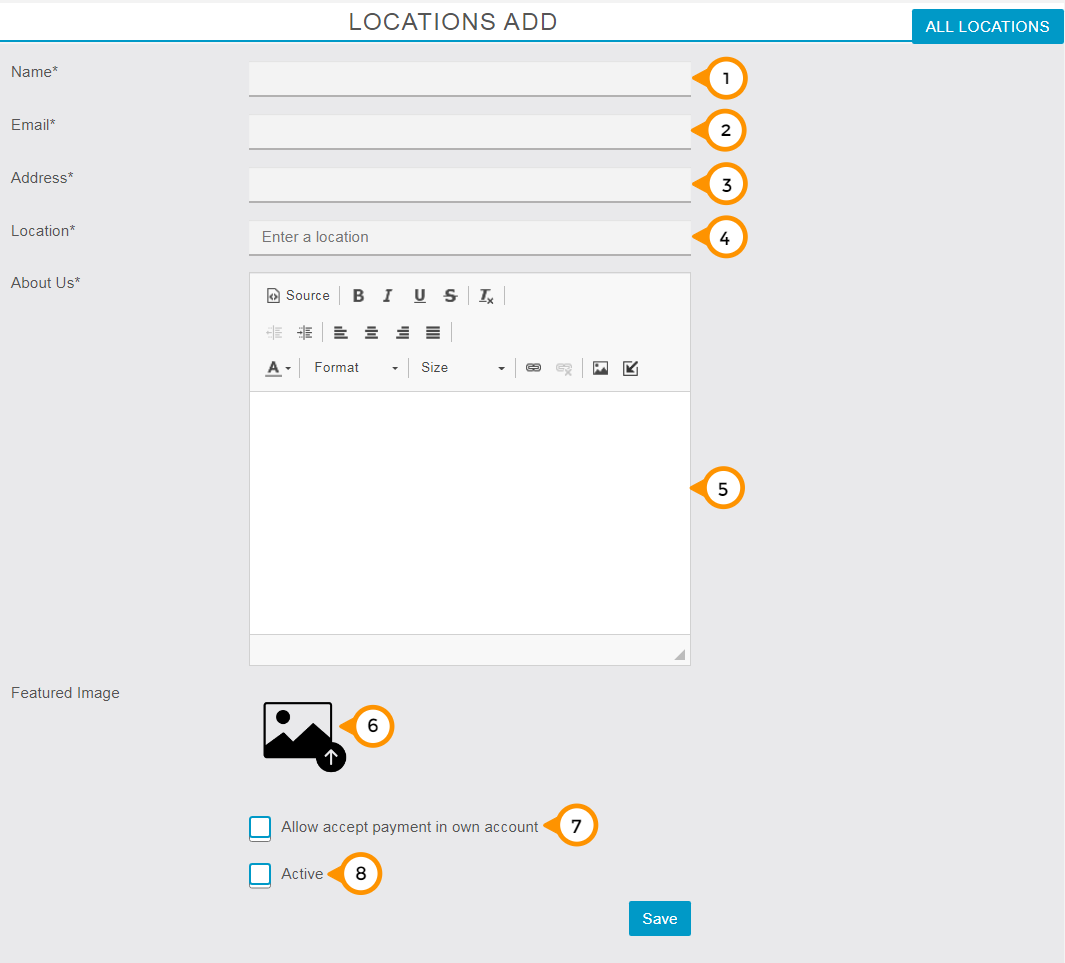
- Enter your location name.
- Enter the email address of the store or branch manager to get the updates via email.
- Enter the address of your location here so that your clients will find your location.
- Enter or select the suggested Geolocation of your branch to show the accurate distance from the app user.
- Enter info about the business and services you are offering.
- Upload a featured image of your location.
- Check the box to enable the accept payment in own account for location based branch-wise payments so the customer payments go directly to the branch’s account instead of the primary admin’s account.
- Note: if you have not set up any payment settings on a particular location and select allow accept payment in own (location) account, it will not be able to complete a paid booking due to lack of payment settings and the user will get a message to show no payment gateway is available.
- Check/Uncheck to enable or disable the location for accepting bookings in the App.
Category
Manage existing category or add a new category.
Add Category
Add a new category of Services or Classes to the app.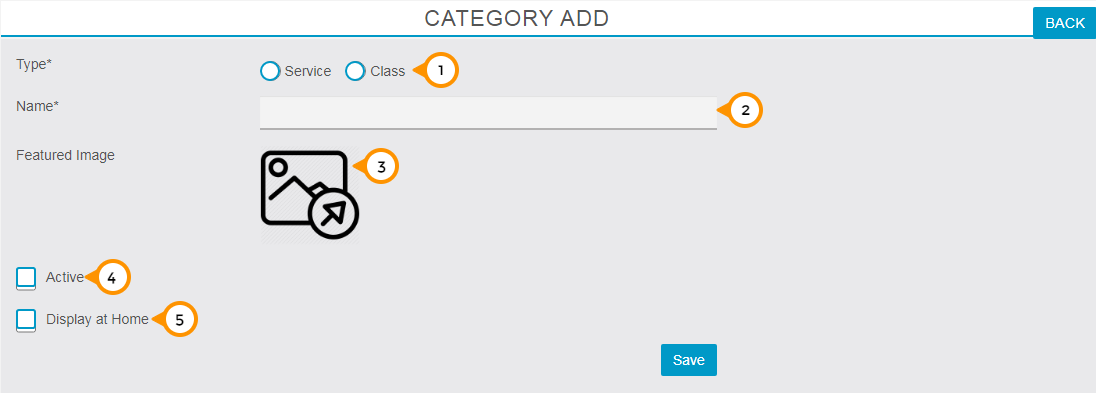
1) Select the type of appointment booking: Service or Class
2) Enter the name of your category for the service or class.
3) Upload the feature image of your category.
4) Check/Uncheck ‘Active’ to enable or disable the particular category in the app.
5) Check/Uncheck ‘Display at Home’ to can enable or disable to display the particular category on app’s home screen.
Service
Manage existing or add new services.
Add Services
Add the new business services for bookings.
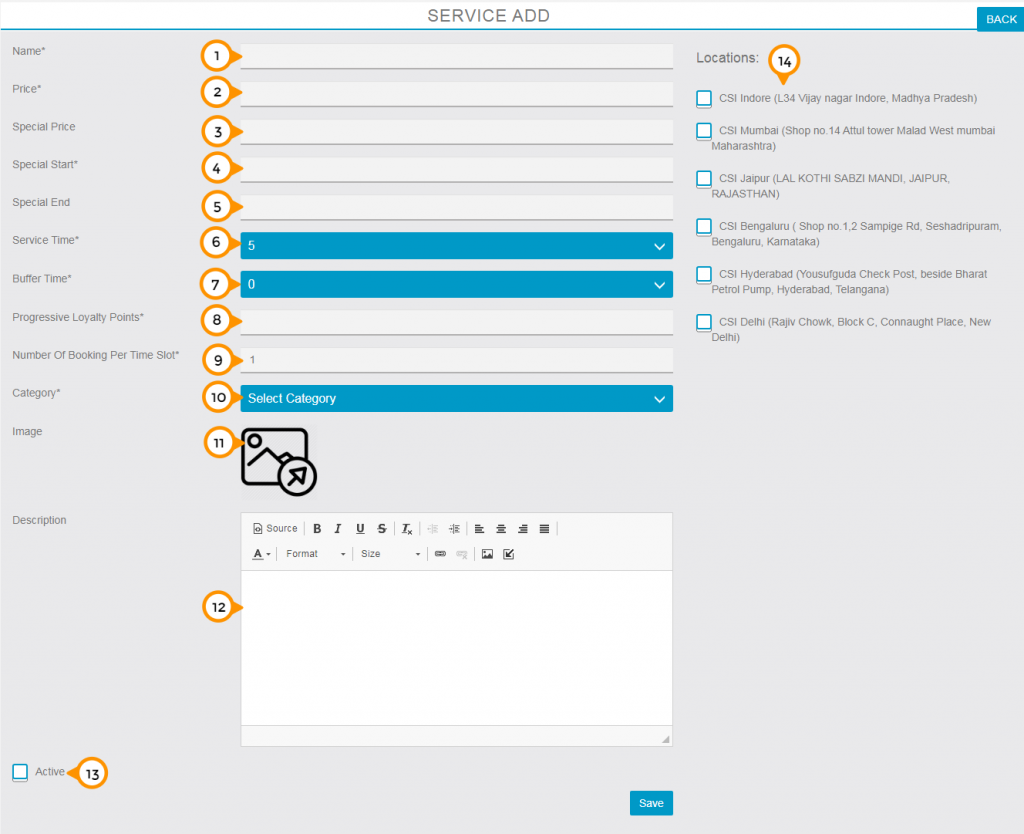
1) Enter the name of your service.
2) Enter the price of your service as per single delivery to the client.
3) Enter a special price for a promotional offer.
4) Enter the start date of your service offer period.
5) Enter the end date of your service offer period.
6) Enter the service time according to per service delivery basis.
7) Enter the buffer time required to prepare for the next appointment or to avoid overlap.
8) Enter the progressive loyalty points you to transfer for each successful service delivery if using a Progressive Loyalty feature.
9) By default, it’s set at one but you can change the Number Of Booking Per Time Slot to meet requirements to allow multiple bookings during the same available time slot.
10) Select the category of the service from the drop-down menu.
11) Upload the image of your service.
12) Enter a brief description about the service.
13) Check/Uncheck ‘Active’ to enable or disable the particular service in the app.
14) Check/Uncheck “Location’s” cto enable or disable the service on the particular locations.
Classes
Manage exiting or add new classes.
Add Classes
Add new Classes.
1) Enter class name.
2) Select location for class delivery from the drop-down menu.
3) Select the provider for the class from the drop down menu.
4) Enter the price of the complete class or complete course of the class.
5) Enter the special price for a promotional offer, if desired,
6) Enter the start date of your class offer period.
7) Enter the end date of your class offer period.
8) Set the limit of available seats for class.
9) Enter the number seats per user to control the number of seats to sell in a single booking order.
10) Enter the class duration for each session.
11) Enter the progressive loyalty points to transfer on each successful service delivery, if using Progressive Loyalty Card.
12) Enter the category of the class.
13) Enter the date to start to delivery of the class.
14) Enter the date that class will end.
15) Enter the daily class time at a particular location.
16) Upload an image of the class.
17) Add the details and course content description for the class.
18) Check/Uncheck ‘Active’ to enable or disable the particular class in the app.
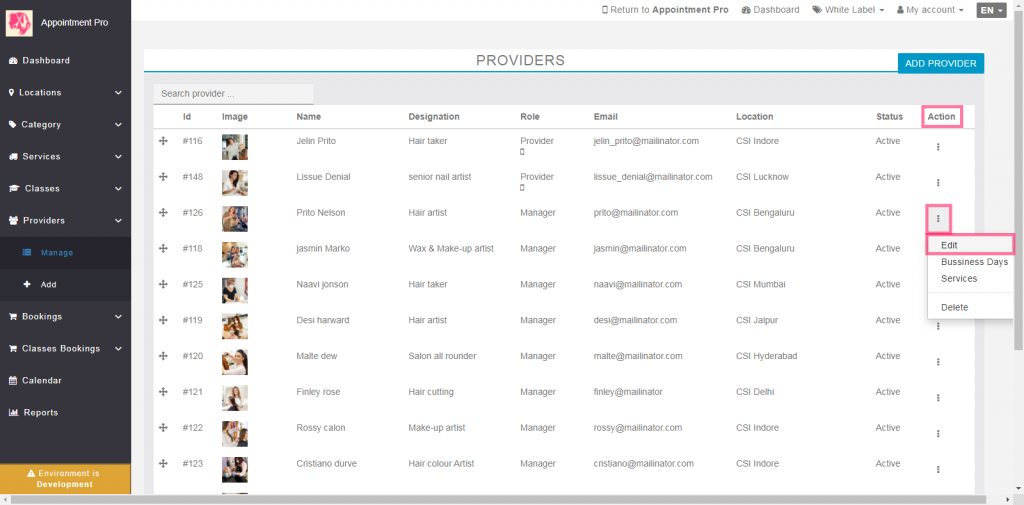
Providers
Manage exiting Providers or add new Provider(s)
Add Provider
Add a new Provider to the business.
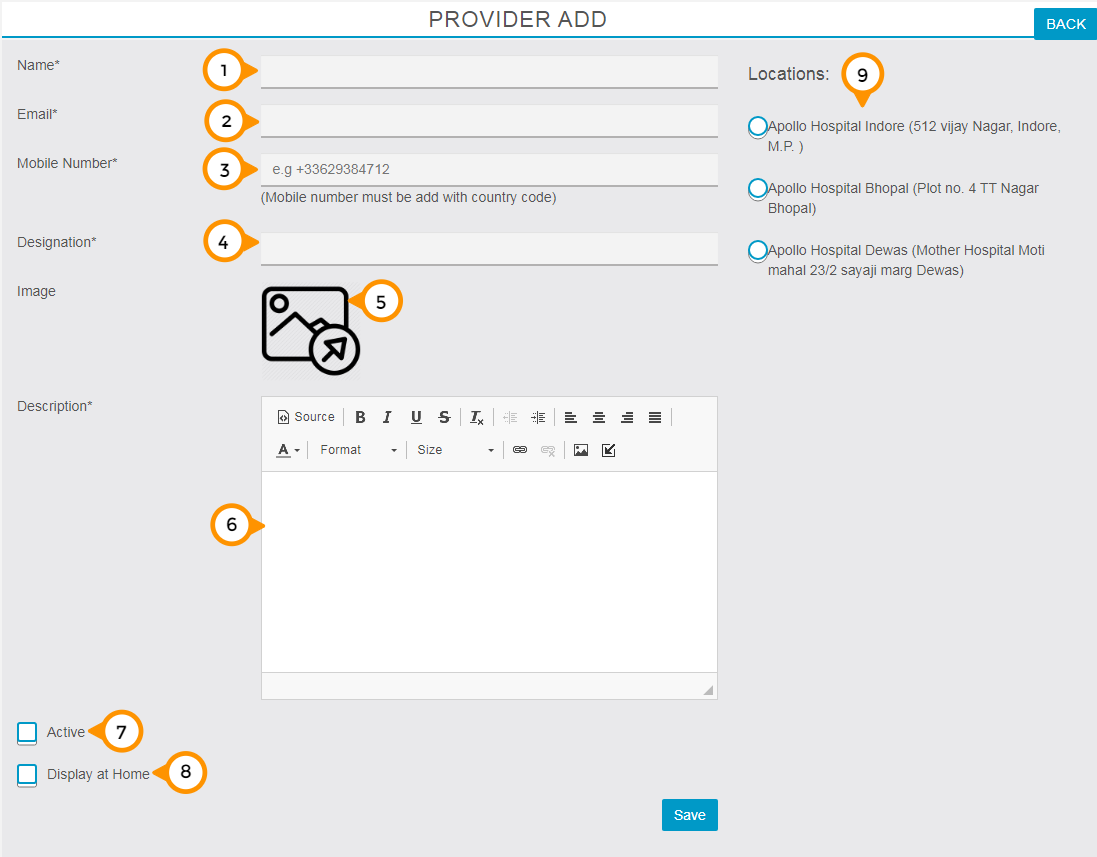
1) Enter the name of the provider.
2) Enter the email address of the provider to get updates via email.
3) Enter the mobile number with country code of the provider.
4) Enter the designation of provider.
5) Click on image icon to upload the profile image of the provider.
6) Enter a short description about provider.
7) Check/Uncheck on ‘Active’ check box you can enable or disable the provider in the app.
8) Check/Uncheck on ‘Display at Home’ check box you can enable or disable to display the particular provider on app’s home screen.
9) Click on bullet button to assign any of the locations to the provider.
Bookings
Manage all the bookings (Today / Upcoming / All) (bookings can also be added from dashboard).
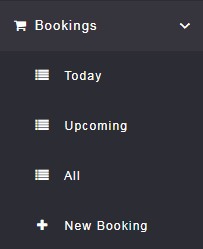
Today
View and manage Today’s appointments for ease to handle service delivery schedule of the day.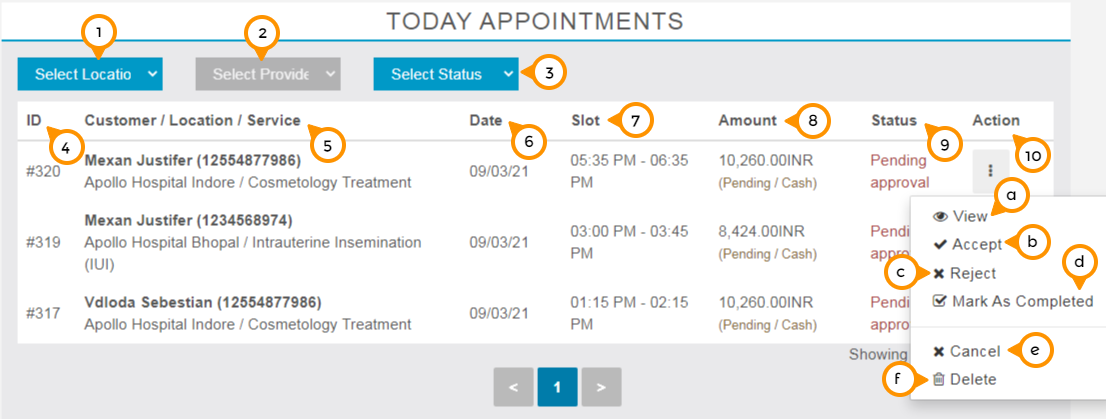
- Apply the filter by location by selecting the location from the drop-down menu.
- Apply the filter by providers by selecting the provide from the drop-down menu.
- Apply the filter on the basis of appointment status like: Accepted, Pending, completed, Rejected, etc. by selecting the status from the drop-down menu.
- From the ID column you can get the unique identification number of the appointment.
- Details about Customer’s name, Location of appointment and service taken by the customer.
- Date of the appointment (current date).
- Slot column gives details about the slot timing of the booking.
- Amount details for the receivable amount of the particular booking.
- Current Status of the booking.
- Click on the three dots in setting tab to manage the booking completely.
- View: By click on ‘view’ under the setting menu you can able to view the complete details of the appointment. i.e. Booking, Payment, Customer, and service.
- Accept: By Click on ‘Accept’ under the setting menu you will accept the booking and prepared for delivery.
- Reject: By Click on ‘Reject’ under the setting menu you will deny accepting the booking or in the case booking requests are not matched at the moment.
- Mark as completed: By Click on ‘Mark as completed’ under the setting menu you will update the booking status as completed. Note: In the case of COD payment mode by default we treated payment received with completion of booking.
- Cancel: By Click on ‘Cancel’ under the setting menu you will cancel the booking by your side. The user has the freedom to cancel the booking by his side too depends on your cancelation settings.
- Delete: By Click on ‘Delete’ under the setting menu you will remove the booking from the platform.
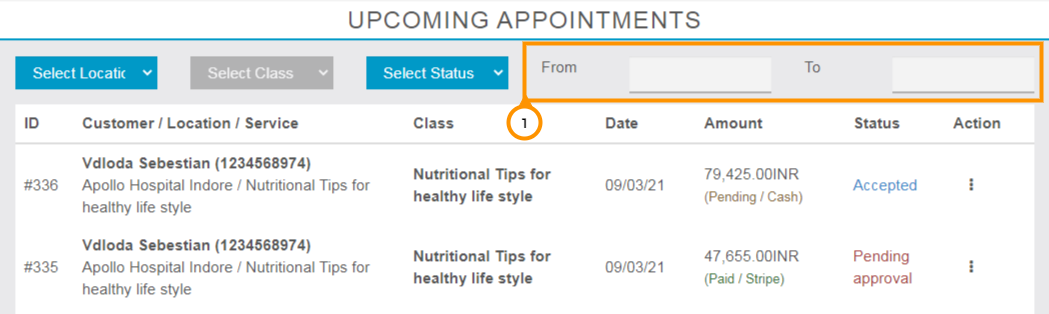
Upcoming
From here you can able to see and manage all the upcoming appointments for ease to handle all upcoming deliveries.
all the elements of the upcoming section are the same as today’s section that we have seen above.
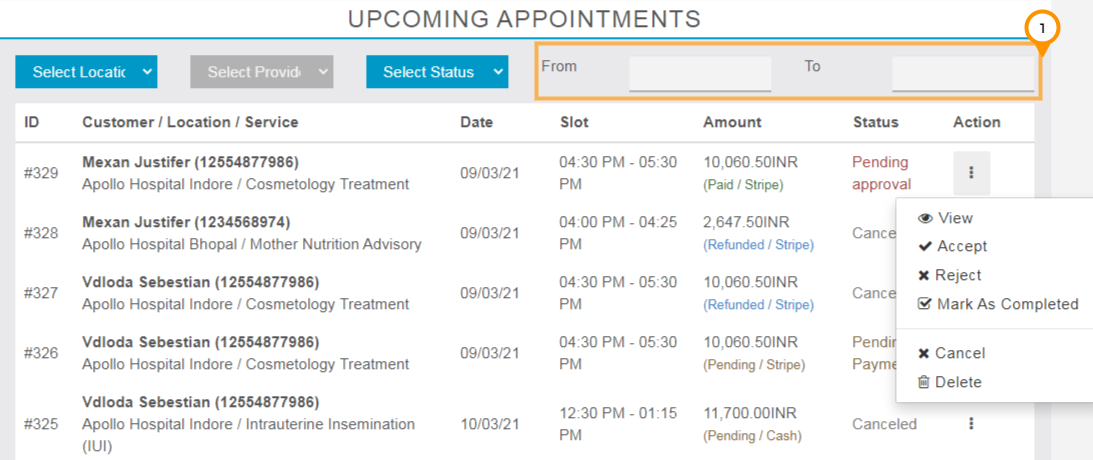
1) Enter the date range according to your needs to view the data accordingly.
All
View and manage all bookings from all locations & providers, old or new.
All the elements of this section are the same as today’s section that we have seen earlier.
New Appointment Booking
Generate the booking from Dashboard for Provider or Client.
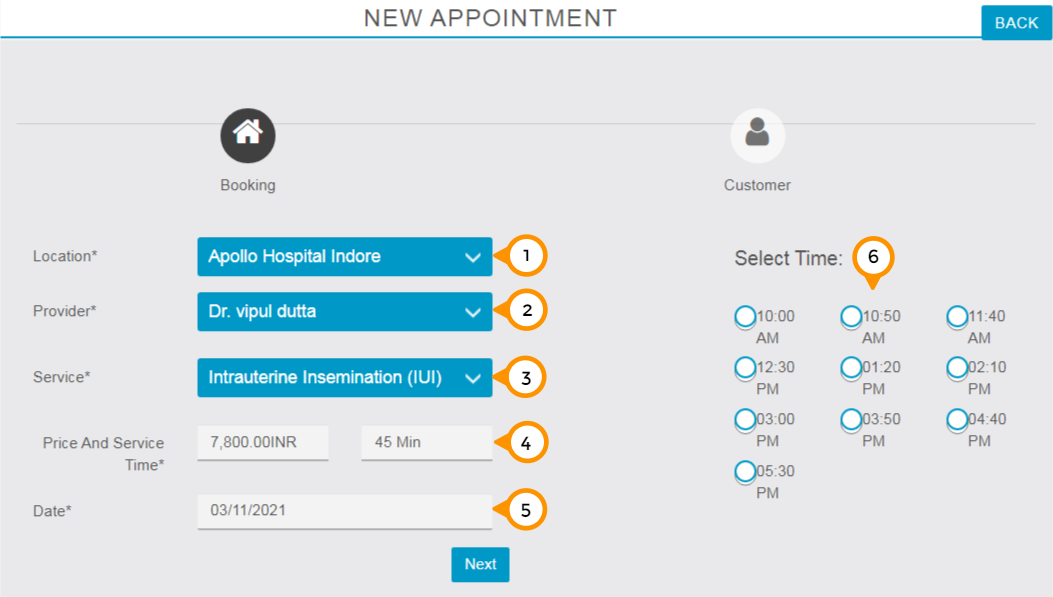
- Select Location from drop-down menu.
- Select Provider from drop-down menu.
- Select Service.
- Price and Service time will automatically get populated here.
- Select the date of booking from the popup calendar.
- Click on the bullet button to select any of the slot display.
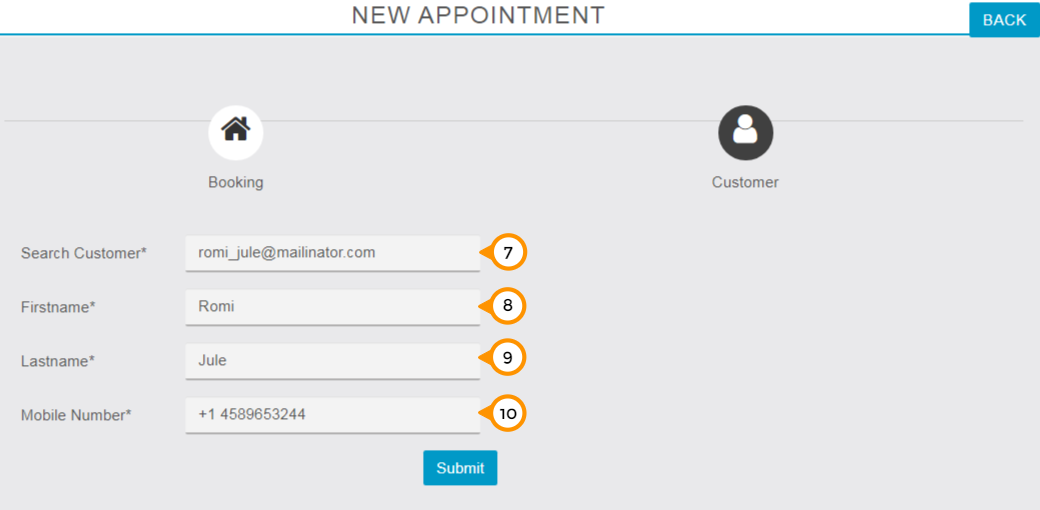
7) Enter the customer’s email ID.
8) Enter the first name of the customer.
9) Enter the Last name of the customer.
10) Enter the customer’s mobile number and click the “Submit” button to generate a booking.
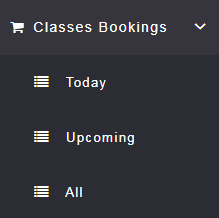
Classes Booking
Manage all bookings (Today / Upcoming / All).
Today
Manage Today’s Appointments & Classes of the day.

- Apply the filter by location by selecting the location from the drop-down menu.
- Apply the filter by class
by selecting the class from the drop-down menu. - Apply the filter on the basis of appointment status like Accepted, Pending, Rejected, etc. by selecting the status from the drop-down menu.
- ID column shows the unique identification number of the appointment.
- View appointment details – Customer’s name, Location of appointment and class taken by the customer.
- View Class name of the booked appointment.
- Date of the appointment (current date).
- View details about the receivable amount of the particular booking.
- Status column shows the current status of the booking.
- Click on the three dots in setting tab to manage the booking completely.
- View: By click on ‘view’ under the setting menu you can able to view the complete details of the appointment. i.e. Booking, Payment, Customer, and service (Class).
- Accept: By Click on ‘Accept’ under the setting menu you will accept the booking and prepared for delivery.
- Reject: By Click on ‘Reject’ under the setting menu you will deny accepting the booking or in the case booking requests are not matched at the moment.
- Cancel: By Click on ‘Cancel’ under the setting menu you will cancel the booking by your side. The user has the freedom to cancel the booking by his side too depends on your cancellation settings.
- Delete: By Click on ‘Delete’ under the setting menu you will remove the booking from the platform.
Upcoming
From here you can able to see and manage all the upcoming appointments for ease to handle all upcoming deliveries.
all the elements of the upcoming section are the same as today’s section that we have seen above.
1) Here you can enter the date range according to your requirement and fetch the data accordingly.
All
Manage all the bookings no mater here that the bookings are old or new.
All the elements of this section are the same as today’s section that we have seen earlier.
Calendar

View entire App bookings from individuals and all the locations of the business. Bookings can be managed directly from here.
View, Accept, Reject, Mark as Completed, Cancel, and Delete the booking.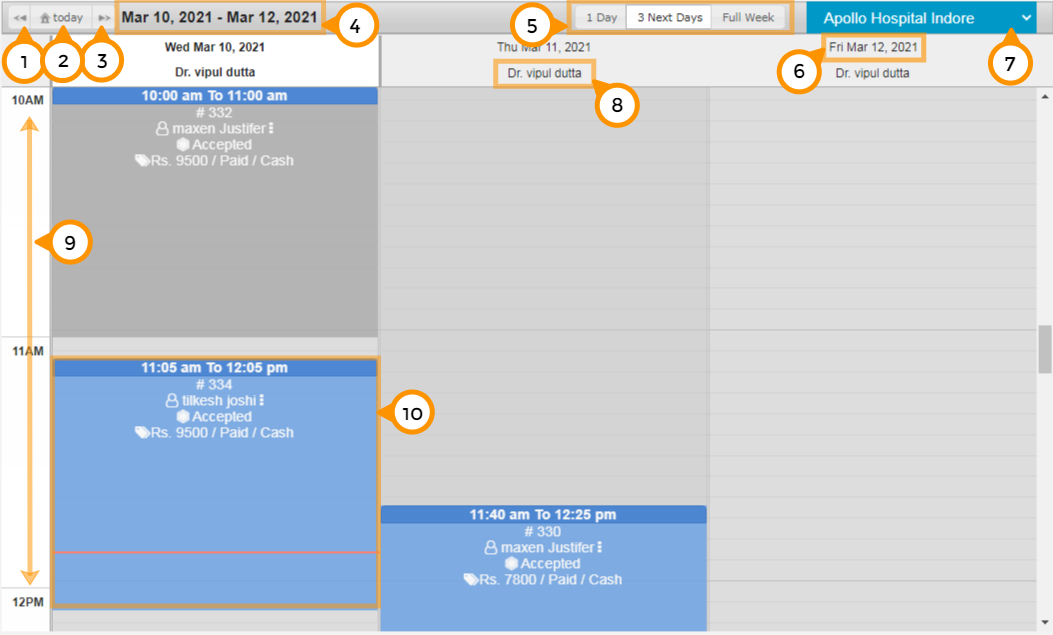
- Click on the ‘Previous’ button to go to previous dates on the calendar.
- Click on the ‘Today’ button to go back to the current date on calendar.
- Click on the ‘Next button to go to the upcoming dates on the calendar.
- View the range of dates showing on calendar.
- Select the range on the calendar. (Single Day / Three Days / Full Week)
- Date of the column.
- Select the location to see the bookings.
- View Provider name of the column.
- View the time frame of calendar.
- View booking summary details on the calendar. By clicking on a particular booking area in the calendar, you can also manage the booking directly.

a) View: Click on ‘view’ under the setting menu to view the complete details of the appointment. i.e. Booking, Payment, Customer, and service.
b) Accept: Click on ‘Accept’ under setting menu to accept the booking and prepared for delivery.
c) Reject: Click on ‘Reject’ under the setting menu to deny accepting the booking or in the case booking requests are not matched at the moment.
d) Mark as completed: Click on ‘Mark as completed’ under the setting menu to update the booking status as completed.
* Note: In case of COD payment mode by default we treat payment received as completion of booking.
e) Delete: Click on ‘Delete’ under the setting menu to remove the booking from the platform.
f) Cancel: Click on ‘Cancel’ under the setting menu to cancel the booking on business/provider side. User has a freedom to cancel the booking on user side as well, depending on cancellation settings.
Reports
View Reports of all Bookings and Payment status.
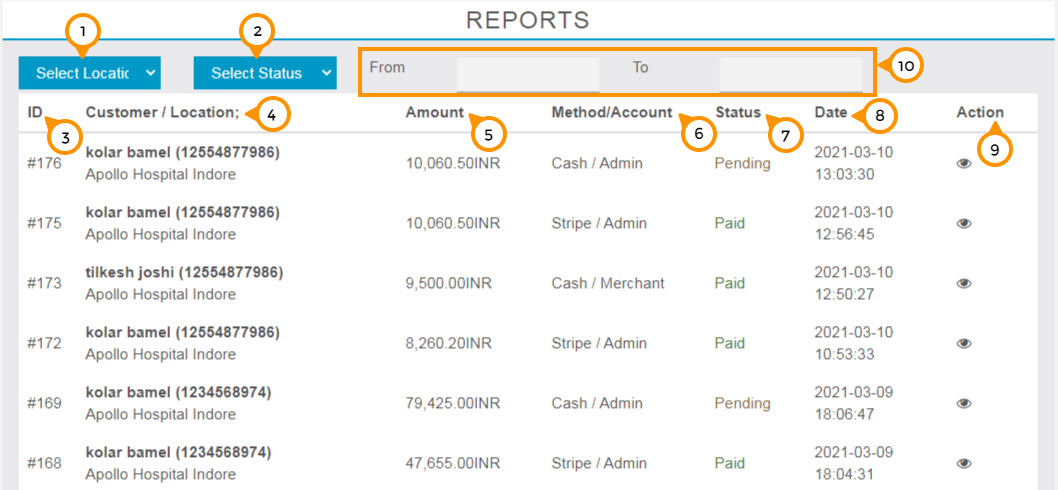
- Select the location of your business branch and get the details accordingly.
- Select the status from the drop-down menu and apply the filter according to the selected status.
- View Record ID.
- View details about the customer name and location of appointment.
- View total amount value of the service inclusive of applicable tax.
- View information about the mode of payment receive and details of the account who will get the amount either Admin or Merchant (location wise).
- View payment status that amount has paid or pending of the booking.
- View Date of booking.
- Click on the eye icon to view the complete details of the appointment.
Miscellaneous
Reminder
a) Reminder for Admin: If a new booking is not accepted within 30 minutes Admin will get an email reminder message on the registered email after 30 minutes of the new booking received.
b) Reminder for Client: The first client will get the confirmation email of his recent booking and will be notified as booking is accepted by Admin and get the reminder before the time slot. The client can set a reminder notification time in the app to be notified at the time selected before appointment booking.
– From App, Click on the Profile icon, then go to the Settings tab, then click on the Notification bar then select the Reminder Notification before time.
Arrangement
Reorder the sequence or arrange the display positions of categories and providers on the home screen of the app.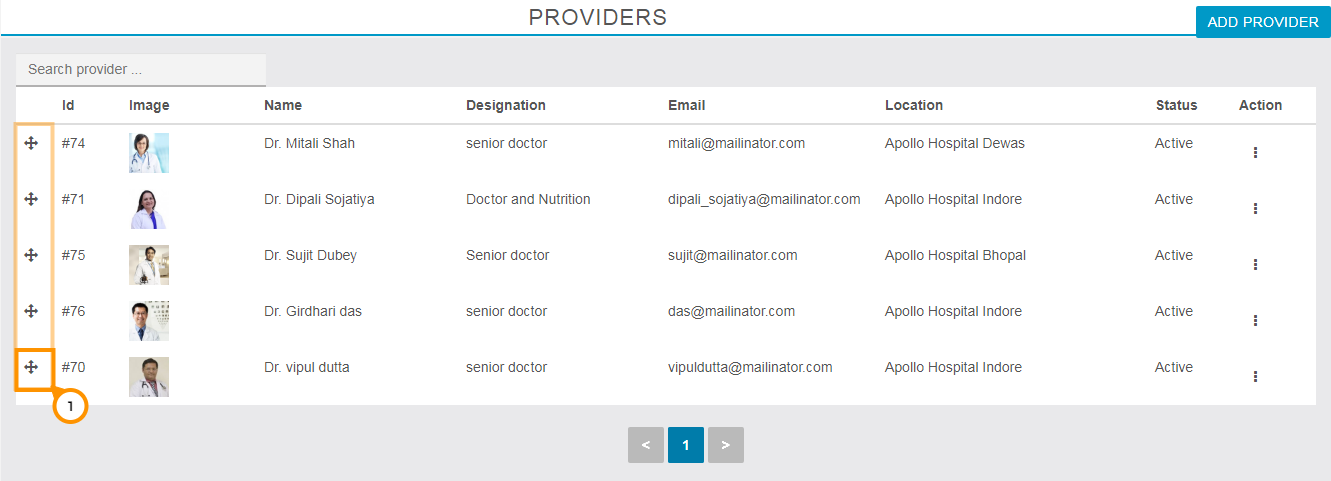
1) Hold and drag the icon to the left of the Provider ID to rearrange positions the order.
Appointment Pro Premium Features
Class Bookings:
Mobile Control feature – In-App Booking Management : This feature enables App owners, managers and service providers to manage bookings directly from the mobile app.
Class Manage & Add
Appointment Pro – Add Class
Use Classes tab to add new or manage existing classes
Add Classes
From here you can add the new Classes of your business.
- Enter your class name.
- Select your location for class delivery from the drop-down menu.
- Select the provider for class from the drop down menu.
- Enter the price of the complete class or complete course of the class.
- Enter the special price for the offer.
- Enter the start date of class offer period.
- Enter the end date of class offer period.
- Enter the available seats for class.
- Enter seats per user / # of seats to allow in a single booking request.
- Enter the class duration for each session.
- Enter the progressive loyalty points you to transfer on each successful service delivery.
- Enter select the category of your class.
- Enter the date on which you going start to deliver the class.
- Enter the date on which class will end.
- Enter the daily class time on a particular location.
- Upload the image of the class.
- Enter the details and course contents of the class.
- Check/Uncheck ‘Active’ to enable or disable the particular class in the app.
Manager/Provider Control Booking from Mobile App
In App Booking Management (Mobile Control) feature: App Managers and Service Providers can manage their bookings directly from application. To enable Mobile Control, complete the settings in the backend from admin account.
1) Very first you need to access Appointment Pro feature and need to click on Dashboard next the new tab will be open in your browser.
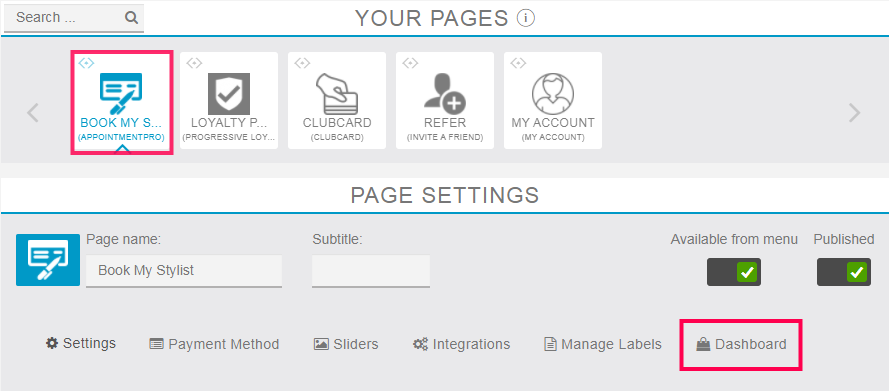
2) Then click on the Providers tab in the left-hand side menu bar next click on the manage sub-menu if you need to edit the existing provider else click on Add for new provider or manager.
Click on the Manage tab to see the list of providers included manager as well as provider as a job role. We need to click on three dots under the action column. Then click on the edit option in the menu.
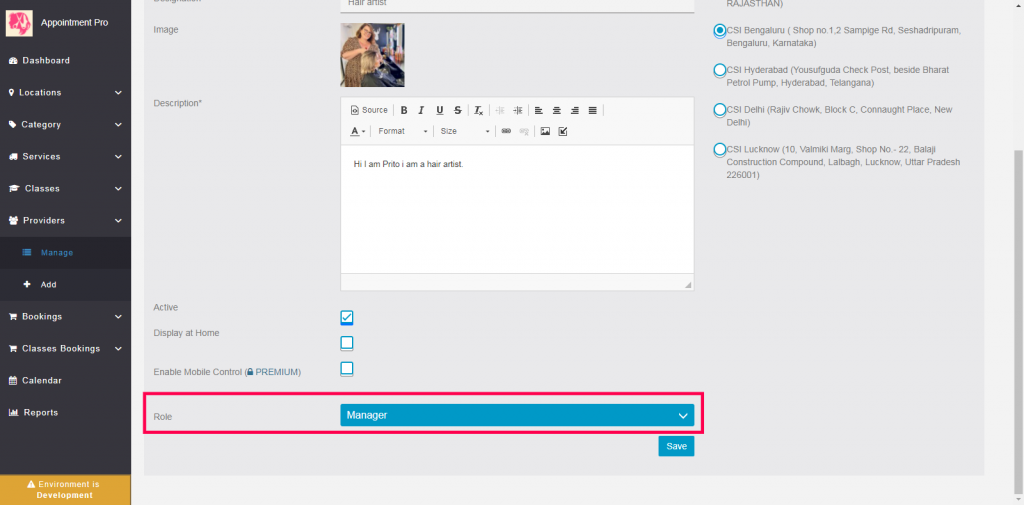
After clicking on edit option go to “Enable Mobile Control” option under provider info page. “Enable Mobile Control” by checking the box associated with the provider.

The small mobile icon indicates “Mobile Control” is ACTIVATED for the particular provider.

It is recommended to select the role of the Provider carefully because if you select the Manager as a role for a provider, that provider can manage all the bookings of the particular locations. If you select the Provider as a role of your Provider they can manage only relevant bookings of that particular provider only.
Provider’s mobile settings
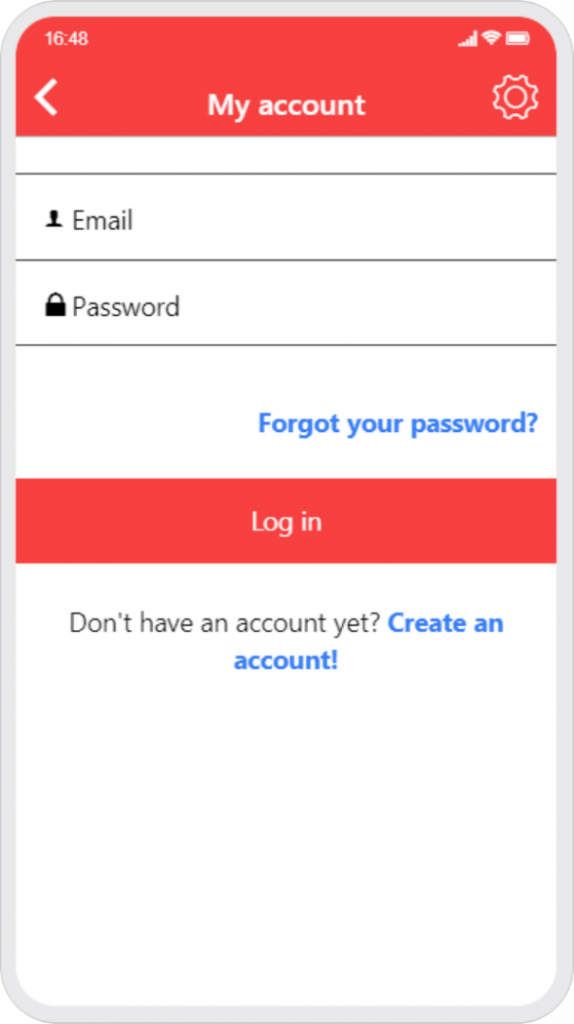
1) Provider must log in with registered email id. When Provider accesses app for the first time they need to register by clicking on create an account link with the same email id used to configure them in the Editor. If it’s showing as an email that is already registered, regenerate the password by clicking on forgot password link.
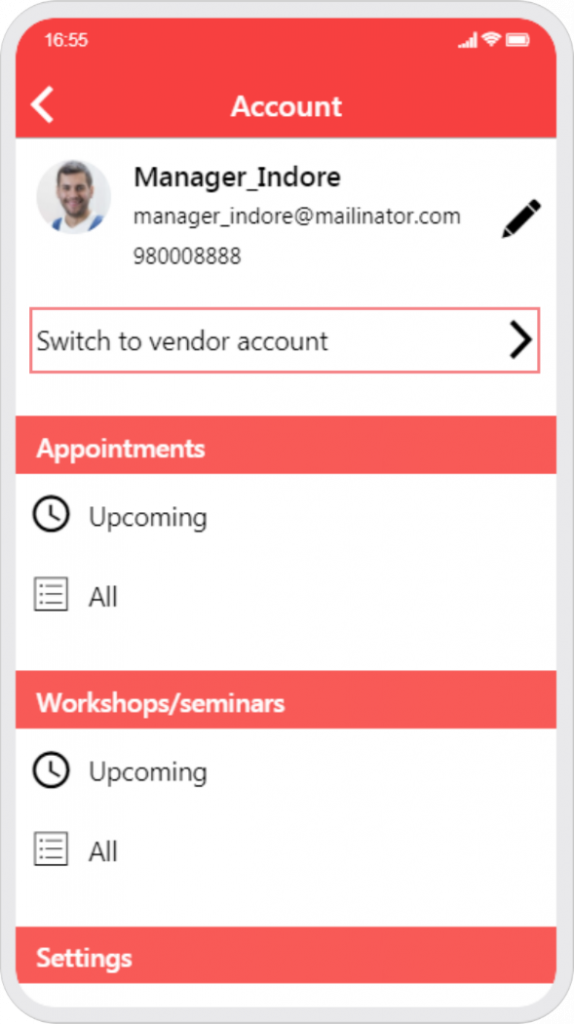
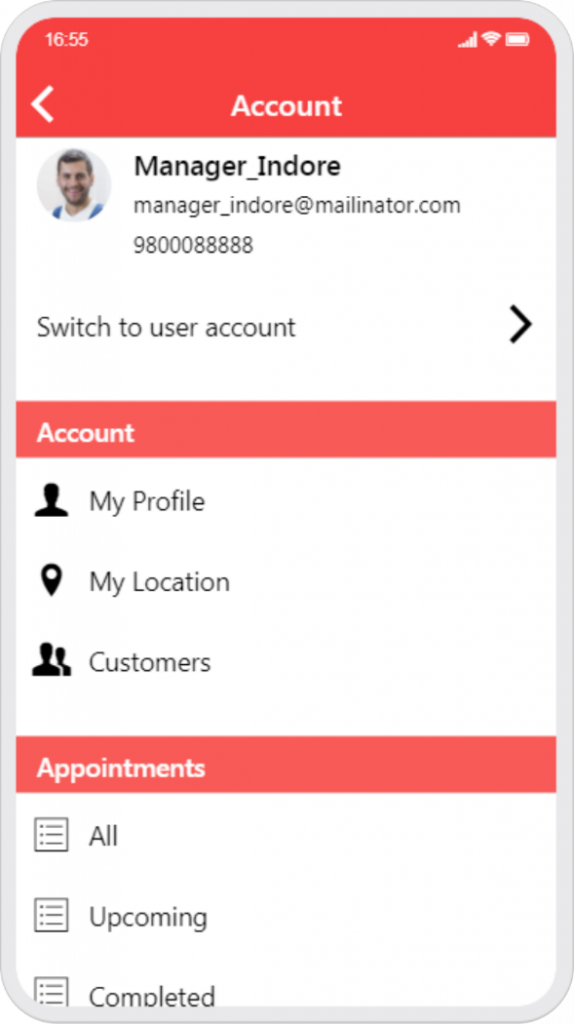
2) After login Provider must click ‘Switch to vendor account’ to view and manage bookings.
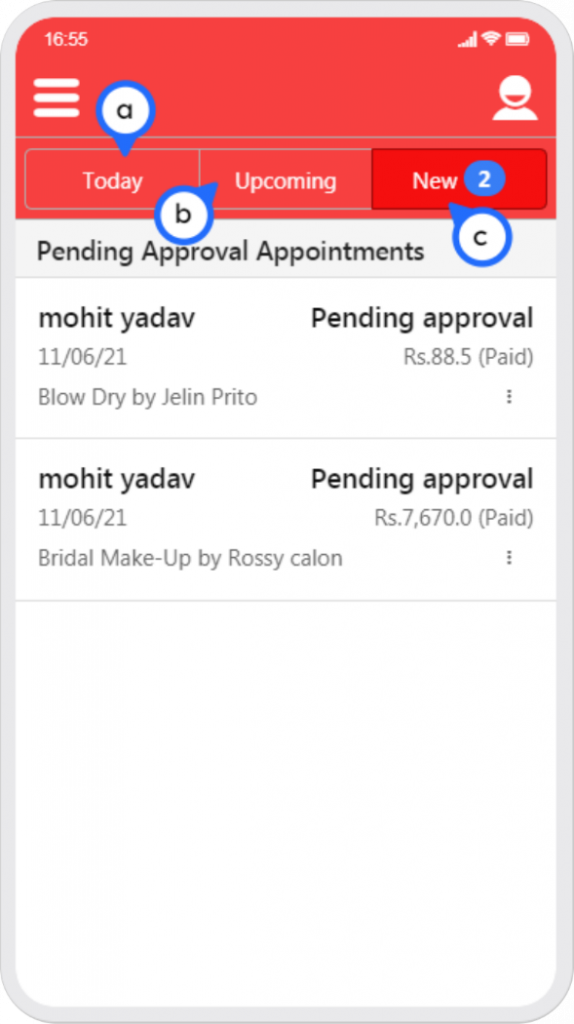
3) after switching to a vendor account three tabs are visible for different types of booking info.
a) Today: In this tab, you can see today’s booking info.
b) Upcoming: Under this tab, you can see all the upcoming booking info and make the plan accordingly.
c) New: Under this tab, you can see all the recent bookings that are pending approval or any other action. Like – Cancel, Delete, Accept, Reject or Mark as completed.
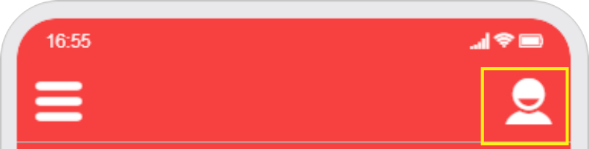
4) By clicking on account icon top right side of the screen you can again switch the account type or edit the information to see the appointments and classes bookings info.
Google Calendar Sync (New in Jan 2022)
Google Calendar Sync allows App Appointments to Sync with Google Calendar. App Service provider can also view all Appointments on the Google calendar as well. Using this capability provides additional functionality to avoid missing appointments and timely service delivery. Appointment Pro enables one-way sync from ‘Mobile App > Google Calendar’.
Follow the all steps below to set up Google Calendar Sync
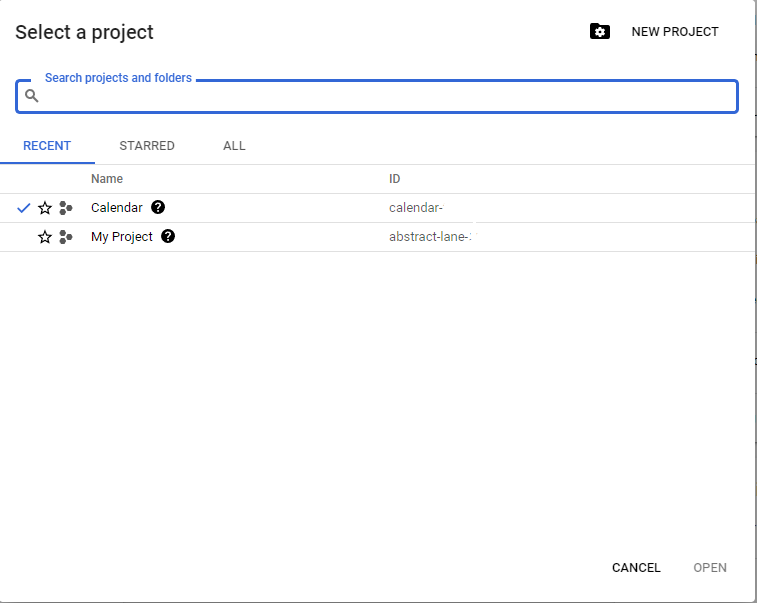
Step 1: Access your account google account via this link https://console.cloud.google.com
next a) select your project via clicking on the drop-down menu under the header section of the active page.

Select project from the pop-up window
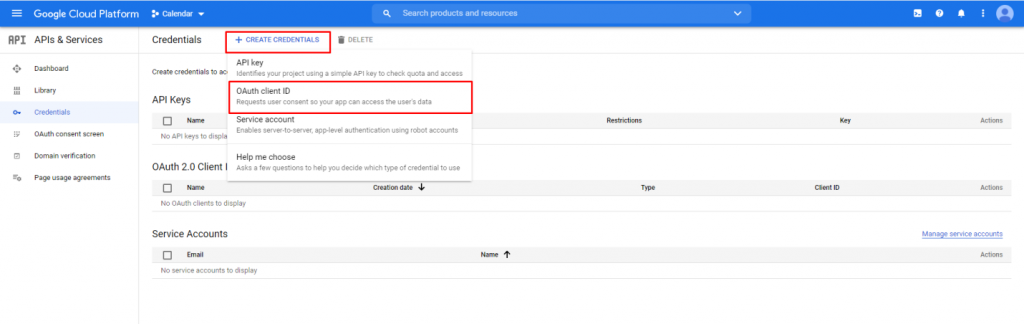
Step 2: Next click Menu >APIs & Services > Credentials

Step 3: Under the credentials screen, click the ‘Create Credentials’ tab then select the OAuth Client ID option in dropdown menu.
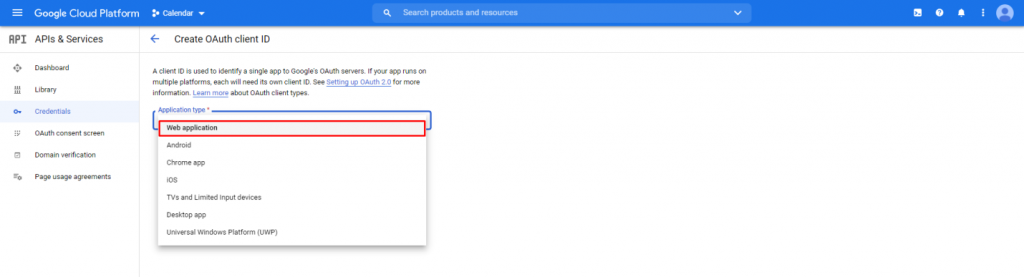
Step 4:
a) Under the ‘Create OAuth client ID’ screen, select the application type. Select the web application as an application type or you may select any of the other options based on configuration requirements.
b) After selecting the application type next click on the ‘+ADD URL’ button under ‘Authorized redirect URLs’
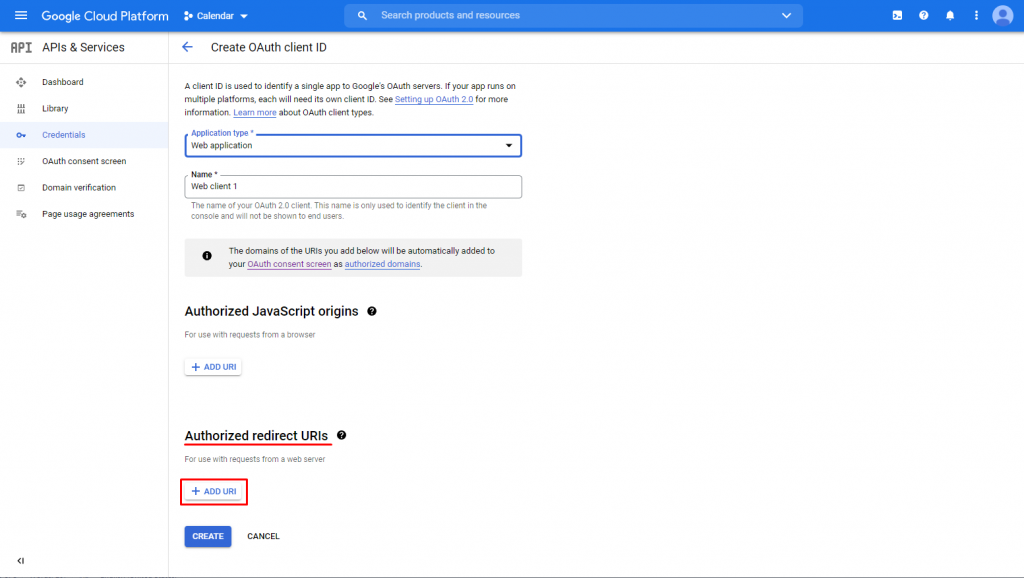
c) Go to Mobile App Editor ‘Feature‘ tab then select Appointment Pro feature.

Select the Settings tab
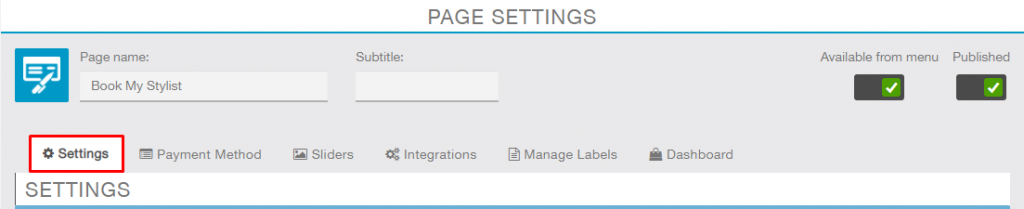
Scroll down to ‘Google calendar credentials section’. Copy the ‘Google App Redirect URL’ from here.

d) Go Back to the ‘Create OAuth client ID’ page and paste the copied URL under ‘Authorized redirect URLs’ then click ‘Create’ button.
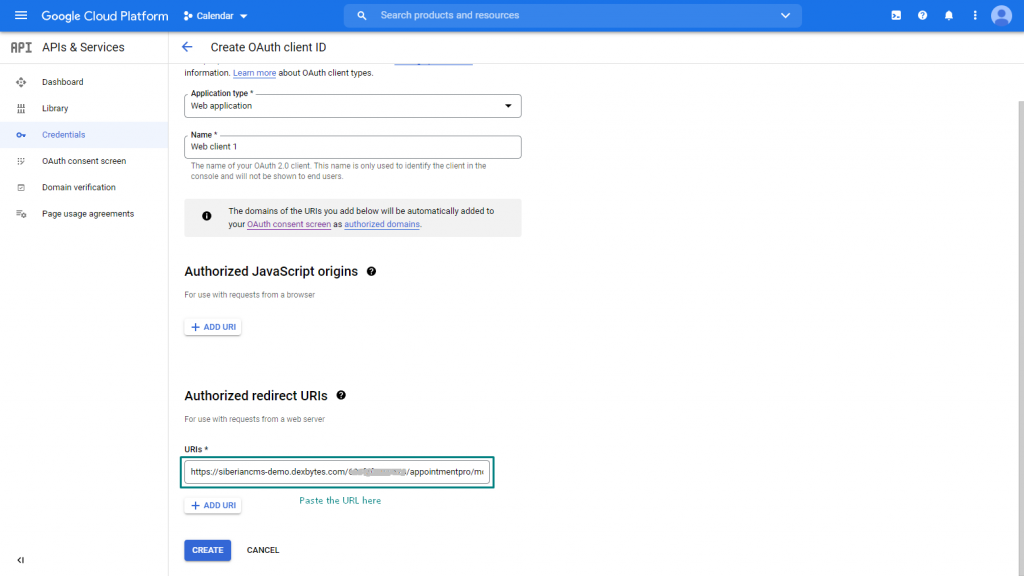
Pop-up window will open indicating ‘OAuth client created’. From here, copy both the IDs Client ID and Client Secret.

e) Once again, in the Mobile App Editor, go to the ‘Google Calendar credentials’ section under Appointment Pro feature. Paste copied client ID and Client Secret under the particular fields’ then check mark on the check box of enable google calendar then click on ‘submit’ button.
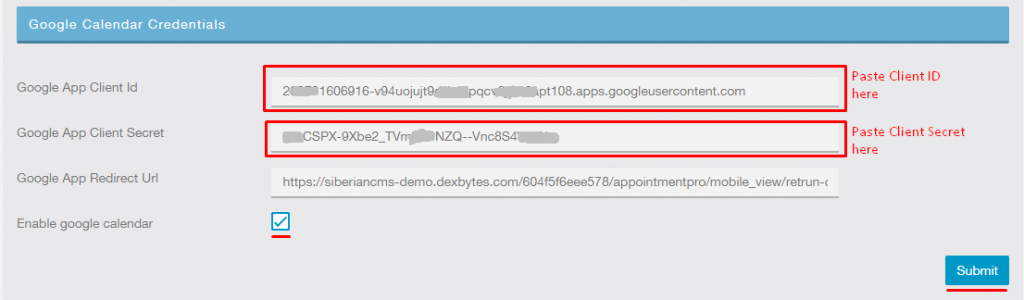
*To enable the Google Calendar, make sure all data is entered correctly and all fields are completed under ‘google calendar credentials’ with check marked ‘enable google calendar’.
Step 5:
a) Next click on menu icon top left side of the screen then go to APIs & Services then select the ‘Dashboard’ option in the sub-menu.
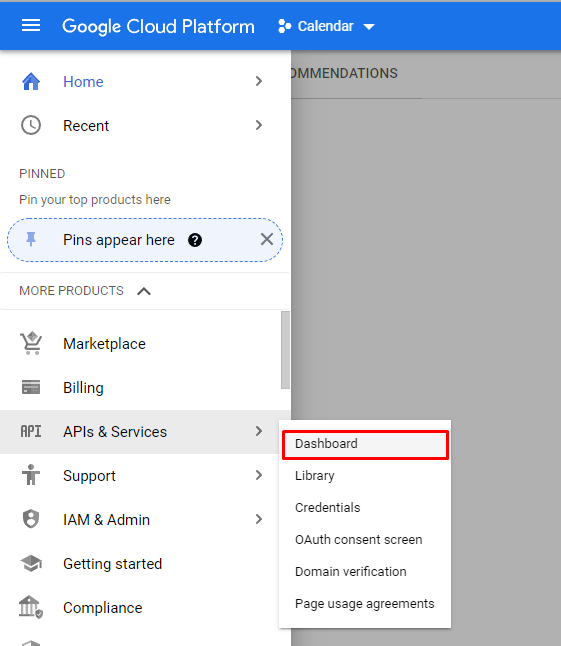
b) Next click “+ ENABLE APIS AND SERVICES” button under the header section on the top of the page.

c) As your reach the API Library page. You need to enter the text “Google Calendar API” under the search box and hit the ‘Enter’ key on your keyboard to search the API.

d) Click on the ‘Google Calendar API’ to showi the list of results.
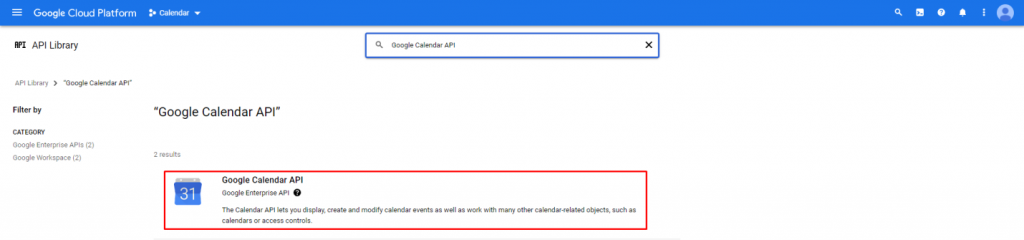
e) Then click on the ‘Enable’ Button to activate the API that it.

How to connect and check google calendar integration
*Google Calendar integration supports browser access to connect with the system.
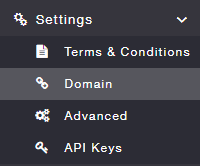
First access Siberian cms and click on the settings tab under the side menu section then select the ‘Domain’ option from the sub-menu of the settings tab.
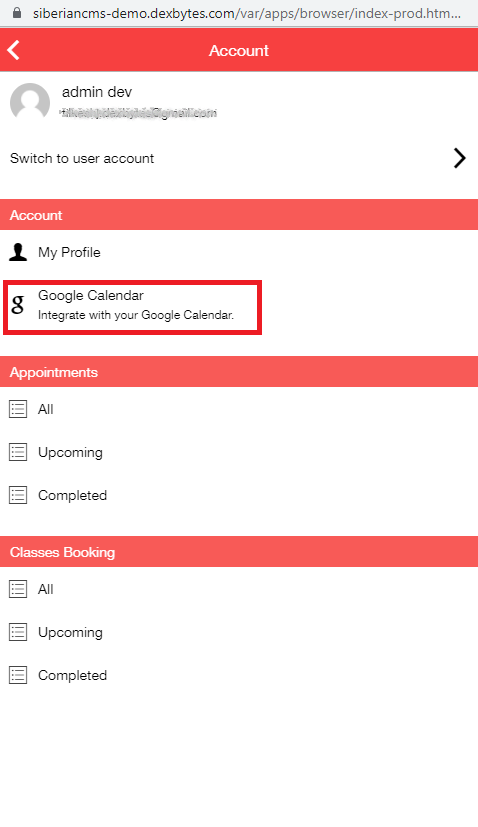
Click the WebApp link to access the app via browser.

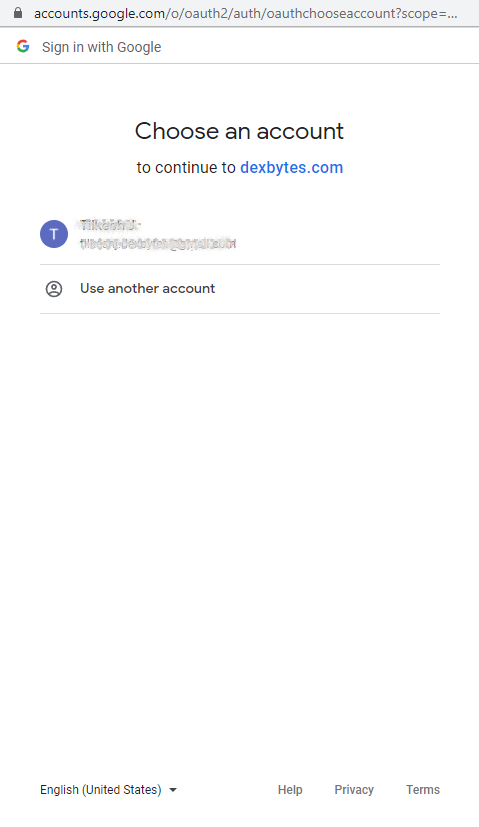
Click on the WebApp link to open a new browser tab to access the App via web browser. Click the Profile icon located on the top right side of the App Screen to access the account page. Next, click on the ‘Google Calendar’ menu under the account tab of the page.
After redirect to the Google login page, log in with the same account as the Service Provider in the app.
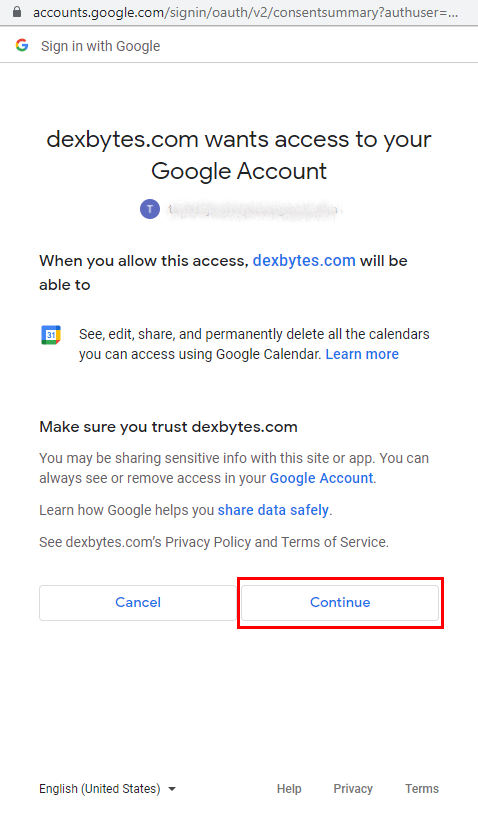
Click on the ‘Continue’ button to connect Gmail calendar with Mobile App.
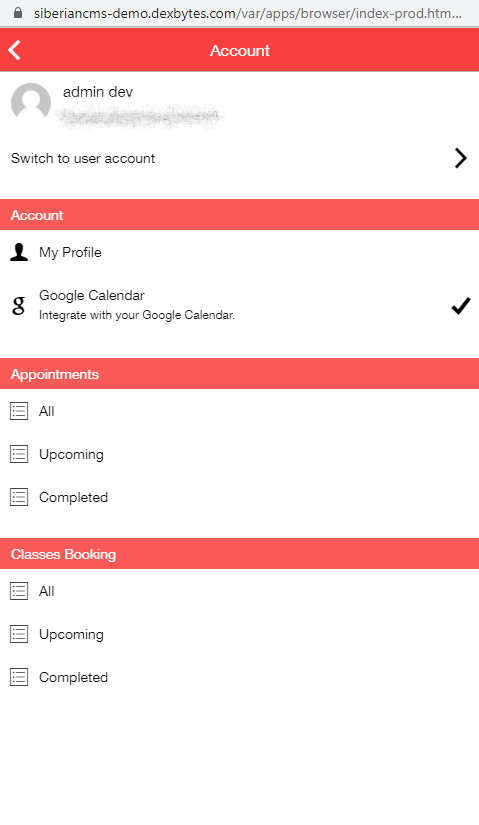
The check mark on the right side of the Google Calendar text it indicates successful integration.
Google Calendar Sync Checklist
- Service provider email ID must match ID used for Google Calendar Sync.
* Only email addresses associated with the Google account are supported. - Verify that credentials are generated and entered correctly in Mobile App Editor under the ‘Google Calendar Credentials’ section of the Appointment Pro ‘Settings’ tab.
- Verify that Google Calendar API is ‘Enabled’.
- Integrate Google Calendar using WebApp via web browser.
All appointments should be visible in Mobile App or in Service Provider’s Google Calendar.