How to Implement the Custom Page feature
Overview
Apptekz gives you a wide choice of features to display your products, services, and activities. The Custom Page feature is one of the most powerful features we offer. This feature enables many ways to design the look and feel of the page and also provides the option to use many types of content within this single feature.
Note: The Custom Page feature set is available as a stand-alone feature and also embedded in many of our other platform features to provide the same robust capabilities to fully customize mobile apps for many different use cases. Places and Gym features are two that use Custom Page functionality within the feature.
The Custom Page feature is essentially a blank slate from which you can enter virtually any content you like from text and images to embedded videos and hyperlinks. It can be used to display general information or used to add almost anything else into an app that doesn’t fit into another feature. If you need to customize a page, add instructions, recipes, training information, create custom contact and about pages, this is probably the feature to use.
Create an article with or without pictures, publish a photo gallery or video directly on the page. It’s also possible to add “one touch call” buttons or link to an external website and much more.
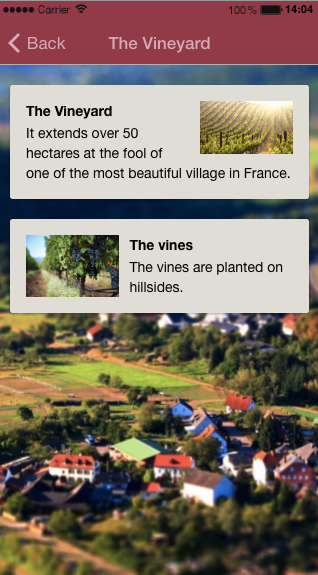
The Custom Page lets you create pages like these…
Let’s create a page such as these. First, create a new Custom Page:
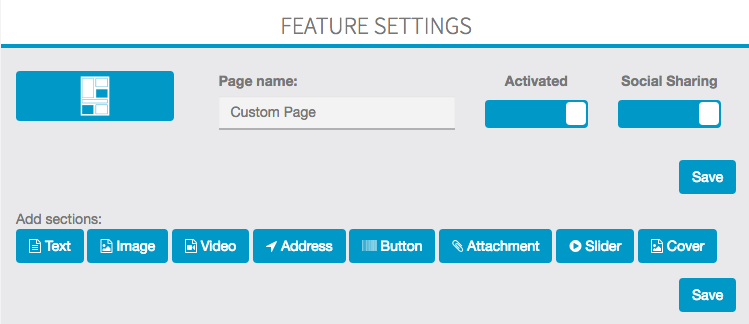
Name the new page (for this example, it will be “Our Activities”).
A custom page is made up of independent blocks. It’s possible to use as many blocks as needed in the same page (in the example page “Our Activities” there are three blocks: one about golf, one about tennis – which are both text sections – and one about the lake which is an image section).
Text Section Block

Here, we’re creating the first section, which is dealing with golf. To do this, click on “Text” . A new text document appears and you can enter text in the box. *After you finish, you may move section blocks around to get the page to look it’s best.
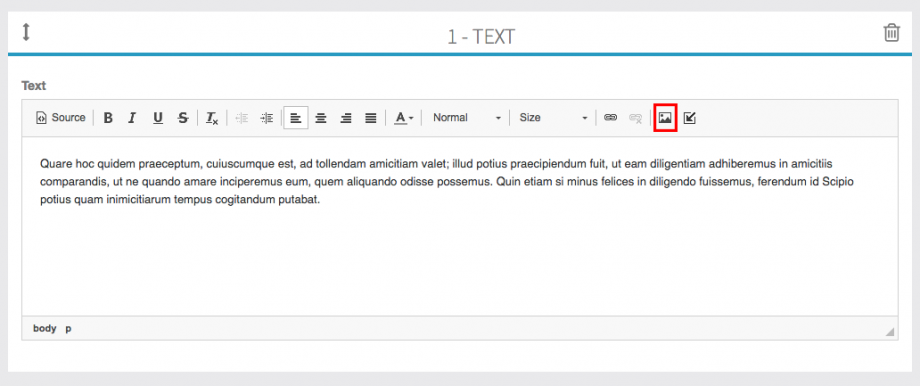

Then, insert the picture we want in this section. To do that, click on the icon which is circled in red. This icon appears and allows you to insert your picture.
When this one has been inserted, you can adjust alignment and size:
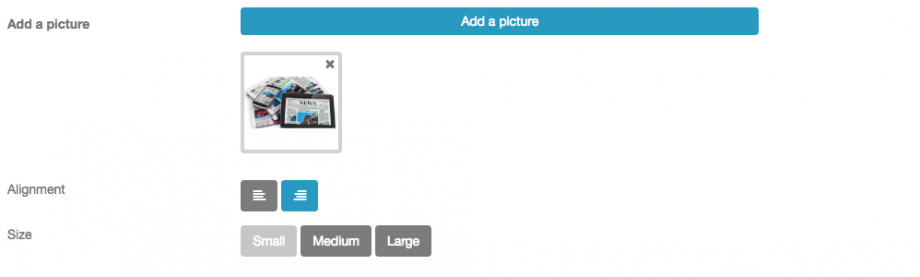
Thus you obtain this result:
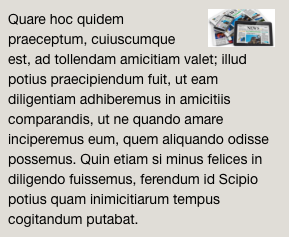
To create a section like “The vines”, click again on and follow the process we have seen. But you must act on the alignment which must be on the left and not on the right. You can create as many sections as you want (custom pages are made up of independent blocks).
More:
You can also add in your text element a link to a website or an e-mail address.
This appears:
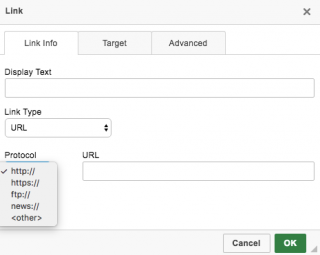
You have to choose the link type you want to integrate, “URL” if you want to integrate a website or “E-mail” if you want to integrate an e-mail address. Then write in the URL case the link.
ex:
Website:

Source Code, HTML Tags :
Using the Source Code Option, embed codes for many video platforms can be used and arranged in whatever order is needed. Use one section for each video or embed for the easiest implementation.
You can also insert HTML TAGS by selecting the “source code” with the “source button”. HTML button code can be added to create custom buttons that link to internal or external pages
The HTML tags allowed are a , img and iframe. Every other html tags will be automatically removed.
Picture Section Block

Creating a photo gallery is as simple as creating a text section. To do that, click on and then on “Add pictures”.
You obtain this:

Add a description for each picture if you choose. Again, you can add as many sections as you like, you just have to click on on the section icon and it will be added to the page. Sections can also be easily arranged or re-arranged by dragging into the desired position on the page.
Video Section Block

The creation of a video section is also as easy as the other sections. To do create a Video Section Block, click on the icon to add to the bottom of the page. Then just fill in the desired information as shown below.
Choose the kind of video type that will be integrated into your custom page: YouTube videos, Podcast videos or your own videos.
YouTube:

Click on . This appears:

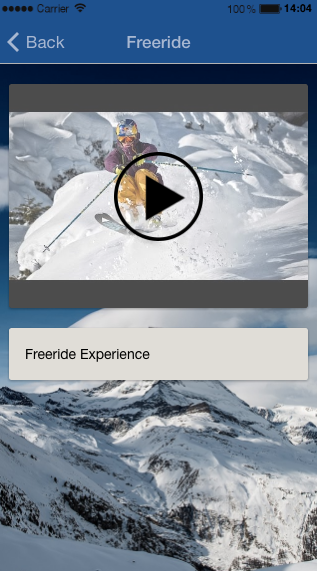
Enter your research or your YouTube URL in the field. In the example we entered “Freeride in Sweden” and then click on OK. This appears:
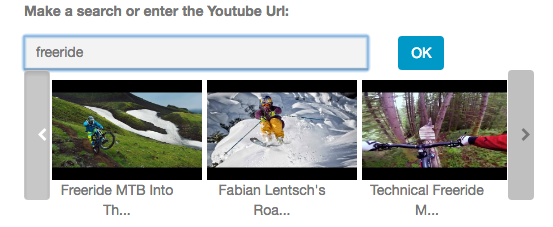
Select the video you want to integrate and then click on “Save” to save your video.
Podcast:

Click on . This appears:
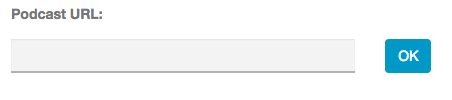
Enter your video podcast address ( .xml format) in the appropriate field. Then click on

Select the video to integrate to the custom page. Then click on “Save”.
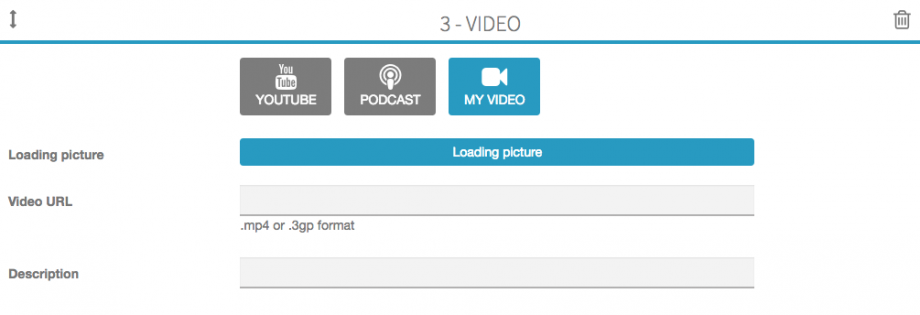
My video:

Click on . This appears:
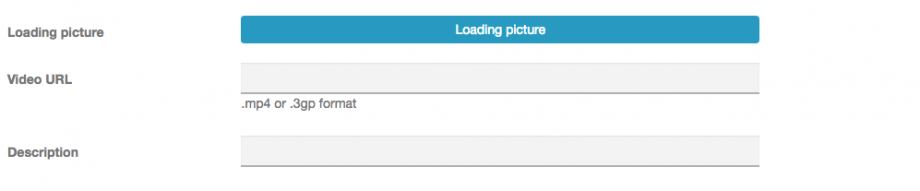
Thus, to include a video, you have to write the URL address of your video in “Video URL”.
Note: Google Drive links are not supported.
Once you have written the URL address of your video, you can write a short description and add a loading picture.
To add a loading picture, click on button as shown below.

Address Section Block
In this section you can add a button to locate any place from the user device. Using this Address Section Block, it’s easy to create a custom Contact or About page, list businesses pages in a directory, and much more.
Buttons Section Block
In this section you can add a button to make a call, or a button to open a website.
Attachment Section Block
In this section you can add files to this page (e.g: PDF files, etc…)
Slider Section Block
In this section you can create a slider by adding several pictures.
Cover Section Block
In this section you can add cover photo to this page. This is often used to place a cover photo at the top of the Custom Page.